Cisco XDR is a leader in providing comprehensive threat detection and response across the entire attack surface. We’ll be showcasing new capabilities that will give security teams even more insight, a… Read more on Cisco Blogs
Security Operations is the beating heart of any organization, a united team vigilantly standing guard against cyber threats. To outsmart their adversaries, they must delve deep into the intricate… Read more on Cisco Blogs
Join the guided tour outside the Security Operations Center, where we’ll discuss real time network traffic of the RSA Conference, as seen in the NetWitness platform. Engineers will be using Cisco S… Read more on Cisco Blogs
![]()
Core Infrastructure and Threat Hunting. 2
Cisco Secure Access Enables ZTNA for SOC… Read more on Cisco Blogs
![]()
On Sunday, February 11, over 160 million viewers from around the globe watched Super Bowl LVIII, making it one of the most viewed annual sporting events. It is also a good bet that a record number of… Read more on Cisco Blogs
Since the European Union (EU) signed the second version of the Network and Information Security (NIS2) Directive in December 2022, there has been a real frenzy all around Europe about it. NIS2 is now… Read more on Cisco Blogs
NIS2 compliance for industrial networks: Are you ready?
Cisco is honored to be this year’s winner of the Best Next Generation Firewall Award in the SE Labs 2023 Annual Report. This industry recognition validates Cisco’s continuous push towards harmonizing network, workload, and application security across hybrid and multicloud environments. I’m incredibly proud of the Cisco Secure Firewall team and am thankful for our amazing customers who continue to trust Cisco and develop their network security around our capabilities.
SE Labs, a cybersecurity testing and evaluation firm, provides impartial and independent assessments of various cybersecurity products and solutions. In their 2023 Annual Report, SE Labs states:
“Our Annual Security Awards recognizes security vendors that notonly do well in our tests, but perform well in the real world withreal customers. These awards are the only in the industry thatrecognize strong lab work combined with practical success.”
SE Labs performs tests on behalf of customers seeking independent proof-of-value assistance, as well as security vendors. At Cisco, we use third-party evaluations from multiple sources, including SE Labs, to augment our internal testing and to drive product improvement.
Winners were determined after months of in-depth testing, based on a combination of continual public testing, private assessments and feedback from corporate clients who use SE Labs to help choose security products and services. The award further validates that our customers can expect superior threat protection and performance with Cisco Secure Firewall.
SE Labs’ reports use the MITRE ATT&CK framework, employing both common “commodity” malware samples and sophisticated, targeted attacks. Their network security testing uses full attack chains to assess the detection and protection abilities of network devices and combinations of network and endpoint solutions. SE Labs publishes its testing methodologies and is BS EN ISO 9001: 2015 certified for The Provision of IT Security Product Testing.
As a worldwide leader in networking and security, Cisco is better positioned than any other security vendor to incorporate effective firewall controls into our customers’ infrastructure — anywhere data and applications reside. We offer a comprehensive threat defense with industry-leading Snort 3 IPS to protect users, applications, and data from continuously evolving threats. Our solutions also leverage machine learning and advanced threat intelligence from Cisco Talos, one of the world’s largest commercial threat intelligence teams.
In the constantly evolving world of cybersecurity, it is important to have access to the latest and most advanced technologies to stay ahead of threats. Whether you are an enterprise, government, healthcare, or a service provider organization, Cisco Secure Firewall provides top-ranked security.
When you invest in Cisco Secure Firewall, you are investing in award-winning threat defense with capabilities that are built for the real world. Learn more about SE Labs 2023 Annual Report, Cisco Secure Firewall and how you can refresh your firewall.
We’d love to hear what you think. Ask a Question, Comment Below, and Stay Connected with Cisco Secure on social!
Cisco Secure Social Channels
Cybersecurity attacks complication and damaging impact are always keeping SOC analyst at their edge. Extended Detection and Response (XDR) solutions tend to simplify for Sam, a SOC analyst, his job by simplifying the workflow and process that involve the lifecycle of a threat investigation from detection to response. In this post we will explore how SecureX, Secure Cloud Analytics (NDR), Secure Endpoint (EDR) with their seamless integration accelerate the ability to achieve XDR outcomes.
One of the first challenges for Sam is alert fatigue. With the overwhelming number of alerts coming from multiple sources and the lack of relevance or correlation, decreases the value of these alerts to the point that they become as meaningless as having none. To counter this effect, Cisco Secure Cloud Analytics and Cisco Secure Endpoint limit alert promotion to SecureX to only include high fidelity alerts with critical severity and marking them as High Impact incidents within SecureX Incident manager.
This capability reduces the noise coming from the source, while keeping the other alerts available for investigation, putting impactful incidents at the top of Sam’s to do list. Now, Sam is confident that his time is spent in a prioritized manner and helps ensure he is tackling the most important threats first. Automatic incident provisioning accelerates incident response by bringing focus on the most impactful incidents.
Understanding the mechanics and data around a specific incident is a key factor for Remi, an incident responder, in his day-to-day work. Achieving his tasks accurately is tightly coupled with his ability to scope and understand the impact of an incident and to gather all possible data from the environment which can be associated with an incident including devices, users, files hashes, email ids, domains IPs and others. SecureX Incident Manager’s automatic enrichment capability completes this data collection for high impact incidents automatically. The data is then classified into targets, observables, and indicators and added to the incident to help the analyst better understand the incident’s scope and potential impact.
The Incident Manager and automatic enrichment provides Remi with crucial information such as the associated MITRE Tactics and Techniques applied during this incident, the contributing threat vectors, and security solutions. In addition, the Incident Manager aggregates events from multiple sources into the same high impact incident that the enrichment was triggered on future providing Remi with more vital context.
This automatic enrichment for high impact incidents is essential to Remi’s understanding as much as possible about an incident as it occurs and significantly accelerates him identifying the proper response for the threat. This brings us to the next step in our incident detection to response workflow.
It is important for an XDR to correlate the right information for the Security Analyst and incident responder to understand an attack but it is equally important to provide an effective response mechanism. This is exactly what SecureX provides with the ability to apply a response to an observable with a simple a single click or through automation.
![]()
![]()
These workflows can be invoked to block a domain, IP or URL across a full environment with a simple click, leveraging existing integrations such as firewalls or umbrella and others. Workflows can be made available to the threat response pivot menu where they are useful for performing specific host specific actions, such as isolate a host, take a host snapshot, and more.
In addition to response workflows, the pivot menu provides the ability to leverage Secure Cloud Analytics (SCA) telemetry by generating a case book linking back to telemetry searches within SCA. This automation is critical to understanding the spread of a threat across an environment. A good example on this, is identifying all hosts communicating to a command-and-control destination before this destination was identified as malicious. This is a pre-existing SecureX workflow which can be taken advantage of today see workflow 0005 – SCA – Generate Case book with Flow Links.
![]()
![]()
Reducing time to remediation is a key aspect of keeping a business secure, SecureX orchestration automates responses with various solutions specially with NDR detections from SCA and use observables from these alerts to isolate hosts leveraging Secure Endpoint. SCA can send alerts via Webhooks and SecureX Orchestration receive them as triggers to launch an NDR- EDR workflow to isolate hosts automatically. (0014-SCA-Isolate endpoints from alerts)
![]()
This orchestration workflow automatically isolates rogue devices in a network or contain confirmed threat alerts received from Cisco’s Machine learning threat detection cloud and can be used for multiple different response scenarios.
The power of automation brought by SecureX, Secure Cloud Analytics and Secure Endpoint accelerates XDR outcomes drastically which simplifies Security Analyst (Sam) and Incident Responder (Remi) jobs and make it more efficient with accurate incident prioritization, automatic investigation/enrichment and most importantly automating responses.
We’d love to hear what you think. Ask a Question, Comment Below, and Stay Connected with Cisco Secure on social!
Cisco Secure Social Channels
Our core mission in the NOC is network resilience. We also provide integrated security, visibility and automation, a SOC inside the NOC.
In part one, we covered:
In part two, we are going deep with security:
As the needs of Black Hat evolved, so did the Cisco Secure Technologies in the NOC:
The SecureX dashboard made it easy to see the status of each of the connected Cisco Secure technologies.
![]()
Since joining the Black Hat NOC in 2016, my goal remains integration and automation. As a NOC team comprised of many technologies and companies, we are pleased that this Black Hat NOC was the most integrated to date, to provide an overall SOC cybersecurity architecture solution.
![]()
We have ideas for even more integrations for Black Hat Asia and Black Hat USA 2023. Thank you, Piotr Jarzynka, for designing the integration diagram.
Below are the SecureX threat response integrations for Black Hat Europe, empowering analysts to investigate Indicators of Compromise very quickly, with one search.
![]()
The original Black Hat NOC integration for Cisco was NetWitness sending suspicious files to Threat Grid (know Secure Malware Analytics). We expanded that in 2022 with Palo Alto Networks Cortex XSOAR and used it in London, for investigation of malicious payload attack.
NetWitness observed a targeted attack against the Black Hat network. The attack was intended to compromise the network.
![]()
NetWitness extracted the payload and sent it to Secure Malware Analytics for detonation.
![]()
Reviewing the analysis report, we were able to quickly determine it was the MyDoom worm, which would have been very damaging.
![]()
The attack was blocked at the perimeter and the analysts were able to track and enrich the incident in XSOAR.
My first time at Black Hat turned out to be an incredible journey!
![]()
Thanks to the cybersecurity partnership between Paris 2024 and Cisco, I was able to integrate into the Cisco Crew, to operate the NOC/SOC as a Threat Hunter on the most dangerous network in the world for this European Edition of Black Hat.
My first day, I helped with deploying the network by installing the wireless Meraki APs on the venue, understanding how they were configured and how they could help analysts to identify and locate any client connected to the network that could have a bad behavior during the event, the idea being to protect the attendees if an attack was to spray on the network.
![]()
Following this “physical” deployment, I’ve been able to access the whole Cisco Secure environment including Meraki, Secure Malware Analytics, Umbrella, SecureX and the other Black Hat NOC partners software tools.
SecureX was definitely the product on which I wanted to step up. By having so fantastic professionals around me, we were able to dig in the product, identifying potential use cases to deploy in the orchestration module and expected integrations for Paris 2024.
![]()
Time was flying and so were the attendees to the conference, a network without user is fun but can be quite boring as nothing happens, having so many cybersecurity professional at the same place testing different security malwares, attacks and so on led us to very interesting investigations. A paradox at the Black Hat, we do not want to block malicious content as it could be part of exercises or training classes, quite a different mindset as what we, security defenders, are used to! Using the different components, we were able to find some observables/IOCs that we investigate through SecureX, SecureX being connected to all the other components helped us to enrich the observables (IPs, urls, domains…), understanding the criticality of what we identified (such as malware payloads) and even led us to poke the folks in the training classes to let them know that something really wrong was happening on their devices.
![]()
Being part of the Black Hat NOC was an incredible experience, I was able to meet fantastic professionals, fully committed on making the event a success for all attendees and exhibitors. It also helped me to better understand how products, that we use or will use within Paris 2024, could be leveraged to our needs and which indicators could be added to our various Dashboards, helping us to identify, instantaneously, that something is happening.
During the last day of Black Hat Europe, our NOC partner, NetWitness saw some files being downloaded on the network. The integration again automatically carved out the file and submitted the Cisco Secure Malware Analytics (SMA) platform. One of those files came back as a trojan, after SMA detonated the file in a sandbox environment. The specific hash is the below SHA-256:
938635a0ceed453dc8ff60eab20c5d168a882bdd41792e5c5056cc960ebef575
The screenshot below shows some of the behaviors that influenced the decision:
![]()
The result of seeing these behaviors caused SMA to give it the highest judgement score available to a detonated file:
![]()
After this judgement was made, we connected with the Palo Alto Networks team, and they found the IP address associated with the file download.
![]()
Once we had this information, we went to the Meraki dashboard and did a search for the IP address. The search returned only one client that has been associated with the address for the entire Black Hat conference.
![]()
Knowing that there has only been one client associated with the address made finding the attendee easier. We then needed to know where they were and Meraki had this figured out. After opening the client’s profile, we saw what SSID and access point (AP) they were connected to using the Meraki location map.
![]()
We then found the attendee and let them know to have their IT inspect their laptop to make sure it is clean.
Apart from the technical challenges of running a temporary network for N thousand people, the Black Hat event reminded us that success doesn’t happen without teamwork; that leadership isn’t just about keeping the project on track. It is also about looking after the team and that small details in planning, build up and tear down can be just as important, as having all the right tools and fantastically skilled Individuals using them during the event itself.
In the Cisco Secure technology stack, within the Black Hat NOC, we use SecureX Single Sign-on. This reduces the confusion of managing multiple accounts and passwords. It also streamlines the integrations between the Cisco products and our fellow NOC partners. We have an open ecosystem approach to integrations and access in the NOC, so we will provision Cisco Secure accounts for any staff member of the NOC. Logging into each individual console and creating an account is time consuming and can often lead to confusion on which tools to provision and which permission levels are needed.
To automate this process, I developed two workflows: one to create non-admin users for NOC partners and one to create administrator accounts in all the tools for Cisco staff. The workflows create accounts in SecureX, Secure Malware Analytics (Threat Grid), Umbrella DNS and Meraki dashboard, all using SecureX Single Sign-On.
Here is what the workflow looks like for creating non-admin users.
![]()
The workflow requires three inputs: first name, last name, and email. Click Run.
![]()
The sequence of API calls is as follows:
![]()
Once the workflow has completed successfully, the user will receive four emails to create a SecureX Sign-On account and accept the invitations to the various products. These workflows really improved our responsiveness to account provisioning requests and makes it much easier to collaborate with other NOC partners.
Over the previous Black Hat events, we have been utilizing Meraki scanning data to get location data for individual clients, as they roamed conference. In the initial blog post (Black Hat Asia 2022), we created a Docker container to accept the data from the Meraki Scanning API and save it for future analysis. At Black Hat USA 2022, we wrote about how to use Python Folium to use the flat text files to generate chronological heatmaps that illustrated the density of clients throughout the conference.
This time around, we’ve stepped it up again by integrating Umbrella DNS Security events and adding the ability to track clients across the heatmap using their local IP address.
![]()
To improve the portability of our data and the efficiency of our code, we began by moving from flat JSON files to a proper database. We chose SQLite this time around, though going forward we will likely use Mongo.
Both can be queried directly into Python Pandas dataframes which is what will give us the optimal performance we are looking for. We have a dedicated Docker container (Meraki-Receiver) that will validate the incoming data stream from the Meraki dashboard and insert the values into the database.
![]()
The database is stored on a Docker volume that can be mounted by our second container, the Meraki-Mapper. Though this container’s primary purpose is building the heatmaps, it also performs the task of retrieving and correlating Umbrella DNS security events. That is, any DNS query from the Black Hat network that matches one of several predefined security categories. Umbrella’s APIs were recently improved to add OAuth and simplify the URI scheme for each endpoint. After retrieving a token, we can get all security events in the time frame of the current heatmap with one call.
![]()
What we want to do with these events is to create Folium Markers. These are static “pins” that will sit on the map to indicate where the DNS query originated from. Clicking on a marker will popup more information about the query and the client who sent it.
Thanks to the Umbrella Virtual Appliances in the Black Hat network, we have the internal IP address of the client who sent the DNS query. We also have the internal IP address in the Meraki scanning data, along with the latitude and longitude. After converting the database query into a Pandas dataframe, our logic takes the IP address from the DNS query and finds all instances in the database of location data for that IP within a 5-minute window (the resolution of our heatmap).
![]()
What we end up with is a list of dictionaries representing the markers we want to add to the map. Using Bootstrap, we can format the popup for each event to make it look a bit more polished. Folium’s Popup plugin allows for an iFrame for each marker popup.
![]()
The result is a moving heatmap covering an entire day on a given conference floor, complete with markers indicating security events (the red pushpin icon).
![]()
Clicking on the pushpin shows the details of the query, allowing us in the NOC to see the exact location of the client when they sent it.
![]()
To further improve this service during the next conference, we plan to implement a web page where NOC staff can submit an IP address and immediately get map tracking that client through the conference floor. This should give us an even more efficient way to find and notify folks who are either behaving maliciously or appear to be infected.
For years we have been tracking the DNS stats at the Blackhat conferences. The post-pandemic 2022 numbers look like we never skipped a beat after the dip in DNS queries from 2021, seen in the bar graph below. This year’s attendance saw well over 11 million total DNS queries.
![]()
The Activity volume view from Umbrella gives a top-level level glance of activity by category, which we can drill into for deeper threat hunting. On trend with the previous Black Hat Europe events, the top Security categories were Dynamic DNS and Newly Seen Domains. However, it’s worth noting a proportionally larger increase in the cryptomining and phishing categories from 9 to 17 and 28 to 73, respectively, compared to last year.
![]()
These years, Black Hat saw over 4,100 apps connect to the network, which is nearly double of what was seen last year. However, still not topping over 6,100 apps seen at Black Hat USA early this year.
![]()
Should the need arise, we can block any application, such as Mail.ru above.
![]()
Black Hat Europe 2022 was the best planned and executed NOC in my experience, with the most integrations and visibility. This allowed us the time to deal with problems, which will always arise.
We are very proud of the collaboration of the team and the NOC partners.
Black Hat Asia will be in May 2023, at the Marina Bay Sands, Singapore…hope to see you there!
Thank you to the Cisco NOC team:
Also, to our NOC partners NetWitness (especially David Glover, Iain Davidson, Alessandro Contini and Alessandro Zatti), Palo Alto Networks (especially James Holland, Matt Ford, Matt Smith and Mathew Chase), Gigamon, IronNet, and the entire Black Hat / Informa Tech staff (especially Grifter ‘Neil Wyler’, Bart Stump, Steve Fink, James Pope, Jess Stafford and Steve Oldenbourg).
![]()
For 25 years, Black Hat has provided attendees with the very latest in information security research, development, and trends. These high-profile global events and trainings are driven by the needs of the security community, striving to bring together the best minds in the industry. Black Hat inspires professionals at all career levels, encouraging growth and collaboration among academia, world-class researchers, and leaders in the public and private sectors. Black Hat Briefings and Trainings are held annually in the United States, Europe and USA. More information is available at: blackhat.com. Black Hat is brought to you by Informa Tech.
We’d love to hear what you think. Ask a Question, Comment Below, and Stay Connected with Cisco Secure on social!
Cisco Secure Social Channels
In this blog about the design, deployment and automation of the Black Hat network, we have the following sections:
Cisco is honored to be a Premium Partner of the Black Hat NOC, and is the Official Network Platform, Mobile Device Management, Malware Analysis and DNS (Domain Name Service) Provider of Black Hat.
![]()
2022 was Cisco’s sixth year as a NOC partner for Black Hat Europe. However, it was our first time building the network for Black Hat Europe. We used experiences of Black Hat Asia 2022 and Black Hat USA 2022 to refine the planning for network topology design and equipment. Below are our fellow NOC partners providing hardware, to build and secure the network, for our joint customer: Black Hat.
![]()
We are grateful to share that Black Hat Europe 2022 was the smoothest experience we’ve had in the years at Black Hat. This is thanks to the 15 Cisco Meraki and Cisco Secure engineers on site (plus virtually supporting engineers) to build, operate and secure the network; and great NOC leadership and collaborative partners.
To plan, configure, deploy (in two days), maintain resilience, and recover (in four hours) an enterprise class network, took a lot of coordination. We appreciate the Black Hat NOC leadership, Informa and the NOC partners; meeting each week to discuss the best design, staffing, gear selection and deployment, to meet the unique needs of the conference. Check out the “Meraki Unboxed” podcast – Episode 94: Learnings from the Black Hat Europe 2022 Cybersecurity Event
We must allow real malware on the Black Hat network: for training, demonstrations, and briefing sessions; while protecting the attendees from attack within the network from their fellow attendees, and prevent bad actors from using the network to attack the Internet. It is a critical balance to ensure everyone has a safe experience, while still being able to learn from real world malware, vulnerabilities, and malicious websites.
![]()
In addition to the weekly meetings with Black Hat and the other partners, the Cisco Meraki engineering team of Sandro Fasser, Rossi Rosario Burgos, Otis Ioannou, Asmae Boutkhil, Jeffry Handal and I met every Friday for two months. We also discussed the challenges in a Webex space with other engineers who worked on past Black Hat events.
The mission:
Division of labor is essential to reduce mistakes and stay laser focused on security scope. Otis took the lead working on network topology design with Partners. Asmae handled the port assignments for the switches. Rossi ensured every AP and Switch was tracked, and the MAC addresses were provided to Palo Alto Networks for DCHP assignments. Otis and Rossi spent two days in the server room with the NOC partners, ensuring every switch was operating and configured correctly. Rossi also deployed and configured a remote Registration switch for Black Hat.
![]()
In the weeks before deployment, our virtual Meraki team member, Aleksandar Dimitrov Vladimirov, and I focused on planning and creating a virtual Wi-Fi site survey. Multiple requirements and restrictions had to be taken into consideration. The report was based on the ExCel centre floor plans, the space allocation requirements from Black Hat and the number of APs we had available to us. Although challenging to create, with some uncertainties and often changing requirements due to the number of stakeholders involved, the surveys AP placement for best coverage ended up being pivotal at the event.
Below is the Signal Strength plan for the Expo Hall Floor on the 5 GHz band. The original plan to go with a dual-Band deployment was adjusted onsite and the 2.4 GHz band was disabled to enhance performance and throughput. This was a decision made during the network setup, in coordination with the NOC Leadership and based on experience from past conferences.
![]()
Upon arrival at the ExCel Centre, we conducted a walkthrough of the space that most of us had only seen as a floor plan and on some photos. Thanks to good planning, we could start deploying the 100+ APs immediately, with only a small number of changes to optimize the deployment on-site. As the APs had been pre-staged and added to the Meraki dashboard, including their location on the floor maps, the main work was placing and cabling them physically. During operation, the floor plans in the Meraki Dashboard were a visual help to easily spot a problem and navigate the team on the ground to the right spot, if something had to be adjusted.
![]()
As the sponsors and attendees filled each space, in the Meraki dashboard, we were able to see in real-time the number of clients connected to each AP, currently and over the time of the conference. This enabled quick reaction if challenges were identified, or APs could be redeployed to other zones. Below is the ExCel Centre Capital Hall and London Suites, Level 0. We could switch between the four levels with a single click on the Floor Plans, and drill into any AP, as needed.
The Location heatmaps also provided essential visibility into conference traffic, both on the network and footfalls of attendees. Physical security is also an important aspect of cybersecurity; we need to know how devices move in space, know where valuable assets are located and monitor their safety.
![]()
Below is the Business Hall at lunchtime, on the opening day of the conference. You can see no live APs in the bottom right corner of the Location heatmap. This is an example of adapting the plan to reality onsite. In past Black Hat Europe conferences, the Lobby in that area was the main entrance. Construction in 2022 closed this entrance. So, those APs were reallocated to the Level 1 Lobby, where attendees would naturally flow from Registration.
![]()
The floor plans and heatmaps also helped with the Training, Briefings and Keynote network resilience. Capacity was easy to add temporarily, and we were able to remove it and relocate it after a space emptied.
During our time in the NOC, we had the chance to work with other vendor engineers and some use cases that came up led to interesting collaborations. One specific use case was that we wanted to block wireless clients, that show some malicious or bad behavior, automatically after they have been identified by one of the SOC analysts on the different security platforms, in addition we wanted to show them a friendly warning page that guides them to the SOC for a friendly conversation.
![]()
The solution was a script that can be triggered thru the interfaces of the other security products and attaches a group policy thru the Meraki Dashboard, including a quarantine VLAN and a splash page, via the Meraki APIs. This integration was just one of the many collaboration bits that we worked on.
During the first day of training, in the Meraki dashboard Air Marshal, I observed packet flood attacks, against we were able to adapt and remain resilient.
![]()
I also observed an AP spoofing and broadcast de-authentication attack. I was able to quickly identify the location of the attack, which was at the Lobby outside the Business Hall. Should the attacks continue, physical security had the information to intervene. We also had the ability to track the MAC address throughout the venue, as discussed in Christian Clasen’s section in part two.
![]()
![]()
![]()
From our experiences at Black Hat USA 2022, we had encrypted frames enabled, blunting the attack.
The Meraki dashboards made it very easy to monitor the health of the network APs and Switches, with the ability to aggregate data, and quickly pivot into any switch, AP or clients.
![]()
Through the phases of the conference, from two days of pre-conference setup, to focused and intense training the first two days, and transition to the briefings and Business Hall, we were able to visualize the network traffic.
![]()
In addition, we could see the number of attendees who passed through the covered area of the conference, with or without connecting to the network. Christian Clasen takes this available data to a new level in Part 2 of the blog.
![]()
As the person with core responsibilities for the switch configuration and uptime, the Meraki dashboard made it very simple to quickly change the network topology, according to the needs of the Black Hat customer.
![]()
If you refer back to Black Hat USA 2022, you’d have seen that we had over 1,000 iOS devices to deploy, with which we had several difficulties. For context, the company that leases the devices to Black Hat doesn’t use a Mobile Device Management (MDM) platform for any of their other shows…Black Hat is the only one that does. So, instead of using a mass deployment technology, like Apple’s Automated Device Enrollment, the iOS devices are “prepared” using Apple Configurator. This includes uploading a Wi-Fi profile to the devices as part of that process. In Las Vegas, this Wi-Fi profile wasn’t set to auto join the Wi-Fi, resulting in the need to manually change this on 1,000 devices. Furthermore, 200 devices weren’t reset or prepared, so we had those to reimage as well.
![]()
Black Hat Europe 2022 was different. We took the lessons from US and coordinated with the contractor to prepare the devices. Now, if you’ve ever used Apple Configurator, there’s several steps needed to prepare a device. However, all of these can be actions can be combined into a Blueprint:
![]()
Instead of there being several steps to prepare a device, there is now just one! Applying the Blueprint!
For Black Hat Europe, this included:
There’s lots of other things that can be achieved as well, but this results in the time taken to enroll and set up a device to around 30 seconds. Since devices can be set up in parallel (you’re only limited by the number of USB cables / ports you have), this really streamlines the enrollment and set up process.
Now, for the future, whilst you can’t Export these blueprints, they are transportable. If you open Terminal on a Mac and type:
cd /Users/<YOUR USER NAME>/Library/Group Containers/K36BKF7T3D.group.com.apple.configurator/Library/Application Support/com.apple.configurator/Blueprints
You’ll see a file / package called something.blueprint This can be zipped up and emailed to some else so, they can then use the exact same Blueprint! You may need to reboot your computer for the Blueprint to appear in Apple Configurator.
As mentioned, the registration / lead capture / session scanning devices are provided by the contractor. Obviously, these are all catalogued and have a unique device code / QR code on the back of them. However, during setup, any device name provisioned on the device gets lost.
So, there’s three things we do to know, without having to resort to using the unwieldy serial number, what devices is what.
![]()
In the footnote, you’ll see Device Name and Device Serial in blue. This denotes that the values are actually dynamic and change per device. They include:
![]()
On the Lock Screen, it’s now possible to see the device’s name and serial number, without having to flip the device over (A problem for the registration devices which are locked in a secure case) or open systems preferences.
We also had integration with SecureX device insights, to see the security status of each iOS device.
![]()
With the ability to quickly check on device health from the SecureX dashboard.
![]()
This goes without saying, but the iOS devices (Registration, Lead Capture and Session Scanning) do have access to personal information. To ensure the security of the data, devices are wiped at the end of the conference. This is incredibly satisfying, hitting the Erase Devices button in Meraki Systems Manager, and watching the 100+ devices reset!
![]()
Deploying a network like Black Hat takes a lot of work, and repetitive configuration. Much of this has been covered in previous blogs. However, to make things easier for this event, instead of the 60 training SSIDs we had in Black Hat US 2022, the Meraki team discussed the benefits of moving to iPSKs with Black Hat NOC Leadership, which accepted the plan.
For context, instead of having a single pre shared key for an SSID, iPSK functionality allows you to have 1000+. Each of these iPSKs can be assigned its own group policy / VLAN. So, we created a script:
This only involves five API calls:
The bulk of the script is error handling (The SSID or network doesn’t exist, for example) and logic!
The result was one SSID for all of training: BHTraining, and each classroom had their own password. This reduced the training SSIDs from over a dozen and helped clear the airwaves.
Thank you to the Cisco NOC team:
Also, to our NOC partners NetWitness (especially David Glover, Iain Davidson, Alessandro Contini and Alessandro Zatti), Palo Alto Networks (especially James Holland, Matt Ford, Matt Smith and Mathew Chase), Gigamon, IronNet, and the entire Black Hat / Informa Tech staff (especially Grifter ‘Neil Wyler’, Bart Stump, Steve Fink, James Pope, Jess Stafford and Steve Oldenbourg).
![]()
For 25 years, Black Hat has provided attendees with the very latest in information security research, development, and trends. These high-profile global events and trainings are driven by the needs of the security community, striving to bring together the best minds in the industry. Black Hat inspires professionals at all career levels, encouraging growth and collaboration among academia, world-class researchers, and leaders in the public and private sectors. Black Hat Briefings and Trainings are held annually in the United States, Europe and USA. More information is available at: blackhat.com. Black Hat is brought to you by Informa Tech.
We’d love to hear what you think. Ask a Question, Comment Below, and Stay Connected with Cisco Secure on social!
Cisco Secure Social Channels
Ampol has been Australia’s leading transport fuel company since 1900. What began over 125 years ago is now an organization that powers a country, operating 1,500 retail stores and stations across ANZ, plus 89 depots for refining and importing fuels and lubricants, and 8,200 employees throughout Australia, New Zealand, the United States, and Singapore. And while Ampol’s history goes back a century, they are a modern organization, using internet of things (IoT) technology across operational and retail locations, with sensors on everything from electric vehicle charging units to fuel tank gauges to transportation trucks to refrigeration units inside retail stores.
As a critical energy provider to a country of over 25 million people, Ampol’s security needed to match its evolving infrastructure. As Satish Chowdhary, Network Enterprise Architect, said, “At Ampol, we have implemented sensor technology across our network: from gauges in the fuel tanks to monitor fuel quality and quantity to sensors that monitor the temperature in various refrigerators across our retail sites to ensure goods stay chilled. It’s critical to manage these devices effectively and securely, and that’s where Cisco comes in…With IoT, a major security risk is posed by dodgy legacy devices left unpatched and vulnerable within your network. Cisco’s TrustSec and VLAN segregation automatically isolate vulnerable devices, not exposing the rest of the network to risks from untrusted devices.”
In addition to securing the IoT that let’s Ampol monitor and manage its critical operations, Cisco was able to create a comprehensive security environment that solved for their three strategic goals.
“Three key components of our cyber-resilient strategy were isolation, orchestration, and rapid recovery. Cisco SecureX nailed all three providing us a single interface to see all security events, and malicious files, thus expediting how fast we can isolate events and recover,” Chowdhary explained. “Before using Cisco Secure, security was a hindrance, not an enabler for our IT team, employees, and even customers,” he added.
In fact, Cisco Secure helped Ampol improve their security posture so much that they were able to quickly pivot during the early days of the pandemic.
“When Covid triggered supply challenges during lockdowns, people not being able to access groceries turned to their local service station convenience stores to get what they needed. For Ampol, maintaining that supply continuity was critical, not just for our business, but for the customers who were relying on us to get their supplies. And all of this was done when many employees were now having to work remotely… This was possible only because we could maintain our revamped locations, staff, clients, and business partners safe on our network – while still maintaining speed and efficiency. Cisco Secure was the ticket to Ampol’s resilience in the face of major change,” Chowdhary said.
In addition to enabling flexibility against supply chain fluctuations, Ampol is readily protected against threats, cyberattacks, and other vulnerabilities. Their Cisco security solution included:
“The major force for our Cisco Secure investment was simplification by integrating the entire Security portfolio…If we ever happen to have a cyber-attack, we can quickly find it and contain it,” Chowdhary said, adding, “The greatest outcome of using Cisco Secure is simplicity at its core. We achieved great efficiency integration, better visibility, and context that’s not hidden across five, ten, or fifteen consoles, and ultimately, greater security outcomes.”
To find out how else Cisco Secure is helping protect Ampol against sophisticated threats and other challenges, read the full Ampol case study.
We’d love to hear what you think. Ask a Question, Comment Below, and Stay Connected with Cisco Secure on social!
Cisco Secure Social Channels
Throughout my career, I have noticed the way we “futurize” technology. Often, we are thinking of technology in five-to-ten-year increments. But the fact of the matter is – technology is moving faster than we can keep up. The minute we think we understand it, it’s already onto something new. That’s why here at Cisco, we’re focused on what’s NEXT. We all know technology will continue to grow at a rapid pace, our goal is to remain at the forefront of these changes.
After much anticipation, it’s finally here! I am excited to present the first episode of “NEXT” by Cisco Secure! “NEXT” is a video series illuminating simple conversations about complex topics. Our mission is twofold: First, we want to humanize cybersecurity. Second, we want to build a bridge between Cisco Secure and the ideas of the future.
CTO of Cisco Secure, TK Keanini and I sit down with Michael Ebel, CEO of Atmosfy. If you saw our preview, then you know Atmosfy is on a mission to help inspire others and support local restaurants through live videos.
Want to learn what’s NEXT for Michael Ebel and Atmosfy? Check out our episode!
We’d love to hear what you think. Ask a Question, Comment Below, and Stay Connected with Cisco Secure on social!
Cisco Secure Social Channels
Since releasing SecureX orchestration, we’ve regularly published two types of content for our customers to import and use: atomic actions and workflows. Atomic actions are small, re-usable functions that allow you to do simple things like isolating an endpoint in Cisco Secure Endpoint. Workflows are more complex combinations of activities, often made up of multiple atomic actions, that accomplish a broader objective. One of our most popular workflows fetches blog posts from Talos and then conducts an investigation into each post using a customer’s SecureX-integrated products. As of this blog post’s publishing, we’ve released 75 workflows. So, let’s talk about what’s new…
In the past, when you wanted to communicate with SecureX APIs, you had to go through a multi-step process to generate an API client, use that API client to get a token, and then refresh the token every 10 minutes. This process wasn’t exactly simple, so in April we released the new SecureX Token account key. This special type of account key allows you to integrate with SecureX APIs without creating an API client, generating a token, or worrying about when the token expires. Simply use a SecureX target in conjunction with a SecureX Token account key and the platform takes care of the tokens. For more information about this update and how to take advantage of this new functionality, check out our documentation. Keep in mind that if your orchestration tenant was created prior to April 2022, you may need to create a SecureX Token.
Now that we have SecureX Token account keys and customers have been using them for a few months, we decided it was time to update all of our previously published workflows to be fully compatible with the new account key type. All 24 workflows using SecureX APIs have now been updated to leverage SecureX Tokens. For more information about Cisco-published workflows, check out our workflow list.
Since Cisco Secure Firewall is almost always deployed on-premises and behind a firewall, integrating it with SecureX orchestration in the cloud has required the use of a SecureX orchestration remote. Not all of our customers are interested in deploying an on-premises virtual machine or they lack a VMware ESXi deployment within which to run the VM. Now, with the release of the SecureX Security Services Exchange (SSE) API proxy, you can integrate your SSE-registered FMC devices with orchestration workflows without the need for additional remotes or virtual machines. To show how this works and highlight how easy this integration is, we re-released five of our existing FMC workflows with support for the SSE API proxy:
To stay updated on what’s new with SecureX, check out the following resources:
We’d love to hear what you think. Ask a Question, Comment Below, and Stay Connected with Cisco Secure on social!
Cisco Secure Social Channels
Welcome back! In our last article, you cleared out your extraneous digital footprints by removing unnecessary accounts and opting-out of data broker services, and have finished a dedicated review of your online history. In this final section, we will answer the natural question encountered at the end of any journey: What’s next?
Before becoming the series you’ve just read, I presented a version of this many times as a live talk at conferences and training sessions. After the first few talks, I noticed a consistent trend in the feedback when I was approached afterwards: people who said they felt anxious about how their online activity going forward might share more than they want. So I went back and added a final section to the talk, one that we’re going to cover together now: risk acceptance and the value of routine in good security.
Some people think that the goal of good security is to eliminate risk. One of the first lessons you learn in this industry, though, is that eradicating every possible risk is very rarely practical, whether we’re talking about the individual or organizational level. This is because there are few choices one can make with zero possibility of a negative outcome, and because human beings are… human, and even with excellent discipline and good intent the best of us can mess up.
The goal of good security strategy is instead to assess risk and find a healthy balance: to decide what is more or less important and valuable, to determine how damaging the worst-case scenario might be and weigh that against the potential benefits, and figuring out how much you can reasonably do to tip the balance and increase your odds of success.
That’s fairly abstract, so let’s use a couple quick practical examples at both levels:
I don’t know about you, but I grew up as a child of the internet, and the thought of never going online again isn’t one I’m likely to seriously consider. So rather than logging off forever, let’s focus on how we can both stay safe and stay connected. We’ve completed the “3 R’s” of the self-dox process: Review, Restrict, and Remove. But now, a surprise more shocking than the Spanish Inquisition itself: we’re going to add two final steps-Repeat and Refine.
Every good security plan includes a plan for routine follow-up. We know that staying offline forever isn’t practical, so the next best thing is to set up a reminder to go through an easier version of this checklist on a regular schedule. Why is it easier? In this review, you had to look back on your entire life up to the present, and next time you’ll just need to look back from then to… well… now! Depending on how active you are online and how likely you are to be doxxed, this might make sense to do on an annual basis, or split into abbreviated and more frequent quarterly reviews.
There is no one-size-fits-all approach to this review, but here are some typical checks you may want to consider:
Before we move on to our final (final, I promise!) step, let’s talk one more kind of repeating. A wifi repeater is a gadget that can connect to and boost the signal from a wireless network, helping to expand the network’s reach and keep a strong connection. In the same way, by sharing the lessons you’ve learned with your family and friends you will expand the reach of that security knowledge. Not only does that help keep the people you care about safer… but since we’ve seen how information shared about us by others can also be discovered by doxxers, it helps to increase your own safety as well!
My goal in writing this series was to give a straightforward introduction and broadly-useful walkthrough of how to figure out what’s out there about you online. In the beginning of this series, I talked about how the level of risk for doxxing is not the same for everyone. You may want to go significantly further than we’ve covered in this guide if you are:
This can cover a wide range of additional steps like placing a freeze on your credit report, requesting a privacy removal from search engines, or even setting up dedicated secure devices/apps for communication online. The full scope of these additional protections is beyond what we can cover here, but I will again recommend the Self-Doxxing Guide from AccessNow and the Gender and Tech Safety Resource guide linked in the first post of this series as an excellent reference for where else you might want to check.
Thank you for following along with me on this journey, and I hope that you found this guide and the resources shared have been helpful for you. Still have questions, or have you discovered any of the links/tools here are no longer available? Please let me know! Life comes at you fast on the web, and I want to make sure this guide continues to be relevant and helpful for a long time to come. You can drop me a line at zoe@duo.com, or find me on Twitter. Until then, happy trails and stay safe out there!
If you can’t get enough security content and care deeply about making the web safer for everyone, we’d also love to hear from you. Please check out our open positions and how your passion can contribute to keeping people safe online.
![]()
We’d love to hear what you think. Ask a Question, Comment Below, and Stay Connected with Cisco Secure on social!
Cisco Secure Social Channels
Welcome back! Previously in our Go Dox Yourself series, we walked through reviewing what information is available about you online, prioritizing those accounts that are most important or still active, and then restricting how much we share through those accounts and who gets to see it. That’s two out of our three steps — maybe good enough for Meatloaf, but not for us! You’re in the home stretch now, and this is the most straightforward-if-slow portion of the process — so let’s dive right in.
In the review step , along with the top accounts that you wrote out in your initial brain dump, we used some email search tricks and the free services NameCheckup.com and NameChk.com to dig up any unused, forgotten, or now obsolete accounts you might have previously registered under your email address or favorite username (or, as us ʼ80s kids used to say, your “handle.”)
We set those old accounts to the side to focus on your active and sensitive data first, but now it’s time to make Marie Kondo proud and clean out the junk drawers of our online life – if it doesn’t still serve you or spark joy, let’s kiss it goodbye!
In a perfect world, this would be as simple as logging in, going to your account settings and clicking a big ol’ “Cancel My Account” button. However, many sites opt to bury the cancelation settings behind a series of smokescreen menus, sometimes even including a half dozen unskippable “are you SURE you want to leave?” and “but we’ll give you a super good deal to stay!” surveys to click through first.
If you find yourself thwarted and your first search of “[Unwanted Service] cancel” doesn’t take you where you need to go, try checking out AccountKiller. This collaborative resource takes submissions of step-by-step deletion instructions and direct links to cancel for a tremendous number of sites, and even includes phone tree options and direct support numbers for canceling offline accounts as well.
The first pass of your delete list might well be longer than a CVS receipt, because these days the average person has 100 password-protected accounts to manage, but don’t worry! You don’t have to sprint to the finish line, and slow progress checking off a few accounts in short sessions over a few weeks will serve you better than a several-hour slog of trying to clear them all at once and burning out.
An important lesson in security is that operating at max capacity isn’t sustainable all the time, and planning for rest and overflow in our personal security planning is no different. Remember that the work you’re doing is cumulative, each small step is one more forward, and every account you clear now is one less that you’ll need to revisit later.
You might notice that we’ve checked off most of the information from our initial brainstorm: emails, usernames, phone numbers, profile pictures… but so far, we haven’t done much with your location history: the cities you lived in and live now, the cities where you worked or went to school, and the city of your birth. Now that we’re going to see how much information on you is available through data brokers and public record sites, these details will be important to have handy.
For the unfamiliar, data brokers are companies which collect and bundle personal information for everything from ad customization to individual investigation. Brokers collect their data through a wide variety of methods, including:
These metrics and details are bundled and sold, either directly through lookup sites like we’ll review in just a moment, or in demographic bundles (for example, “Resilient Renters” or “Living on Loans: Young Urban Single Parents”). If you’ve ever walked through a car dealership window-shopping and suddenly found sponsored content for that car company in your feed, data brokers are the most likely reason.
For this step you should reference the previously-mentioned Personal Data Removal Workbook provided by Michael Bazzell through his company, IntelTechniques. Bazzell has maintained and updated this workbook for many years now, and it is by far the most comprehensive resource for keeping a handle on who is buying and selling your data.
One of the first things you’ll notice on opening the workbook is the sheer volume of businesses out there buying and selling your data: at time of writing, the current edition includes 220 separate brokers. But much like your initial account inventory likely included a select set of important accounts and a longer list of less-relevant ones, there are less than a dozen brokers who dominate most of the market and should be at the top of your list – and fortunately, they’re also at the top of the workbook! These sites are:
Aside from covering most of the market for data and analytics intelligence, these primary sites often act as “feeders” for smaller providers that are either directly affiliated or collect information for their own databases from the largest providers. Which means that as you remove your data from these sites, you’ll not only check off another box on your list, but you may also reduce the number of hits you find for your information on smaller sites as you work your way down.
Congratulations: if you’ve been following along, you’ve just made it through your self-doxxing! Hopefully you’re feeling much better informed and aware of what tracks you’ve left online, and addressed who you do and do not want to have your… addresses. Join us soon for our wrap-up post where we’ll recap with takeaway lessons, as well as good habits and check-ins to keep you safe going forward.
Care about keeping people and their data safe online? Check out our open roles.
We’d love to hear what you think. Ask a Question, Comment Below, and Stay Connected with Cisco Secure on social!
Cisco Secure Social Channels
With passwords and MFA out of the way, let’s next look at connected apps or services that are tied to our priority accounts. When you log into other sites on the web through Facebook, Google, or another social account, as well as when you install social media apps or games, you are sharing information about those accounts with those services. This may be as limited as the email address and username on file, or may include much more information like your friends list, contacts, likes/subscriptions, or more.
A well-known example of this data-harvesting method is the Cambridge Analytica story, where installing a social media app opened up access to much more information than users realized. (Note: as mentioned in the linked article, Facebook added protective measures to limit the amount of data available to app developers, but connected accounts can still present a liability if misused.)
With this in mind, look under the Security or Privacy section of each of your account’s settings, and review where you have either used this account to log into a third-party website or allowed access when installing an app. Here are some handy links to some of the most common services to check:
If you aren’t going to use the app again or don’t want to share any details, remove them. Once you’ve checked your accounts, repeat this process with all the apps installed on your phone.
Just like connecting a social account to a third-party game can share information like your contact info and friend’s list, installing an app on your mobile device can share information including your contacts, camera roll and more. Fortunately, mobile OSes have gotten much better at notifying users before installation on what information is shared, so you should be able to see which apps might be nosier than you’re comfortable with.
Finally — and this is really for the nerds and techies out there — check if you have any API (short for “application programming interface”) keys or browser extensions connected to your accounts. API keys are commonly used to let different apps or services “talk” between one another. They let you use services like Zapier or IFTTT to do things like have your Spotify favorites automatically saved to a Google Sheet, or check Weather Underground to send a daily email with the forecast.
Browser extensions let you customize a web browser and integrate services, like quickly clicking to save an article for review on a “read it later” service like Instapaper. Even if you trust the developer when installing these apps, they may pose a risk later on if they are recovered or taken over by an attacker. These “zombie extensions” rely on a broad install base from a legitimate service which can later be misused to gather information or launch attacks by a malicious developer.
We’ve made great progress already, and taken steps to help defend your accounts from prying eyes going forward – now it’s time to lock down your previous activities on social media. Rather than enumerate every option on every service, I’ll highlight some common tools and privacy settings you’ll want to check:
![]()
Before moving on to email, I’ll add another plug for the NYT Social Media Security and Privacy Checklists if you, like me, would rather have a series of boxes to mark off while going through each step above.
Security experts know that you can’t erase the possibility of risk, and it can be counterproductive to build a plan to that expectation. What is realistic and achievable is identifying risk so you know what you’re up against, mitigating risk by following security best practices, and isolating risk where possible so that in the event of an incident, one failure doesn’t have a domino effect affecting other resources. If that seems a bit abstract, let’s take a look at a practical example.
Tech journalist Mat Honan was the unlucky victim of a targeted hack, which resulted in a near-complete lockout from his digital life requiring a Herculean effort to recover. Fortunately for us, Mat documented his experience in the Wired story, “How Apple and Amazon Security Flaws Led to My Epic Hacking,” which offers an excellent summary of exactly the type of domino effect I described. I encourage you to read the full article, but for a CliffsNotes version sufficient for our needs here:
Honan’s article goes into much more detail, including some of the changes made by the services exploited to prevent similar incidents in the future. The key takeaway is that having a couple of emails without strong authentication tied to all his most important accounts, including the recovery of these email accounts themselves, meant that the compromise of his Amazon account quickly snowballed into something much bigger.
We’re going to learn from that painful lesson, and do some segmentation on our email channels based on the priority and how public we want that account to be. (“Segmentation” is an industry term that can be mostly boiled down to “don’t put all your eggs in one basket”, and keep critical or vulnerable resources separate from each other.) I would suggest setting up a few different emails, listed here from least- to most-public:
For all of the above, of course, we’ll create strong passwords and set up 2FA. And speaking of 2FA, you can use the same split-channel approach we followed for email to set up a dedicated verification number (using a VOIP service or something like Google Voice) when sending a passcode by SMS is the only option supported. Keeping these recovery numbers separate from your main phone number reduces the risk of them being leaked, sold, or captured in an unrelated breach.
Good news: We’re almost done with doxxing ourselves! In the next section, we’ll sweep out those unused accounts to avoid leaving data-filled loose ends and take a look at how data brokers profit off of your personal information and what you can do to opt-out.
You’ve made it this far so maybe you’re passionate like we are about developing innovative ways to make security accessible. We’d love for you to join our mission.
We’d love to hear what you think. Ask a Question, Comment Below, and Stay Connected with Cisco Secure on social!
Cisco Secure Social Channels
In the first step of our doxxing research, we collected a list of our online footprint, digging out the most important accounts that you want to protect and obsolete or forgotten accounts you no longer use. Because the most recent and relevant data is likely to live in the accounts you use regularly, our next step will be to review the full scope of what’s visible from these accounts and to set more intentional boundaries on what is shared.
It’s important to note here that the goal isn’t to eliminate every trace of yourself from the internet and never go online again. That’s not realistic for the vast majority of people in our connected world (and I don’t know about you, but even if it was I wouldn’t want to!) And whether it’s planning for an individual or a giant organization, security built to an impossible standard is destined to fail. Instead, we are shifting you from default to intentional sharing, and improving visibility and control over what you do want to share.
Before making changes to the settings and permissions for each of these accounts, we’re going to make sure that access to the account itself is secure. You can start with your email accounts (especially any that you use as a recovery email for forgotten passwords, or use for financial, medical, or other sensitive communications). This shouldn’t take very long for each site, and involves a few straightforward steps:
The best way to prevent a breached password from exposing another account to attack is to use a unique password for for every website you visit. And while you may have heard previous advice on strong passwords (along the lines of “eight or more characters, with a mix of upper/lower case letters, numbers, and special characters”), more recent standards emphasize the importance of longer passwords. For a great explanation of why longer passwords work better than shorter, multi-character type passwords, check out this excellent XKCD strip:

A password manager will make this process much easier, as most have the ability to generate unique passwords and allow you to tailor their length and complexity. While we’re on the topic of what makes a good password, make sure that the password to access your password manager is both long and memorable.
You don’t want to save or auto-fill that password because it acts as the “keys to the kingdom” for everything else, so I recommend following a process like the one outlined in the comic above, or another mnemonic device, to help you remember that password. Once you’ve reset the password, check for a “log out of active devices” option to make sure the new password is used.
MFA uses two or more “factors” verifying something you know, something you have, or something you are. A password is an example of “something you know”, and here are a few of the most common methods used for an additional layer of security:
![]()
![]()
![]()
If you want to know more about the different ways you can log in with strong authentication and how they vary in effectiveness, check out the Google Security Team blog post “Understanding the Root Cause of Account Takeover.”
Before we move on from passwords and 2FA, I want to highlight a second step to log in that doesn’t meet the standard of strong authentication: password questions. These are usually either a secondary prompt after entering username and password, or used to verify your identity before sending a password reset link. The problem is that many of the most commonly-used questions rely on semi-public information and, like passcodes, are entered on the same device used to log in.
Another common practice is leveraging common social media quizzes/questionnaires that people post on their social media account. If you’ve seen your friends post their “stage name” by taking the name of their first pet and the street they grew up on, you may notice that’s a combination of two pretty common password questions! While not a very targeted or precise method of attack, the casual sharing of these surveys can have consequences beyond their momentary diversion.
One of the first widely-publicized doxxings happened when Paris Hilton’s contact list, notes, and photos were accessed by resetting her password using the password question, “what is your favorite pet’s name?”. Because Hilton had previously discussed her beloved chihuahua, Tinkerbell, the attacker was able to use this information to access the account.
Sometimes, though, you’ll be required to use these password questions, and in those cases I’ve got a simple rule to keep you safe: lie! That’s right, you won’t be punished if you fib when entering the answers to your password questions so that the answers can’t be researched, and most password managers also include a secure note field that will let you save your questions and answers in case you need to recall them later.
We’d love to hear what you think. Ask a Question, Comment Below, and Stay Connected with Cisco Secure on social!
Cisco Secure Social Channels
Technology has typically had a reputation for being exciting and inventive. Unfortunately, this hasn’t always been the case for security. But times have changed. We are now recognizing the crucial role security plays in any groundbreaking technology. Without strong defenses, even the most visionary app is likely to crash and burn. So it’s imperative that big security players like Cisco stay on top of what’s next.
I am thrilled to announce that in November, we will be launching our new video series, “NEXT” by Cisco Secure. In the series, my esteemed co-host TK Keanini and I will interview some of the brightest new minds in tech to find out more about the future of the industry and how we can best secure it. Watch the series preview below!
As the CTO of Cisco Secure, TK has over 25 years of networking and security expertise, as well as a penchant for driving technical innovation. As for me, I’m a cybersecurity specialist of 10 years with an obsession for communication and empathy. Together, TK and I will bring new cyber pioneers to the forefront and highlight the criticality of digital protection and privacy for everyone.
Whether we’re discussing Web3, the metaverse, or next-generation healthcare, we’ll learn and laugh a lot. Through simple conversations about complex topics, we’re building a bridge between leading-edge tech and how Cisco is helping to safeguard what’s on the horizon.
And what better time to preview this series than during Cybersecurity Awareness Month? A time when we focus on the reality that security belongs to everyone — not just the threat hunter, or the product engineer, or the incident responder — but everyone.
We all have a responsibility to protect the world’s data and infrastructure, and should all have a seat at the table for important security conversations. We hope you’ll join us as we dive into what’s making waves out there, and how we can keep it safe.
Follow our Cisco Secure social channels to catch our first episode in November, when we will speak with Michael Ebel, CEO of Atmosfy. Atmosfy is revolutionizing restaurant reviews by incorporating engaging live video that inspires others and supports local businesses. TK and I will chat with Michael about the origin of Atmosfy, and how the company keeps its content authentic and organization resilient.
In the meantime, explore our other Cybersecurity Awareness Month resources.
Who do you want to hear from next? Tell us your ideas for future guests in the comments.
We’d love to hear what you think. Ask a Question, Comment Below, and Stay Connected with Cisco Secure on social!
Cisco Secure Social Channels
Sharing is caring… but on the internet, sharing can also be tricky! When we post something, we have to look at the forest and not just the trees. Doxxers usually start with one or two pieces of relatively innocent or public information, but by connecting the dots between those pieces they can build a frighteningly detailed picture of an individual.
Seemingly innocuous details can be pieced together into a much more personal profile when collected and leveraged to learn more. As one example, your wish list/wedding registry makes it easy for friends and family to get you gifts that you actually want, but could also be used to find out products/services you’re interested in as pretext (setting the scene) of a conversation or phishing email trying to gather more. You may have Google Alerts set up for your name (a great idea!), but this may not flag text in scanned documents such as school yearbooks, newspapers and other digitized paper records available online.
![]()
![]()
If the above sounds scary – don’t panic! Your first step in this auto-dox is going to be brainstorming as much personally identifying information (PII) shared online as possible. I suggest doing this either in a secure note or longhand. The goal is to write down all of the accounts/addresses/phone numbers that come to mind, as these are some of the top things that attackers will try to gather in their search. Start your list here:
Email addresses are an especially juicy target for someone trying to locate you, because most people only use one personal and maaaybe a second school or work email account. Those accounts are tied to all our other online identities and often double as our username for logging in.
When you finish this process, you will likely have dozens or even hundreds of “breadcrumbs” between your account list and search results. Read through your list again, and we’re going to sort it into three categories:
Great job! You’ve already got a much better idea of what people can learn about you than most folks ever do, and are well on your way to cleaning up your online footprint. In our next step, we’ll start locking down everything that you want to keep!
P.S. If you’re enjoying this process and value keeping people safe online, please check out our open roles at Cisco Secure.
We’d love to hear what you think. Ask a Question, Comment Below, and Stay Connected with Cisco Secure on social!
Cisco Secure Social Channels
Whether or not you’ve heard the term “doxxing” before, you’re probably familiar with the problem it names: collecting personal information about someone online to track down and reveal their real-life identity. The motivations for doxxing are many, and mostly malicious: for some doxxers, the goal in tracking someone is identity theft. For others, it’s part of a pattern of stalking or online harassment to intimidate, silence or punish their victim – and overwhelmingly, victims are youth and young adults, women, and LGBTQ+ people. The truth is, most of us have information online that we don’t realize can put us at risk, and that’s why I’ve written this series: to inform readers about how doxxing happens, and how you can protect yourself from this very real and growing problem by doxxing yourself.
In computer security, we talk about the idea of a “security mindset”: understanding how someone with bad intentions would cause harm, and being able to think like they would to find weak spots. In this series, you will learn by doing. By understanding the tools and methods used by those with ill intent, you’ll be better prepared to keep yourself safe and your information secure.
Your mission, should you choose to accept it, is to follow along and find out everything the internet knows about… you!
This series will provide simple steps for you to follow as you begin your investigation. Along the way, as you get familiar with the tools and tactics of internet sleuths, you’ll get a better idea of your current internet footprint as well as know what tracks you leave in the future. Our process will be split into three main sections:
![]()
Information is power. And in the case of doxxing, most people don’t realize how much of their power they’re giving up! My goal in this series is to demystify the methods used for doxxing, so in the spirit of “showing my work,” here are some of the best resources and collected checklists I referenced when planning these exercises, along with how to best use each:
If this looks like a whole lot of homework… don’t worry! We’ll cover most of the core tools and tips mentioned in these resources through the course of this series, and we’ll revisit these links at the end of the series when you’ve gotten more context on what they cover. In the next article, we’ll take on the review step of our process, getting a holistic inventory of what personal information is currently available online so you can prioritize the most important fixes. See you soon!
![]()
We’d love to hear what you think. Ask a Question, Comment Below, and Stay Connected with Cisco Secure on social!
Cisco Secure Social Channels
Explore the nature of vulnerabilities in this episode of ThreatWise TV.
It’s shaping up to be another big year for vulnerability disclosure. Already the number of Common Vulnerabilities and Exposures (CVEs) disclosed has crossed 18,000 and it’s on track to make this another record-breaking year.
With new CVEs being disclosed daily, it has become increasingly difficult for security teams to stay abreast of the latest risks, let alone quickly determine which ones apply to their network environment. From those, prioritizing which CVEs to patch first adds an additional wrinkle to the process.
If this wasn’t challenging enough, a curve ball that’s often lobbed at security teams are the “breaking news” vulnerabilities— vulnerabilities picked up by the security media, often with much fanfare. The stories surrounding these high-profile vulnerabilities generally carry an implied threat that the CVE in question will throw the doors wide open to attackers if not addressed immediately. What security team hasn’t had someone from the C-suite share an article they’ve read, asking “are we protected from this?”
On the surface, CVEs that appear severe enough to garner media attention do seem like a good place to start when addressing vulnerabilities in your environment. But vulnerabilities are complicated, and what a security researcher manages to do within a controlled environment doesn’t always translate into real-world attacks. In fact, most disclosed vulnerabilities never see active exploitation. And of those that do, not every vulnerability ends up becoming a tool in an attacker’s arsenal. Bad actors generally follow the path of least resistance when they compromise a network, relying on tested exploits long before trying something new and unproven.
This begs the question: how much overlap is there between the most talked about vulnerabilities and those that are widely used in attacks? Moreover, if media attention isn’t a reliable indicator, what else might predict if a vulnerability will be used in an attack?
To answer these questions, we used intelligence tools available from Cisco’s Kenna Security risk-based vulnerability management (RBVM) software. In particular, Kenna.VI+ consolidates a variety of vulnerability intelligence, where a CVE ID lookup can pull back a wealth of information. In addition to this, Kenna.VI+ includes an API that brings in an additional layer of external threat intelligence, enabling further analysis.
We started with a direct comparison of Successful Exploitations and Chatter Count from within Kenna.VI+. The former is a full count of confirmed exploits within the dataset, while the latter is a count of mentions in the news, social media, various forums, and the dark web.
Our first pass at the data included a comparison of the top 50 CVEs in both Successful Exploitations and Chatter Count. However, there were only two CVEs that overlapped. The data showed that many of the top exploited CVEs were old and predated the data in Chatter Count. We quickly decided that this wasn’t a fair comparison.
To get a better look at more relevant CVEs, we limited the dataset to a range of 10 years. Unfortunately, this did not do much to improve things—only three CVEs showed up in both lists.
A more effective approach was to look at CVEs that we know are actively being exploited. The Cybersecurity and Infrastructure Security Agency (CISA) happens to maintain such a list. The Known Exploited Vulnerabilities (KEV) catalog is considered an authoritative compilation of vulnerabilities identified as being actively exploited in the wild.
Running the KEV catalog though Kenna.VI+ resulted in six CVEs that appeared in the top 50 for both lists, with a single overlap in the top 10. This leads us to conclude that the vulnerabilities with the most discussion are not the same as those being actively exploited in the majority of cases.
| CVE | Brief description | |
| 1 | CVE-2017-9841 | PHPUnit vulnerability (used to target popular CMSes) |
| 2 | CVE-2021-44228 | Log4j vulnerability |
| 3 | CVE-2019-0703 | Windows SMB information disclosure vulnerability |
| 4 | CVE-2014-0160 | Heartbleed vulnerability |
| 5 | CVE-2017-9805 | REST plugin in Apache Struts vulnerability |
| 6 | CVE-2017-11882 | Microsoft Office memory corruption vulnerability |
| 7 | CVE-2017-5638 | Apache Struts vulnerability (used in Equifax breach) |
| 8 | CVE-2012-1823 | 10-year-old PHP vulnerability |
| 9 | CVE-2017-0144 | EternalBlue vulnerability |
| 10 | CVE-2018-11776 | Apache Struts RCE vulnerability |
| CVE | Brief description | |
| 1 | CVE-2021-26855 | Microsoft Exchange vulnerability (used in Hafnium attacks) |
| 2 | CVE-2021-40444 | Microsoft MSHTML RCE vulnerability |
| 3 | CVE-2021-26084 | Confluence Server and Data Center vulnerability |
| 4 | CVE-2021-27065 | Microsoft Exchange vulnerability (used in Hafnium attacks) |
| 5 | CVE-2021-34473 | Microsoft Exchange vulnerability (used in Hafnium attacks) |
| 6 | CVE-2021-26858 | Microsoft Exchange vulnerability (used in Hafnium attacks) |
| 7 | CVE-2021-44228 | Log4j vulnerability |
| 8 | CVE-2021-34527 | One of the PrintNightmare vulnerabilities |
| 9 | CVE-2021-41773 | Apache HTTP Server vulnerability |
| 10 | CVE-2021-31207 | One of the ProxyShell vulnerabilities |
Despite the lack of overlap, there are many well-known vulnerabilities at the top of both lists. Heartbleed and EternalBlue appear on the top 10 exploited list, while Hafnium, PrintNightmare, and ProxyShell make the top 10 most talked about CVEs.
The Log4j vulnerability is the only CVE that appears in both lists. This isn’t surprising considering the ubiquity of Log4j in modern software. It’s the second-most exploited vulnerability—far outpacing the CVEs directly below it. This, coupled with its appearance in the chatter list, puts it in a class of its own. In a brief period, it’s managed to outpace older CVEs that are arguably just as well known.
The CVE that recorded the most successful exploitations is a five-year-old vulnerability in PHPUnit. This is a popular unit-testing framework that’s used by many CMSes, such as Drupal, WordPress, MediaWiki, and Moodle.
Since many websites are built with these tools, this exploit can be a handy vector for gaining initial access to unpatched webservers. This also lines up with research we conducted last year, where this vulnerability was one of the most common Snort detections seen by Cisco Secure Firewall.
All four of the Microsoft Exchange Server vulnerabilities used in the Hafnium attacks appear in the most talked about list of CVEs. However, even when you add all four of these CVEs together, they still don’t come anywhere close to the counts seen in the top exploited CVEs.
If media attention is not a good predictor of use for exploitation, then what are the alternatives?
The Common Vulnerability Scoring System (CVSS) is a well-known framework for gauging the severity of vulnerabilities. We looked for CVEs from the KEV catalog that were ranked as “critical”—9.0 and above in the CVSSv3 specification. Examining the entire KEV catalog, 28% of the CVEs have a score of 9.0 or higher. Of the top 50 successfully exploited, 38% had such scores.
This is an improvement, but the CVSSv3 specification was released in 2015. Many CVEs in the KEV catalog predate this—19% of the entire catalog and 28% of the top 50—and have no score.
Using the previous CVSS specification does fill this gap—36% overall and 52% of the top 50 score 9.0 or higher. However, the older CVSS specification comes with its share of issues as well.
Another indicator worth exploring is remote control execution (RCE). A vulnerability with RCE grants an attacker the ability to access and control a vulnerable system from anywhere. It turns out that 45% of the CVEs in our dataset allow for RCE, and 66% of the top 50, making it the most worthwhile indicator analyzed.
Let’s summarize how we’ve honed our approach to determine if media attention and exploitation line up:
| Data set | Exploitation and Chatter lists | Number of CVEs |
| All CVEs | Appears in both top 50 | 2 |
| Appears in both top 50 (last 10 years) | 3 | |
| KEV Catalog | Appears in both top 50 | 6 |
| Appears in both top 10 | 1 |
And here’s a summary of our look at other indicators:
| KEV Catalog | Top 50 exploited | |
| CVSSv3 (9.0+) | 28% | 38% |
| CVSS (9.0+) | 36% | 52% |
| Allows for RCE | 45% | 66% |
All of this analysis provides a clear answer to our original question—the most regularly exploited CVEs aren’t the most talked about. Additional work highlights that monitoring variables like RCE can help with prioritization.
For illustrative purposes we’ve only looked at a few indicators that could be used to prioritize CVEs. While some did better than others, we don’t recommend relying on a single variable in making decisions about vulnerability management. Creating an approach that folds in multiple indicators is a far better strategy when it comes to real-world application of this data. And while our findings here speak to the larger picture, every network is different.
Regardless of which list they appear on, be it Successful Exploitations or Chatter Count, it’s important to point out that all these vulnerabilities are serious. Just because Hafnium has more talk than Heartbleed doesn’t make it any less dangerous if you have assets that are vulnerable to it. The fact is that while CVEs with more talk didn’t make the top of the exploitation list, they still managed to rack up tens of thousands of successful exploitations.
It’s important to know how to prioritize security updates, fixing those that expose you to the most risk as soon as possible. From our perspective, here are some basic elements in the Cisco Secure portfolio that can help.
Kenna Security, a pioneer in risk-based vulnerability management, relies on threat intel and prioritization to keep security and IT teams focused on risks. Using data science, Kenna processes and analyzes 18+ threat and exploit intelligence feeds, and 12.7+ billion managed vulnerabilities to give you an accurate view of your company’s risk. With our risk scoring and remediation intelligence, you get the info you need to make truly data-driven remediation decisions.
To responsibly protect a network, it’s important to monitor all assets that connect to it and ensure they’re kept up to date. Duo Device Trust can check the patch level of devices for you before they’re granted access to connect to corporate applications or sensitive data. You can even block access and enable self-remediation for devices that are found to be non-compliant.
How about remote workers? By leveraging the Network Visibility Module in Cisco Secure Client as a telemetry source, Cisco Secure Cloud Analytics can capture endpoint-specific user and device context to supply visibility into remote worker endpoint status. This can bolster an organization’s security posture by providing visibility on remote employees that are running software versions with vulnerabilities that need patching.
Lastly, for some “lateral thinking” about vulnerability management, take a look at this short video of one of our Advisory CISOs, Wolfgang Goerlich. Especially if you’re a fan of the music of the 1920s…
We’d love to hear what you think. Ask a Question, Comment Below, and Stay Connected with Cisco Secure on social!
Cisco Secure Social Channels
In part one of this issue of our Black Hat USA NOC (Network Operations Center) blog, you will find:
Adapt and Overcome, by Jessica Bair Oppenheimer
In technology, we plan as best as we can, execute tactically with the resources and knowledge we have at the time, focus on the strategic mission, adjust as the circumstances require, collaborate, and improve; with transparency and humility. In short, we adapt and we overcome. This is the only way a community can have trust and grow, together. Every deployment comes with its challenges and Black Hat USA 2022 was no exception. Looking at the three Ps (people, process, platform), flexibility, communication, and an awesome Cisco platform allowed us to build and roll with the changes and challenges in the network. I am proud of the Cisco Meraki and Secure team members and our NOC partners.
The Buck Stops Here. Full stop. I heard a comment that the Wi-Fi service in the Expo Hall was “the worst I’ve ever experienced at a conference.” There were a lot of complaints about the Black Hat USA 2022 Wi-Fi network in the Expo Hall on 10 August. I also heard a lot of compliments about the network. Despite that the Wi-Fi and wired network was generally very good the most of the conference, and before my awesome colleagues share the many successes of designing, building, securing, managing, automating and tearing down one of the most hostile networks on Earth; I want to address where and how we adapted and what we did to fix the issues that arose, as we built an evolving, enterprise class network in a week.
![]()
First, a little history of how Cisco came to be the Official Network Provider of Black Hat USA 2022, after we were already successfully serving as the Official Mobile Device Management, Malware Analysis and Domain Name Service Provider. An Official Provider, as a Premium Partner, is not a sponsorship and no company can buy their way into the NOC for any amount of money. From the beginning of Black Hat 25 years ago, volunteers built the network for the conference rather than using the hotel network. This continues today, with the staff of Black Hat hand selecting trusted partners to build and secure the network.
After stepping up to help Black Hat with the network at Black Hat Asia, we had only two and a half months until Black Hat USA, in Las Vegas, 6-11 August 2022. Cisco was invited to build and secure the network for the much larger Black Hat USA flagship conference, affectionally known as ‘Hacker Summer Camp’, as the Official Network Equipment Provider. There were few other options, given the short timeframe to plan, supply chain difficulties in procuring the networking gear and assembling a team of network engineers, to join the Cisco Secure engineers and threat hunters. All the work, effort and loaned equipment were a gift from Cisco Meraki and Cisco Secure to the community.
![]()
We were proud to collaborate with NOC partners Gigamon, IronNet, Lumen, NetWitness and Palo Alto Networks; and work with Neil ‘Grifter’ Wyler, Bart Stump, Steve Fink and James Pope of Black Hat. We built strong bonds of familial ties over the years of challenges and joint successes. I encourage you to watch the replay of the Black Hat session An Inside Look at Defending the Black Hat Network with Bart and Grifter.
![]()
In June 2022, adjacent to Cisco Live Americas, the NOC partners met with Black Hat to plan the network. Cisco Meraki already donated 45 access points (APs), seven MS switches, and two Meraki MX security and SD-WAN appliances to Black Hat, for regional conferences.
I looked at the equipment list from 2019, that was documented in the Bart and Grifter presentation, and estimated we needed to source an additional 150 Cisco Meraki MR AP (with brackets and tripods) and 70+ Cisco Meraki MS switches to build the Black Hat USA network in just a few weeks. I wanted to be prepared for any changes or new requirements on-site. We turned to JW McIntire, who leads the network operations for Cisco Live and Cisco Impact. JW was enthusiastically supportive in helping identify the equipment within the Cisco Global Events inventory and giving his approval to utilize the equipment. A full thanks to those who made this possible is in the Acknowledgements below.
Over the week-long conference, we used all but three of the switches and all the APs.
![]()
We worked off the draft floor plans from 13 June 2022, for the training rooms, briefing rooms, support rooms, keynote rooms, conference public areas, registration, and of course the Expo Hall: over two million square feet of venue. We received updated plans for the training rooms, Expo Hall and support needs 12 days before we arrived on site. There were about 60 training rooms planned, each requiring their own SSID and Virtual Local Area Network, without host isolation. The ‘most access possible’ was the requirement, to use real world malware and attacks, without attacking other classrooms, attendees, sponsors or the rest of the world. Many of the training rooms changed again nine days before the start of the network build, as the number confirmed students rose or fell, we adjusted the AP assignments.
For switching allocation, we could not plan until we arrived onsite, to assess the conference needs and the placement of the cables in the walls of the conference center. The Black Hat USA network requires that every switch be replaced, so we always have full control of the network. Every network drop to place an AP and put the other end of a cable into the new switches in the closets costs Black Hat a lot of money. It also requires the time of ‘Doc’ – the lead network engineer at the Mandalay Bay, to whom we are all deeply grateful.
![]()
The most important mission of the NOC is Access, then Security, Visibility, Automation, etc. People pay thousands of dollars to attend the trainings and the briefings; and sponsors pay tens of thousands for their booth space. They need Access to have a successful conference experience.
With that background, let’s discuss the Wi-Fi in the Expo Hall. Cisco has a service to help customers do a methodical predictive survey of their space for the best allocation of their resources. We had 74 of the modern MR57 APs for the conference and prioritized their assignment in the Expo Hall and Registration. Specifications for MR57s include a 6 GHz 4×4:4, 5 GHz 4×4:4 and 2.4 GHz 4×4:4 radio to offer a combined tri–radio aggregate frame rate of 8.35 Gbps, with up to 4,804 Mbps in 6GHz band, 2,402 Mbps 5 GHz band and, 1,147 Mbps / 574 Mbps in the 2.4 GHz band based on 40MHz / 20MHz configuration. Technologies like transmit beamforming and enhanced receive sensitivity allow the MR57 to support a higher client density than typical enterprise-class access points, resulting in better performance for more clients, from each AP.
![]()
We donated top of the line gear for use at Black Hat USA. So, what went wrong on the first day in the Expo Hall? The survey came back with the following map and suggestions of 34 MR57s in the locations below. Many assumptions were made in pre-planning, since we did not know the shapes, sizes and materials of the booths that would be present inside the allocated spaces. We added an AP in the Arsenal Lab on the far-left side, after discussing the needs with Black Hat NOC leadership.
![]()
In the Entrance area (Bayside Foyer) of the Expo Hall (bottom of the map), you can see that coverage drops. There were four MR57s placed in the Bayside Foyer for iPad Registration and attendee Wi-Fi, so they could access their emails and obtain their QR code for scanning and badge printing.
I believed that would be sufficient and we allocated other APs to the rest of the conference areas. We had positive reports on coverage in most areas of the rest of the conference. When there were reported issues, we quickly deployed Cisco Meraki engineers or NOC technical associates. to confirm and were able to make changes in radio strength, broadcasting bands, SSIDs, etc. to fine tune the network. All while managing a large amount of new or changing network requirements, as the show expanded due to its success and was fully hybrid, with the increased streaming of the sponsored sessions, briefings and keynotes and remote Registration areas in hotels.
As the attendees queued up in mass outside of the Expo Hall on the morning of 10 August, the number of attendee devices connecting to the four MR57s in the foyer grew into the thousands. This degraded the performance of the Registration network. We adjusted by making the APs closest to the registration iPads only dedicated to the Registration. This fixed Registration lag but reduced the performance of the network for the attendees, as they waited to rush into the Expo Hall. From the site survey map, it is clear that the replacement APs were now needed in the Entrance for a connected mesh network, as you entered the Expo Hall from the Bayside foyer. Here lies Lesson 1: expected people flow should be taken into account in the RF design process.
Another challenge the morning of the Expo Hall opening was that five of the 57MRs inside were not yet connected to the Internet when it opened at 10am. The APs were installed three days earlier, then placed up on tripods the afternoon prior. However, the volume of newly requested network additions, to support the expanded hybrid element required the deployment of extra cables and switches. This cascaded down and delayed the conference center team from finalizing the Expo Hall line drops until into the afternoon. Lesson 2: Layer 1 is still king; without it, no Wi-Fi or power.
A major concern for the sponsors in their booths was that as the Expo Hall filled with excited attendees, the connectivity of the 900+ iOS devices used for lead management dropped. Part of this congestion was thousands of 2.4Ghz devices connected to the Expo Hall network. We monitored this and pushed as many as possible to 5Ghz, to relieve pressure on those airwaves. Lesson 3: With Wi-Fi 6e now available in certain countries, clean spectrum awaits, but our devices need to come along as well.
We also adjusted in the Cisco Meraki Systems Manager Mobile Device Management, to allow the iPhones for scanning to connect securely to the Mandalay Bay conference network, while still protecting your personal information with Cisco SecureX, Security Connector and Umbrella DNS, to ensure access as we expanded the network capacity in the Expo Hall. Lesson 4: Extreme security by default where you can control the end point. Do not compromise when dealing with PPI.
![]()
Using the Cisco Meraki dashboard access point location heat map and the health status of the network, we identified three places in the front of the Expo Hall to deploy additional drops with the Mandalay Bay network team. Since adding network drops takes some time (and costs Black Hat extra money), we took immediate steps to deploy more MS120 switches and eight additional APs at hot spots inside the Expo Hall with the densest client traffic, at no expense to Black Hat. Lesson 5: Footfall is not only about sales analytics. It does play a role into RF planning. Thereby, allowing for a data-driven design decision.
![]()
Above is the heat map of the conference Expo Hall at noon on 11 August. You can see the extra APs at the Entrance of the Expo Hall, connected by the three drops set up by the Mandalay Bay to the Cisco Meraki switches in the closets. Also, you can see the clusters of APs connected to the extra MS120 switches. At the same time, our lead Meraki engineer, Evan Basta, did a speed test from the center left of the Expo Hall.
![]()
As I am sharing lessons learned, I want to provide visibility to another situation encountered. On the afternoon of 9 August, the last day of training, a Black Hat attendee walked the hallways outside several training rooms and deliberately attacked the network, causing students and instructors not to be able to connect to their classes. The training rooms have host isolation removed and we designed the network to provide as much safe access as possible. The attacker took advantage of this openness, spoofed the SSIDs of the many training rooms and launched malicious attacks against the network.
![]()
We must allow real malware on the network for training, demonstrations and briefing sessions; while protecting the attendees from attack within the network from their fellow attendees and prevent bad actors from using the network to attack the Internet. It is a critical balance to ensure everyone has a safe experience, while still being able to learn from real world malware, vulnerabilities and malicious websites.
![]()
The attack vector was identified by a joint investigation of the NOC teams, initiated by the Cisco Meraki Air Marshal review. Note the exact same MAC addresses of the spoofed SSIDs and malicious broadcasts. A network protection measure was suggested by the Cisco Meraki engineering team to the NOC leadership. Permission was granted to test on one classroom, to confirm it stopped the attack, while not also disrupting the training. Lesson 6: The network-as-a-sensor will help mitigate issues but will not fix the human element.
Once confirmed, the measure was implemented network wide to return resiliency and access. The NOC team continued the investigation on the spoofed MAC addresses, using syslogs, firewall logs, etc. and identified the likely app and device used. An automated security alerting workflow was put in place to quickly identify if the attacker resumed/returned, so physical security could also intervene to revoke the badge and eject the attacker from the conference for violation of the Black Hat code of conduct.
I am grateful to the 20+ Cisco engineers, plus Talos Threat Hunters, deployed to the Mandalay Bay Convention Center, from the United States, Canada, Qatar and United Kingdom who made the Cisco contributions to the Black Hat USA 2022 NOC possible. I hope you will read on, to learn more lessons learned about the network and the part two blog about Cisco Secure in the NOC
Building the Hacker Summer Camp Network, by Evan Basta
It was the challenge of my career to take on the role of the lead network engineer for Black Hat USA. The lead engineer, who I replaced, was unable to travel from Singapore, just notifying us two weeks before we were scheduled to deploy to Las Vegas.
We prepared as much as possible before arrival, using the floor plans and the inventory of equipment that was ordered and on its way from the warehouse. We met with the Black Hat NOC leadership, partners and Mandalay Bay network engineers weekly on conference calls, adjusted what we could and then went to Black Hat, ready for a rapidly changing environment.
Our team was able to remain flexible and meet all the Black Hat requests that came in, thanks to the ability of the Cisco Meraki dashboard to manage the APs and switches from the cloud. Often, we were configuring the AP or switch as it was being transported to the location of the new network segment, laptop in hand.
![]()
For the construction of the Black Hat network, let’s start with availability. Registration and training rooms had priority for connectivity. iPads and iPhones needed secure connectivity to scan QR codes of registering attendees. Badge printers needed hardline access to the registration system. Training rooms all needed their separate wireless networks, for a safe sandbox for network defense and attack. Thousands of attendees attended, ready to download and upload terabytes of data through the main conference wireless network. All the keynotes, briefings and sponsored sessions needed to be recorded and streamed. Below are all the APs stacked up for assignment, including those assigned to the Expo Hall in the foreground.
![]()
All this connectivity was provided by Cisco Meraki access points and switches along with integrations into SecureX, Umbrella, and other Cisco platforms. We fielded a literal army of engineers to stand up the network in six days.
![]()
Let’s talk security and visibility. For a few days, the Black Hat network is one of the most hostile in the world. Attendees learn new exploits, download new tools, and are encouraged to test them out. Being able to drill down on attendee connection details and traffic was instrumental in ensuring attendees followed the Black Hat code of conduct.
On the wireless front, we made extensive use of our Radio Profiles to reduce interference by tuning power and channel settings. We enabled band steering to get more clients on the 5GHz bands versus 2.4GHz and watched the Location Heatmap like a hawk looking for hotspots and dead areas. Handling the barrage of wireless change requests – enable or disabling this SSID, moving VLANs (Virtual Local Area Networks), enabling tunneling for host isolation on the general conference Wi-Fi, mitigating attacks – was a snap with the Cisco Meraki Dashboard.
Floor Plan and Location Heatmap
On the first day of NOC setup, the Cisco team worked with the Mandalay Bay networking engineers to deploy core switches and map out the switches for the closets, according to the number of cables coming in from the training and briefing rooms. The floor plans in PDF were uploaded into the Meraki Dashboard; and with a little fine tuning, aligned perfectly with the Google Map.
Cisco Meraki APs were then placed physically in the venue meeting and training rooms. Having the APs named, as mentioned above, made this an easy task. This enabled accurate heatmap capability.
![]()
The Location Heatmap provided the capability to drill into the four levels of the conference, including the Expo Hall, lower level (North Conference Center), 2nd Floor and 3rd Floor. Below is the view of the entire conference.
![]()
Network Visibility
We were able to monitor the number of connected clients, network usage, the people passing by the network and location analytics, throughout the conference days. We provided visibility access to the Black Hat NOC management and the technology partners, along with full API (Application Programming Interface) access, so they could integrate with the network platform.
![]()
![]()
Alerts
Cisco Meraki alerts provide notification when something happens in the Dashboard. Default behavior is to be emailed when something happens. Obviously, emails got lost in the noise, at Black Hat Asia 2022, we made a web hook in Cisco SecureX orchestration to be able to consume Cisco Meraki alerts and send it to Slack (the messaging platform within the Black Hat NOC), using the native template in the Cisco Meraki Dashboard.
The alert kicked off if an AP or a switch lost connectivity. At Black Hat USA, we modified this to text alerts, as these were a priority. In the following example, we knew at the audio-visual team unplugged a switch to move it and were able to deploy technical associates from the NOC to ensure it was reconnected properly.
![]()
The Cisco Stack’s Potential in Action, by Paul Fidler
As we planned for Black Hat USA, the number of iOS devices to manage and protect rose from 300+ to over 900, and finally over 1,000.
![]()
The first amongst these was the use of the Cisco Meraki API. We were able to import the list of MAC addresses of the Cisco Meraki APs, to ensure that the APs were named appropriately and tagged, using a single source of truth document shared with the NOC management and partners, with the ability to update en masse at any time. Over three quarters of the AP configuration was able to be completed before arriving on site.
![]()
Meraki Systems Manager – Initial device enrollment and provisioning
We’ll start with the positive: When it comes to creating the design to manage X number of devices, it doesn’t matter if it’s 10 devices, or 10,000… And this was certainly true for Black Hat. The requirements were straightforward:
All this configuration was done ahead of time in the Meraki Dashboard, almost a month before the conference.
Now the negatives: Of all the events that the company who supplies the devices attends; Black Hat is the only one where devices are managed. Using mass deployment techniques like Apple’s Automated Device Enrollment, therefore, is not used. The company pre-stages the devices using Apple Configurator, which allows for both Supervision and Enrollment.
![]()
![]()
It became more difficult: Whilst the pre-staged devices were fine (other than having to handle all 1,000+ devices to turn Wi-Fi to Autojoin and opening the Meraki Systems Manager app [to give us Jailbreak and Location visibility]), an extra 100 devices were supplied that were not enrolled. As these devices were enrolled elsewhere from the prior Black Hat conferences, a team of around 10 people pitched in to restore each device, adding the Wi-Fi profile and then enrollment.
Fortunately, Apple Configurator can create Blueprints:
A Blueprint is essential a list of actions, in a particular order, that Apple Configurator can run through autonomously
![]()
But why did it need a team of ten? There were several limitations:
However, the task was completed in around three hours, given the limitations! If there’s one lesson to learn from this: Use Apple’s Automated Device Enrollment.
Command vs Profile
One of the slight nuances of Apple Mobile Device Manager is the difference between a ‘command’ and ‘profile’. Within the Meraki Systems Manager dashboard, we don’t highlight the difference between the two. But it’s important to know. A ‘profile’ is something that remains on the device: If there’s a state change on the device, or the user attempts something, the profile is always on there. However, a ‘command’ is exactly that: It’s sent once, and if something changes in the future, then the command won’t have any effect.
So, why is this highlighted here? Well, in some instances, some apps weren’t pushed successfully: You’d see them on the device, but with a cloud icon next to them. The only way to resolve this would be to remove the app, and then repost it. But we were also using a Homepage Layout, which put various apps on various pages. Pushing the app would result in it appearing on the wrong page. To ensure a consistent user experience, we would push the homepage profile again to devices to take effect.
Meraki BSSID Geolocation
We’ve mentioned this before in past Black Hat events, but, given the scale of The Mandalay Bay, it’s important to circle back to this. GPS is notoriously unreliable in conference centers like this, but it was still important to know where devices are. Because we’d ensured the correct placement of the Access Points on the floor plan, and because Systems Manager was in the same organisation, it ensured that the devices reported their location accurately! If one were to ‘walk’ we could wipe it remotely to protect your personal details.
![]()
Protection of PPI (Protected Private Information)
When the conference Registration closed on the last day and the Business Hall Sponsors all returned their iPhones, we were able to remotely wipe all the devices, removing all attendee data, prior to returning to the device contractor.
APIs
As mentioned elsewhere in this blog, this was a conference of APIs. Just the sheer scale of the conference resulted in the use of APIs. Various API projects included:
From a Systems Manager perspective, there were:
Port Security, by Ryan MacLennan, Ian Redden and Paul Fidler
During the Cisco Meraki deployment, we had a requirement to shutdown ports as they went inactive to prevent malicious actors from removing an official device and plugging in theirs. This ability is not directly built into the Cisco Meraki dashboard, so we built a workflow for the Black Hat customer, using the Cisco Meraki API. To achieve this, we created a small python script that was hosted as an AWS (Amazon Web Services) Lambda function and listened for webhooks from the Cisco Meraki Dashboard when a port went down. Initially this did solve our issue, but it was not fast enough, about five minutes from the time the port went down/a cable was unplugged. This proof of concept laid the groundwork to make the system better. We migrated from using a webhook in the Cisco Meraki Dashboard to using syslogs. We also moved the script from Lambda to a local server. Now, a python script was scanning for syslogs from the switches and when it saw a port down log, it will immediately call out to the locally hosted python script that calls out to the Cisco Meraki API and disabled the port.
![]()
This challenge had many setbacks and iterations while it was being built. Before we settled on listening for syslogs, we tried using SNMP polling. After figuring out the information we needed to use, we found that trying to poll SNMP would not work because SNMP would not report the port being down if the switch to another device was fast enough. This led us to believe we might not be able to do what we needed in a timely manner. After some deliberation with fellow NOC members, we started working on a script to listen for the port down syslogs. This became the best solution and provided immediate results. The ports would be disabled within milliseconds of going downThe diagram below shows an example of what will happen: If the Workshop Trainer’s device is un-plugged and a Threat Actor tries to plug into their port, a syslog is sent from the Cisco Meraki switch to our internal server hosting the python listener. Once the python script gets the request, it sends an API call to the Cisco Meraki API gateway and the Cisco Meraki cloud then tells the switch to disable the port that went down very briefly.
![]()
However, what was apparent was that the script was working TOO well! As discussed, several times already in this blog, the needs of the conference were very dynamic, changing on a minute-by-minute basis. This was certainly true in Registration and with the Audio-Visual teams. We discovered quickly that legitimate devices were being unplugged and plugged in to various ports, even if just temporarily. Of course, the script was so quick that it disabled ports before the users in registration knew what was happening. This resulted in NOC staff having to re-enable ports. So, more development was done. The task? For a given network tag, show the status of all the ports of all the switches. Given the number of switches at the conference, tags were used to reduce the amount of data being brought back, so it was easier to read and manage.
Mapping Meraki Location Data with Python, by Christian Clausen
In the blog post we published after Black Hat Asia 2022, we provided details on how to collect Bluetooth and Wi-Fi scanning data from a Meraki organization, for long-term storage and analysis. This augmented the location data provided by the Meraki dashboard, which is limited to 24-hours. Of course, the Meraki dashboard does more than just provide location data based on Wi-Fi and Bluetooth scanning from the access points. It also provides a neat heatmap generated from this data. We decided to take our long-term data project a step further and see if we could generate our own heatmap based on the data collected from the Meraki Scanning API.
The Folium Python library “builds on the data wrangling strengths of the Python ecosystem and the mapping strengths of the leaflet.js library” to provide all kinds of useful mapping functions. We can take location data (longitude and latitude) and plot them on lots of built-in map tiles from the likes of OpenStreetMap, MapBox, Stamen, and more. Among the available Folium plugins is a class called “HeatMapWithTime.” We can use this to plot our Meraki location data and have the resulting map animate the client’s movements.
Step 1: Collect the data
During the previous conference, we used a Docker container containing a couple Flask endpoints connected via ngrok to collect the large amount of data coming from Meraki. We re-used the same application stack this time around, but moved it out from behind ngrok into our own DMZ with a public domain and TLS (Transport Layer Security) certificate, to avoid any bandwidth limitations. We ended up with over 40GB of JSON data for the conference week to give to Black Hat!
Step 2: Format the data
Folium’s HeatMapWithTime plugin requires a “list of lists of points of time.” What we wanted to do is generate an ordered dictionary in Python that is indexed by the timestamp. The data we received from the Meraki API was formatted into “apFloor” labels provided by the admin when the access points are placed. Within each “apFloor” is a list of “observations” that contain information about individual clients spotted by the AP scanners, during the scanning interval.
Here’s what the data looked like straight from the Meraki API, with some dummy values:
![]()
The “observations” list is what we wanted to parse. It contains lots of useful information, but what we wanted is MAC address, latitude and longitude numbers, and timestamp:
![]()
We used Python to iterate through the observations and to eliminate the data we did not use. After a lot of data wrangling, de-duplicating MAC addresses, and bucketizing the observations into 15-minute increments, the resulting data structure looks like this:
![]()
Now that the data is in a usable format, we can feed it into Folium and see what kind of map we get back!
Step 3: Creating the map
Folium is designed to project points onto a map tile. Map tiles can show satellite images, streets, or terrain, and are projected onto a globe. In our case, however, we want to use the blueprint of the conference center. Folium’s allows for an image’s overlay to be added, and the bounds of the image to be set by specifying the coordinates for the top-left and bottom-right corners of image. Luckily, we can get this from the Meraki dashboard.
![]()
This enabled us to overlay the floorplan image on the map. Unfortunately, the map tiles themselves limit the amount of zoom available to the map visualization. Lucky for us, we did not care about the map tile now that we have the floorplan image. We passed “None” as the map tile source and finally received our data visualization and saved the map as an HTML file for Black Hat leadership.
![]()
We opened the HTML file, and we had an auto-playing heatmap that lets us zoom at far in as we want:
![]()
Detail at 1:30pm PT, on 10 August 2022 below.
![]()
To improve this going forward, the logical next steps would be to insert the data into a database for the Black Hat conference organizers, for quick retrieval and map generation. We can then start looking at advanced use-cases in the NOC, such as tracking individual a MAC address that may be producing suspicious traffic, by cross-referencing data from other sources (Umbrella, NetWitness, etc.).
——————————————————————————————————
Network Recovery, by Jessica Bair Oppenheimer
Once the final session ended, the Expo Hall closed and the steaming switched off, dozens of conference associates, technical associates, Mandalay Bay engineers and Cisco staff spread out through two million square feet and numerous switching closets to recover the equipment for inventory and packing. It took less than four hours to tear down a network that was built and evolved 11 days prior. Matt Vander Horst made a custom app to scan in each item, separating equipment donated to Black Hat from that which needed to be returned to the warehouse for the next global Cisco event.
![]()
Adapt and overcome! Check out part two of this blog, Black Hat USA 2022 Continued: Innovation in the NOC.
Until then, thanks again to our Cisco Meraki engineers, pictured below with a MR57 access point.
![]()
Acknowledgements: Special thanks to the Cisco Meraki and Cisco Secure Black Hat NOC team.
Meraki Systems Manager: Paul Fidler (team leader), Paul Hasstedt and Kevin Carter
Meraki Network Engineering: Evan Basta (team leader), Gregory Michel, Richard Fung and CJ Ramsey
Network Design and Wireless Site Survey: Jeffry Handal, Humphrey Cheung, JW McIntire and Romulo Ferreira
Network Build/Tear Down: Dinkar Sharma, Ryan Maclennan, Ron Taylor and Leo Cruz
Critical support in sourcing and delivering the Meraki APs and switches: Lauren Frederick, Eric Goodwin, Isaac Flemate, Scott Pope and Morgan Mann
SecureX threat response, orchestration, device insights, custom integrations, and Malware Analytics: Ian Redden, Aditya Sankar, Ben Greenbaum, Matt Vander Horst and Robert Taylor
Umbrella DNS: Christian Clasen and Alejo Calaoagan
Talos Incident Response Threat Hunters: Jerzy ‘Yuri’ Kramarz and Michael Kelley
Also, to our NOC partners NetWitness (especially David Glover), Palo Alto Networks (especially Jason Reverri), Lumen, Gigamon, IronNet, and the entire Black Hat / Informa Tech staff (especially Grifter ‘Neil Wyler’, Bart Stump, Steve Fink, James Pope, Jess Stafford and Steve Oldenbourg).
Read Part 2:
Black Hat USA 2022 Continued: Innovation in the NOC
About Black Hat
For 25 years, Black Hat has provided attendees with the very latest in information security research, development, and trends. These high-profile global events and trainings are driven by the needs of the security community, striving to bring together the best minds in the industry. Black Hat inspires professionals at all career levels, encouraging growth and collaboration among academia, world-class researchers, and leaders in the public and private sectors. Black Hat Briefings and Trainings are held annually in the United States, Europe and USA. More information is available at: blackhat.com. Black Hat is brought to you by Informa Tech.
We’d love to hear what you think. Ask a Question, Comment Below, and Stay Connected with Cisco Secure on social!
Cisco Secure Social Channels
In part one of our Black Hat USA 2022 NOC blog, we discussed building the network with Meraki:
In this part two, we will discuss:
Cisco is a Premium Partner of the Black Hat NOC, and is the Official Wired & Wireless Network Equipment, Mobile Device Management, DNS (Domain Name Service) and Malware Analysis Provider of Black Hat.
![]()
Black Hat USA is my favorite part of my professional life each year. We had an incredible staff of 20 Cisco engineers to build and secure the network. Also, for the first time, we had two Talos Threat Hunters from the Talos Incident Response (TIR) team, providing unique perspectives and skills to the attacks on the network. I really appreciated the close collaboration with the Palo Alto Networks and NetWitness team members. We created new integrations and the NOC continued to serve as an incubator for innovation.
We must allow real malware on the network for training, demonstrations, and briefing sessions; while protecting the attendees from attack within the network from their fellow attendees and prevent bad actors using the network to attack the Internet. It is a critical balance to ensure everyone has a safe experience, while still being able to learn from real world malware, vulnerabilities, and malicious websites. So, context is what really matters when investigating a potential attack and bringing so many technologies together in SecureX really accelerated investigation and response (when needed).
![]()
All the Black Hat network traffic was supported by Meraki switches and wireless access points, using the latest Meraki gear donated by Cisco. Our Meraki team was able to block people from the Black Hat network, when an investigation showed they did something in violation of the attendee Code of Conduct, upon review and approval by the Black Hat NOC leadership.
Cisco Secure provided all the domain name service (DNS) requests on the Black Hat network through Umbrella, whenever attendees wanted to connect to a website. If there is a specific DNS attack that threatened the conference, we supported Black Hat in blocking it to protect the network. However, by default, we allow and monitor DNS requests to malware, command and control, phishing, crypto mining, and other dangerous domains, which would be blocked in a production environment. That balance of allowing cybersecurity training and demos to occur, but ready to block when needed.
![]()
In addition to the Meraki networking gear, Cisco Secure also shipped an Umbrella DNS virtual appliance to Black Hat USA, for internal network visibility with redundancy. The Intel NUC containing the virtual appliance also contained the bridge to the NetWitness on-premises SIEM, custom developed by Ian Redden.
![]()
We also deployed the following cloud-based security software:
![]()
We analyzed files that were downloaded on the network, checking them for malicious behavior. When malware is downloaded, we confirm it is for a training, briefing or demonstration, and not the start of an attack on attendees.
![]()
During an investigation, we used SecureX to visualize the threat intelligence and related artifacts, correlating data. In the example below, an attacker was attempting remote code execution on the Registration Servers, alerted by the Palo Alto team, investigated by the NOC threat hunters, and blocked by order of the NOC leadership upon the results of the investigation.
![]()
Cisco Secure Threat Intelligence (correlated through SecureX)
Donated Partner Threat Intelligence (correlated through SecureX)
![]()
Open-Source Threat Intelligence (correlated through SecureX)
Continued Integrations from past Black Hat events
New Integrations Created at Black Hat USA 2022
The NOC partners, especially NetWitness and Palo Alto Networks, were so collaborative and we left Vegas with more ideas for future integration development
Creating Custom Meraki Dashboard Tiles for SecureX, by Matt Vander Horst
One of the biggest benefits of Cisco SecureX is its open architecture. Anyone can build integrations for SecureX if they can develop an API with the right endpoints that speak the right language. In the case of SecureX, the language is the Cisco Threat Intelligence Model (CTIM). As mentioned above, Cisco Meraki powered Black Hat USA 2022 by providing wired and wireless networking for the entire conference. This meant a lot of equipment and users to keep track of. To avoid having to switch between two different dashboards in the NOC, we decided to build a SecureX integration that would provide Meraki dashboard tiles directly into our single pane of glass: SecureX.
Building an integration for SecureX is simple: decide what functionality you want your integration to offer, build an internet-accessible API that offers those functions, and then add the integration to SecureX. At Black Hat, our Meraki integration supported two capabilities: health and dashboard. Here’s a summary of those capabilities and the API endpoints they expect:
| Capability | Description | API Endpoints |
| Health | Enables SecureX to make sure the module is reachable and working properly. | /health |
| Dashboard | Provides a list of available dashboard tiles and, after a tile is added to a dashboard, the tile data itself. | /tiles
/tile-data |
With our capabilities decided, we moved on to building the API for SecureX to talk to. SecureX doesn’t care how you build this API if it has the expected endpoints and speaks the right language. You could build a SecureX-compatible API directly into your product, as a serverless Amazon Web Services (AWS) Lambda, as a Python script with Django, and so on. To enable rapid development at Black Hat, we chose to build our integration API on an existing Ubuntu server in AWS running Apache and PHP.
After building the API framework on our AWS server, we had to decide which dashboard tiles to offer. Here’s what we ended up supporting:
| Tile Name | Description |
| Top Applications | Shows the top 10 applications by flow count |
| Client Statistics | Shows a summary of clients |
| Top SSIDs by Usage in GB | Shows the top 10 SSIDs by data usage in GB |
| Access Point Status | Shows a summary of access points |
Finally, once the API was up and running, we could add the integration to SecureX. To do this, you need to create a module definition and then push it to SecureX using its IROH-INT API. After the module is created, it appears in the Available Integration Modules section of SecureX and can be added. Here’s what our module looked like after being added to the Black Hat SecureX instance:
![]()
After adding our new tiles to the SecureX dashboard, SecureX would ask our API for data. The API we built would fetch the data from Meraki’s APIs, format the data from Meraki for SecureX, and then return the formatted data. Here’s the result:
![]()
These dashboard tiles gave us useful insights into what was going on in the Meraki network environment alongside our existing dashboard tiles for other products such as Cisco Secure Endpoint, Cisco Umbrella, Cisco Secure Malware Analytics, and so on.
If you want to learn more about building integrations with SecureX, check out these resources:
Talos Threat Hunting, by Jerzy ‘Yuri’ Kramarz and Michael Kelly
Black Hat USA 2022 was our first fully supported event, where we deployed an onsite threat hunting team from Talos Incident Response (TIR). Our colleagues and friends from various business units, connected by SecureX integration, granted us access to all the underlying consoles and API points to support the threat hunting efforts enhanced by Talos Intelligence.
![]()
The threat hunting team focused on answering three key hypothesis-driven questions and matched that with data modelling across all of the different technology stacks deployed in Black Hat NOC:
To answer the above hypothesis, our analysis started with understanding of how the network architecture is laid out and what kind of data access is granted to NOC. We quickly realized that our critical partners are key to extending visibility beyond Cisco deployed technologies. Great many thanks go to our friends from NetWitness and Palo Alto Networks for sharing full access to their technologies, to ensure that hunting did not stop on just Cisco kit and contextual intelligence could be gathered across different security products.
Daily threat hunt started with gathering data from Meraki API to identify IP and DNS level requests leaving the devices connected to wireless access points across entire conference. Although Meraki does not directly filter the traffic, we wanted to find signs of malicious activity such as DNS exfiltration attempts or connections to known and malicious domains which were not part of the class teaching. Given the level of access, we were then able to investigate network traffic capture associated with suspicious connections and check for suspected Command and Control (C2) points (there were a few from different threat actors!) or attempts to connect back to malicious DNS or Fast Flux domains which indicated that some of the attendee devices were indeed compromised with malware.
That said, this is to be expected given hostility of the network we were researching and the fact that classroom environments have users who can bring their own devices for hands-on labs. SecureX allowed us to quickly plot this internally to find specific hosts which were connecting and talking with malicious endpoints while also showing a number of additional datapoints which were useful for the investigation and hunting. Below is one such investigation, using SecureX threat response.
![]()
While looking at internal traffic, we have also found and plotted quite a few different port-scans running across the internal network. While not stopping these, it was interesting to see different tries and attempts by students to find ports and devices across networks. Good thing that network isolation was in place to prevent that! We blurred out the IP and MAC addresses in the image below.
![]()
Here is another example of really nice port scan clusters that were running across both internal and external networks we have found. This time it was the case of multiple hosts scanning each other and looking to discovery ports locally and across many of the Internet-based systems. All of that was part of the class but we had to verify that as it looked quite suspicious from the outset. Again, blurred picture for anonymity.
![]()
In a few instances, we also identified remarkably interesting clear-text LDAP traffic leaving the environment and giving a clear indicator of which organization the specific device belonged to simply because of the domain name which was requested in the cleartext. It was quite interesting to see that in 2022, we still have a lot of devices talking clear text protocols such as POP3, LDAP, HTTP or FTP, which are easy to subvert via Man-In-The-Middle type of attacks and can easily disclose the content of important messages such as email or server credentials. Below is an example of the plain text email attachments, visible in NetWitness and Cisco Secure Malware Analytics.
![]()
In terms of the external attacks, Log4J exploitation attempts were pretty much a daily occurrence on the infrastructure and applications used for attendee registration along with other typical web-based attacks such as SQL injections or path traversals. Overall, we saw a good number of port scans, floods, probes and all kind of web application exploitation attempts showing up daily, at various peak hours. Fortunately, all of them were successfully identified for context (is this part of a training class or demonstration) and contained (if appropriate) before causing any harm to external systems. Given the fact that we could intercept boundary traffic and investigate specific PCAP dumps, we used all these attacks to identify various command-and-control servers for which we also hunted internally to ensure that no internal system is compromised.
The final piece of the puzzle we looked to address, while threat hunting during Black Hat 2022, was automation to discover interesting investigation avenues. Both of us investigated a possibility of threat hunting using Jupyter playbooks to find outliers that warrant a closer look. We have created and developed a set of scripts which would gather the data from API endpoints and create a data frames which could be modeled for further analysis. This allowed us to quickly gather and filter out systems and connections which were not that interesting. Then, focus on specific hosts we should be checking across different technology stacks such as NetWitness and Palo Alto.
Unmistaken Identity, by Ben Greenbaum
An unusual aspect of the Black Hat NOC and associated security operations activities is that this is an intentionally hostile network. People come to learn new tricks and to conduct what would in any other circumstance be viewed rightfully as malicious, unwanted behavior. So, determining whether this is “acceptable” or “unacceptable” malicious behavior is an added step. Additionally, this is a heavily BYOD environment and while we do not want attendees attacking each other, or our infrastructure, there is a certain amount of suspicious or indicative behavior we may need to overlook to focus on higher priority alerts.
In short, there are broadly speaking 3 levels of security event at Black Hat:
When Umbrella alerted us (via a SecureX orchestration Webex workflow) of DNS requests for a domain involved in “Illegal Activity” it was reminiscent of an event at a previous conference where an attendee was caught using the conference network to download forged vaccination documents.
![]()
Using the Cisco Secure Malware Analytics platform’s phishing investigation tools, I loaded and explored the subject domain and found it to be a tool that generates and provides pseudo-randomized fake identities, customizable in various ways to match on demographics. Certainly, something that could be used for nefarious purposes, but is not illegal in and of itself. Physical security and access control is, however, also important at Black Hat, and if this activity was part of an effort to undermine that, then this was still a concern.
![]()
This is, however, also the kind of thing that gets taught at Black Hat…
Using the reported internal host IP from Umbrella, Meraki’s connection records, and the Meraki access point map, we were able to narrow the activity down to a specific classroom. Looking up what was being taught in that room, we were able to confirm that the activity was related to the course’s subject matter
![]()
Network owners and administrators, especially businesses, typically don’t want their network to be used for crimes. However, here at Black Hat what some would consider “crimes” is just “the curriculum”. This adds a layer of complexity to securing and protecting not just Black Hat, but also Black Hat attendees. In security operations, not every investigation leads to a smoking gun. At Black Hat, even when it does, you may find that the smoking gun was fired in a safe manner at an approved target range. Having the right tools on hand can help you make these determinations quickly and free you up to investigate the next potential threat.
25 Years of Black Hat – Musings from the show (and some DNS stats), by Alejo Calaoagan
Back in Singapore, I wrote about cloud app usage and the potential threat landscape surrounding them. My original plan at Black Hat USA was to dig deeper into this vector to see what interesting tidbits I could find on our attendee network. However, given that this was the 25th anniversary of Black Hat (and my 14th in total between Vegas, Singapore, and London), I’ve decided to pivot to talk about the show itself.
I think it’s safe to say, after two difficult pandemic years, Black Hat is back. Maybe it’s the fact that almost everyone has caught COVID by now (or that a lot of people just stopped caring). I caught it myself at RSA this year back in June, the first of consecutive summer super spread events (Cisco Live Vegas was the following week). Both of those shows were in the 15-18k attendee range, well below their pre-pandemic numbers. Black Hat USA 2022 was estimated at 27,000 attendees.
If I remember correctly, 2019 was in the 25-30K range. Last year in Vegas, there were ~3,000 people at the event, tops. 2021 in London, was even lower…it felt like there were less than 1,000 attendees. Things certainly picked up in Singapore (2-3k attendees), though that event doesn’t typically see attendee numbers as high as the other locations. All in all, while the pandemic certainly isn’t over, Las Vegas gave glimpses of what things were like before the “Rona” took over our lives.
![]()
The show floor was certainly back to the norm, with swag flying off the countertops and lines for Nike sneaker and Lego giveaways wrapping around different booths. The smiles on people’s faces as they pitched, sold, hustled, and educated the masses reminded me how much I missed this level of engagement. RSA gave me this feeling as well, before COVID sidelined me midway through the show anyway.
Not everything was quite the same. The Black Hat party scene certainly is not what it used to be. There was no Rapid 7 rager this year or last, or a happy hour event thrown by a security company you’ve never heard of at every bar you walk by on the strip. There were still some good networking events here and there, and there were some awesomely random Vanilla Ice, Sugar Ray, and Smashmouth shows. For those of you familiar with Jeremiah Grossman’s annual Black Hat BJJ throwdown, that’s still, thankfully, a thing. Hopefully, in the coming years, some of that old awesomeness returns….
Enough reminiscing, here are our DNS numbers from the show:
![]()
From a sheer traffic perspective, this was the busiest Black Hat ever, with over 50 million DNS requests made…
![]()
Digging into these numbers, Umbrella observed over 1.3 million security events, including various types of malware across the attendee network. Our threat hunting team was busy all week!
We’ve also seen an increase in app usage at Black Hat:
In a real-world production environment, Umbrella can block unapproved or high-risk apps via DNS.
![]()
![]()
The increases in DNS traffic volume and Cloud App usage obviously mirrors Black Hat’s return to the center stage of security conferences, following two years of pandemic uncertainty. I’m hopeful that things will continue to trend in a positive direction leading up to London and, hopefully, we’ll see you all there.
——
Hats off to the entire NOC team. Check out Black Hat Europe in London, 5-8 December 2022!
![]()
Acknowledgements: Special thanks to the Cisco Meraki and Cisco Secure Black Hat NOC team.
SecureX threat response, orchestration, device insights, custom integrations and Malware Analytics: Ian Redden, Aditya Sankar, Ben Greenbaum, Matt Vander Horst and Robert Taylor
Umbrella DNS: Christian Clasen and Alejo Calaoagan
Talos Incident Response Threat Hunters: Jerzy ‘Yuri’ Kramarz and Michael Kelley
Meraki Systems Manager: Paul Fidler (team leader), Paul Hasstedt and Kevin Carter
Meraki Network Engineering: Evan Basta (team leader), Gregory Michel, Richard Fung and CJ Ramsey
Network Design and Wireless Site Survey: Jeffry Handal, Humphrey Cheung, JW McIntire and Romulo Ferreira
Network Build/Tear Down: Dinkar Sharma, Ryan Maclennan, Ron Taylor and Leo Cruz
Critical support in sourcing and delivering the Meraki APs and switches: Lauren Frederick, Eric Goodwin, Isaac Flemate, Scott Pope and Morgan Mann
Also, to our NOC partners NetWitness (especially David Glover), Palo Alto Networks (especially Jason Reverri), Lumen, Gigamon, IronNet, and the entire Black Hat / Informa Tech staff (especially Grifter ‘Neil Wyler’, Bart Stump, Steve Fink, James Pope, Jess Stafford and Steve Oldenbourg).
Read Part 1:
Black Hat USA 2022: Creating Hacker Summer Camp
About Black Hat
For 25 years, Black Hat has provided attendees with the very latest in information security research, development, and trends. These high-profile global events and trainings are driven by the needs of the security community, striving to bring together the best minds in the industry. Black Hat inspires professionals at all career levels, encouraging growth and collaboration among academia, world-class researchers, and leaders in the public and private sectors. Black Hat Briefings and Trainings are held annually in the United States, Europe and USA. More information is available at: blackhat.com. Black Hat is brought to you by Informa Tech.
We’d love to hear what you think. Ask a Question, Comment Below, and Stay Connected with Cisco Secure on social!
Cisco Secure Social Channels
Security tools are only as good as the intelligence and expertise that feeds them. We’re very fortunate to have our security technologies powered by Cisco Talos, one of the largest and most trusted threat intelligence groups in the world. Talos is comprised of highly skilled researchers, analysts, and engineers who provide industry-leading visibility, actionable intelligence, and vulnerability research to protect both our customers and the internet at large.
The Talos team serves as a crucial pillar of our innovation — alerting customers and the public to new threats and mitigation tactics, enabling us to quickly incorporate protection into our products, and stepping in to help organizations with incident response, threat hunting, compromise assessments and more. Talos can also be found securing large-scale events such as the Super Bowl, and working with government and law enforcement organizations across the globe to share intelligence.
With Cisco’s vast customer base and broad portfolio — from routers and switches to email and endpoints — Talos has visibility into worldwide telemetry. Once a threat is seen, whether it’s a phishing URL or an IP address hosting malware, detections are created and indicators of compromise are categorized and blocked across our Cisco Secure portfolio.
Talos also leverages its unique insights to help society as a whole better understand and combat the cyberattacks facing us daily. During the war in Ukraine, the group has taken on the additional task of defending over 30 critical infrastructure providers in the country by directly managing and monitoring their endpoint security.
The reality of security today is that organizations must be constantly ready to detect and contain both known and unknown threats, minimize impact, and keep business going no matter what happens in the cyber realm. In light of hybrid work, evolving network architectures, and increasingly insidious attacks, all organizations must also be prepared to rapidly recover if disaster strikes, and then emerge stronger. We refer to this as security resilience, and Talos plays a critical role in helping our customers achieve it.
For several years, our integrated, cloud-native Cisco SecureX platform has been delivering extended detection and response (XDR) capabilities and more. SecureX allows customers to aggregate, analyze, and act on intelligence from disparate sources for a coordinated response to cyber threats.
Through the SecureX platform, intelligence from Talos is combined with telemetry from our customers’ environments — including many third-party tools — to provide a more complete picture of what’s going on in the network. Additionally, built-in, automated response functionality helps to speed up and streamline mitigation. This way, potential attacks can be identified, prioritized, and remediated before they lead to major impact.
For XDR to be successful, it must not only aggregate data, but also make sense of it. Through combined insights from various resources, SecureX customers obtain the unified visibility and context needed to rapidly prioritize the right threats at the right time. With SecureX, security analysts spend up to 90 percent less time per incident.
One of Australia’s largest universities, Deakin University, needed to improve its outdated security posture and transition from ad hoc processes to a mature program. Its small security team sought an integrated solution to simplify and strengthen threat defense.
With a suite of Cisco security products integrated through SecureX, Deakin University was able to reduce the typical investigation and response time for a major threat down from over a week to just an hour. The university was also able to decrease its response time for malicious emails from an hour to as little as five minutes.
“The most important outcome that we have achieved so far is that security is now a trusted function.”
– Fadi Aljafari, Information Security and Risk Manager, Deakin University
Also in the education space, AzEduNet provides connectivity and online services to 1.5 million students and 150,000 teachers at 4,300 educational institutions in Azerbaijan. “We don’t have enough staff to monitor every entry point into our network and correlate all the information from our security solutions,” says Bahruz Ibrahimov, senior information security engineer at AzEduNet.
The organization therefore implemented Cisco SecureX to accelerate investigations and incident management, maximize operational efficiency with automated workflows, and decrease threat response time. With SecureX, AzEduNet has reduced its security incidents by 80 percent.
“The integration with all our Cisco Secure solutions and with other vendors saves us response and investigation time, as well as saving time for our engineers.”
– Bahruz Ibrahimov, Senior Information Security Engineer, AzEduNet
The sophistication of attackers and sheer number of threats out there today make it extremely challenging for most cybersecurity teams to effectively stay on top of alerts and recognize when something requires their immediate attention. According to a survey by ESG, 81 percent of organizations say their security operations have been affected by the cybersecurity skills shortage.
That’s why Talos employs hundreds of researchers around the globe — and around the clock — to collect and analyze massive amounts of threat data. The group uses the latest in machine learning logic and custom algorithms to distill the data into manageable, actionable intelligence.
“Make no mistake, this is a battle,” said Nick Biasini, head of outreach for Cisco Talos, who oversees a team of global threat hunters. “In order to keep up with the adversaries, you really need a deep technical understanding of how these threats are constructed and how the malware operates to quickly identify how it’s changing and evolving. Offense is easy, defense is hard.”
Earlier this year, we unveiled our strategic vision for the Cisco Security Cloud to deliver end-to-end security across hybrid, multicloud environments. Talos will continue to play a pivotal role in our technology as we execute on this vision. In addition to driving protection in our products, Talos also offers more customized and hands-on expertise to customers when needed.
Cisco Talos Incident Response provides a full suite of proactive and emergency services to help organizations prepare for, respond to, and recover from a breach — 24 hours a day. Additionally, the recently released Talos Intel on Demand service delivers custom research unique to your organization, as well as direct access to Talos security analysts for increased awareness and confidence.
Visit our dedicated Cisco Talos web page to learn more about the group and the resources it offers to help keep global organizations cyber resilient. Then, discover how XDR helps Security Operations Center (SOC) teams hunt for, investigate, and remediate threats.
Watch video: What it means to be a threat hunter
We’d love to hear what you think. Ask a Question, Comment Below, and Stay Connected with Cisco Secure on social!
Cisco Secure Social Channels
With a rising number of cyberattacks targeting organizations, protecting sensitive customer information has never been more critical. The stakes are high due to the financial losses, reputational damage, legal & compliance fines, and more that often stem from mishandled data. At Cisco Secure, we recognize this and are continuously looking for ways to improve our information security practices.
As a result, we are excited to announce that we have achieved SOC 2 compliance for the Cisco Secure Endpoint solution, Cisco Malware Analytics, and the Cisco SecureX platform! SOC 2 is a compliance framework developed by the American Institute of Certified Public Accountants (AICPA) that helps ensure organizations responsibly handle customer data. This is done via strong information security practices that adhere to trust service criteria for security, availability, and confidentiality.
Achieving SOC 2 compliance means that we have adhered to these trust principles and gone through a rigorous audit by an independent, third-party firm to validate our information security practices. This shows that we are committed to safeguarding your sensitive data with robust controls in place and gives you the peace of mind that your data is in good hands. We have achieved SOC 2 Type 2 compliance for the following Cisco Secure products:
To learn more about SOC 2 compliance for these solutions, please speak to your Cisco representative, or visit the Cisco Trust Portal, where you can access the SOC 2 reports.
During our threat hunting exercises in recent months, we’ve started to observe a distinguishing pattern of msiexec.exe usage across different endpoints. As we drilled down to individual assets, we found traces of a recently discovered malware called Raspberry Robin. The RedCanary Research Team first coined the name for this malware in their blog post, and Sekoia published a Flash Report about the activity under the name of QNAP Worm. Both articles offer great analysis of the malware’s behavior. Our findings support and enrich prior research on the topic.
Raspberry Robin is a worm that spreads over an external drive. After initial infection, it downloads its payload through msiexec.exe from QNAP cloud accounts, executes its code through rundll32.exe, and establishes a command and control (C2) channel through TOR connections.
Let’s walkthrough the steps of the kill-chain to see how this malware functions.
Raspberry Robin is delivered through infected external disks. Once attached, cmd.exe tries to execute commands from a file within that disk. This file is either a .lnk file or a file with a specific naming pattern. Files with this pattern exhibit a 2 to 5 character name with an usually obscure extension, including .swy, .chk, .ico, .usb, .xml, and .cfg. Also, the attacker uses an excessive amount of whitespace/non printable characters and changing letter case to avoid string matching detection techniques. Example command lines include:
File sample for delivery can be found in this URL:
https://www.virustotal.com/gui/file/04c13e8b168b6f313745be4034db92bf725d47091a6985de9682b21588b8bcae/relations
Next, we observe explorer.exe running with an obscure command line argument, spawned by a previous instance of cmd.exe. This obscure argument seems to take the name of an infected external drive or .lnk file that was previously executed. Some of the samples had values including USB, USB DISK, or USB Drive, while some other samples had more specific names. On every instance of explorer.exe we see that the adversary is changing the letter case to avoid detection:
After delivery and initial execution, cmd.exe spawns msiexec.exe to download the Raspberry Robin payload. It uses -q or /q together with standard installation parameter to operate quietly. Once again, mixed case letters are used to bypass detection:
As you can see above, URLs used for payload download have a specific pattern. Domains use 2 to 4 character names with obscure TLDs including .xyz, .hk, .info, .pw, .cx, .me, and more. URL paths have a single directory with a random string 11 characters long, followed by hostname and the username of the victim. On network telemetry, we also observed the Windows Installer user agent due to the usage of msiexec.exe. To detect Raspberry Robin through its URL pattern, use this regex:
^http[s]{0,1}\:\/\/[a-zA-Z0-9]{2,4}\.[a-zA-Z0-9]{2,6}\:8080\/[a-zA-Z0-9]+\/.*?(?:-|\=|\?).*?$
If we look up the WHOIS information for given domains, we see domain registration dates going as far back as February 2015. We also see an increase on registered domains starting from September 2021, which aligns with initial observations of Raspberry Robin by our peers.
| WHOIS Creation Date | Count |
| 12/9/2015 | 1 |
| … | … |
| 10/8/2020 | 1 |
| 11/14/2020 | 1 |
| 7/3/2021 | 1 |
| 7/26/2021 | 2 |
| 9/11/2021 | 2 |
| 9/23/2021 | 9 |
| 9/24/2021 | 6 |
| 9/26/2021 | 4 |
| 9/27/2021 | 2 |
| 11/9/2021 | 3 |
| 11/10/2021 | 1 |
| 11/18/2021 | 2 |
| 11/21/2021 | 3 |
| 12/11/2021 | 7 |
| 12/31/2021 | 7 |
| 1/17/2022 | 6 |
| 1/30/2022 | 11 |
| 1/31/2022 | 3 |
| 4/17/2022 | 5 |
Table 1: Distribution of domain creation dates over time
Associated domains have SSL certificates with the subject alternative name of q74243532.myqnapcloud.com, which points out the underlying QNAP cloud infra. Also, their URL scan results return login pages to QTS service of QNAP:
Once the payload is downloaded, it is executed through various system binaries. First, rundll32.exe uses the ShellExec_RunDLL function from shell32.dll to leverage system binaries such as msiexec.exe, odbcconf.exe, or control.exe. These binaries are used to execute the payload stored in C:\ProgramData\[3 chars]\
It is followed by the execution of fodhelper.exe, which has the auto elevated bit set to true. It is often leveraged by adversaries in order to bypass User Account Control and execute additional commands with escalated privileges [3]. To monitor suspicious executions of fodhelper.exe, we suggest monitoring its instances without any command line arguments.
Raspberry Robin sets up its C2 channel through the additional execution of system binaries without any command line argument, which is quite unusual. That likely points to process injection given elevated privileges in previous steps of execution. It uses dllhost.exe, rundll32.exe, and regsvr32.exe to set up a TOR connection.
In Cisco Global Threat Alerts available through Cisco Secure Network Analytics and Cisco Secure Endpoint, we track this activity under the Raspberry Robin threat object. Image 3 shows a detection sample of Raspberry Robin:
Raspberry Robin tries to remain undetected through its use of system binaries, mixed letter case, TOR-based C2, and abuse of compromised QNAP accounts. Although we have similar intelligence gaps (how it infects external disks, what are its actions on objective) like our peers, we are continuously observing its activities.
| Type | Stage | IOC |
| Domain | Payload Delivery | k6j[.]pw |
| Domain | Payload Delivery | kjaj[.]top |
| Domain | Payload Delivery | v0[.]cx |
| Domain | Payload Delivery | zk4[.]me |
| Domain | Payload Delivery | zk5[.]co |
| Domain | Payload Delivery | 0dz[.]me |
| Domain | Payload Delivery | 0e[.]si |
| Domain | Payload Delivery | 5qw[.]pw |
| Domain | Payload Delivery | 6w[.]re |
| Domain | Payload Delivery | 6xj[.]xyz |
| Domain | Payload Delivery | aij[.]hk |
| Domain | Payload Delivery | b9[.]pm |
| Domain | Payload Delivery | glnj[.]nl |
| Domain | Payload Delivery | j4r[.]xyz |
| Domain | Payload Delivery | j68[.]info |
| Domain | Payload Delivery | j8[.]si |
| Domain | Payload Delivery | jjl[.]one |
| Domain | Payload Delivery | jzm[.]pw |
| Domain | Payload Delivery | k6c[.]org |
| Domain | Payload Delivery | kj1[.]xyz |
| Domain | Payload Delivery | kr4[.]xyz |
| Domain | Payload Delivery | l9b[.]org |
| Domain | Payload Delivery | lwip[.]re |
| Domain | Payload Delivery | mzjc[.]is |
| Domain | Payload Delivery | nt3[.]xyz |
| Domain | Payload Delivery | qmpo[.]art |
| Domain | Payload Delivery | tiua[.]uk |
| Domain | Payload Delivery | vn6[.]co |
| Domain | Payload Delivery | z7s[.]org |
| Domain | Payload Delivery | k5x[.]xyz |
| Domain | Payload Delivery | 6Y[.]rE |
| Domain | Payload Delivery | doem[.]Re |
| Domain | Payload Delivery | bpyo[.]IN |
| Domain | Payload Delivery | l5k[.]xYZ |
| Domain | Payload Delivery | uQW[.]fUTbOL |
| Domain | Payload Delivery | t7[.]Nz |
| Domain | Payload Delivery | 0t[.]yT |
Ransomware and other advanced attacks continue to evolve and threaten organizations around the world. Effectively defending your endpoints from these attacks can be a complex undertaking, and a seemingly endless number of security acronyms only compounds that complexity. There are so many acronyms – EPP, EDR, MEDR, MDR, XDR, and more – for various cybersecurity products and services that it becomes difficult to understand the differences between them and choose the right solution for your organization. Deciphering all these acronyms is a task on its own and deciding which solution works best for you is even more challenging.
We here at Cisco believe that understanding these acronyms and determining which security products or services are the best fit for your organization’s needs doesn’t have to be so hard. That’s why we developed this blog – the first in a series – to give you an overview of the different types of threat detection and response solutions.
This series will help you understand the benefits and disadvantages of each solution, the similarities and differences between these solutions, and how to identify the right solution for your organization. Now let’s go over the different types of security solutions.
There are several types of threat detection and response solutions, including:
These solutions are similar in that they all enable you to detect and respond to threats, but they differ by the environment(s) being monitored for threats, who conducts the monitoring, as well as how alerts are consolidated and correlated. For instance, certain solutions will only monitor your endpoints (EDR, MEDR) while others will monitor a broader environment (XDR, MDR). In addition, some of these solutions are actually managed services where a third-party monitors your environment (MEDR, MDR) versus solutions that you monitor and manage yourself (EDR, XDR).
When evaluating these solutions, keep in mind that there isn’t a single correct solution for every organization. This is because each organization has different needs, security maturities, resource levels, and goals. For example, deploying an EDR makes sense for an organization that currently has only a basic anti-virus solution, but this seems like table stakes to a company that already has a Security Operations Center (SOC).
That being said, there are a few questions you can ask yourself to find the cybersecurity solution that best fits your needs, including:
Of these questions, the most critical are about your security goals and current cybersecurity posture. For instance, organizations at the beginning of their security journey may want to look at an EDR or MEDR solution, while companies that are further along their journey are more likely to be interested in an XDR. Asking whether you already have or are willing to build out a SOC is another essential question. This will help you understand whether you should run your security yourself (EDR, XDR) or find a third-party to manage it for you (MEDR, MDR).
Asking whether you have or are willing to hire the right security talent is another critical question to pose. This will also help determine whether to manage your cybersecurity solution yourself or have a third-party run it for you. Finally, questions about visibility and context, alert, and security tool fatigue, as well as detection and response times will help you to decide if your current security stack is sufficient or if you need to deploy a next-generation solution such as an XDR.
These questions will help guide your decision-making process and give you the information you need to make an informed decision on your cybersecurity solution. For more details on the different endpoint security acronyms and how to determine the right solution for your organization, keep an eye out for the next blog in this series – Unscrambling Cybersecurity Acronyms: The ABCs of EDR and MEDR. Stay tuned!
We’d love to hear what you think. Ask a Question, Comment Below, and Stay Connected with Cisco Secure on social!
Cisco Secure Social Channels
Instagram
Facebook
Twitter
LinkedIn
We’re excited to announce Cisco Secure Client, formerly AnyConnect, as the new version of one of the most widely deployed security agents. As the unified security agent for Cisco Secure, it addresses common operational use cases applicable to Cisco Secure endpoint agents. Those who install Secure Client’s next-generation software will benefit from a shared user interface for tighter and simplified management of Cisco agents for endpoint security.
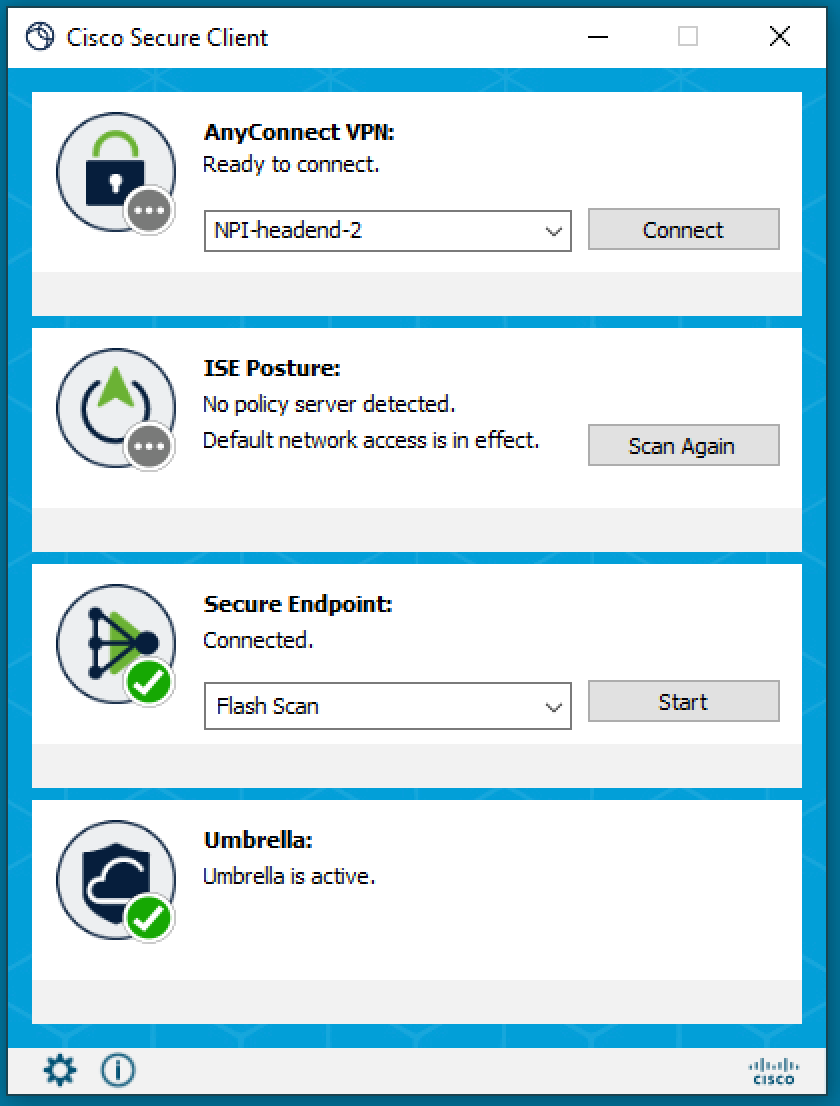
Now, with Secure Client, you gain improved secure remote access, a suite of modular security services, and a path for enabling Zero Trust Network Access (ZTNA) across the distributed network. The newest capability is in Secure Endpoint as a new module within the unified endpoint agent framework. Now you can harness Endpoint Detection & Response (EDR) from within Secure Client. You no longer need to deploy and manage Secure Client and Secure Endpoint as separate agents, making management more effortless on the backend.
Within Device Insights, Secure Client lets you deploy, update, and manage your agents from a new cloud management system inside SecureX. If you choose to use cloud management, Secure Client policy and deployment configuration are done in the Insights section of Cisco SecureX. Powerful visibility capabilities in SecureX Device Insights show which endpoints have Secure Client installed in addition to what module versions and profiles they are using.

The emphasis on interoperability of endpoint security agents helps provide the much-needed visibility and simplification across multiple Cisco security solutions while simultaneously reducing the complexity of managing multiple endpoints and agents. Application and data visibility is one of the top ways Secure Client can be an important part of an effective security resilience strategy.
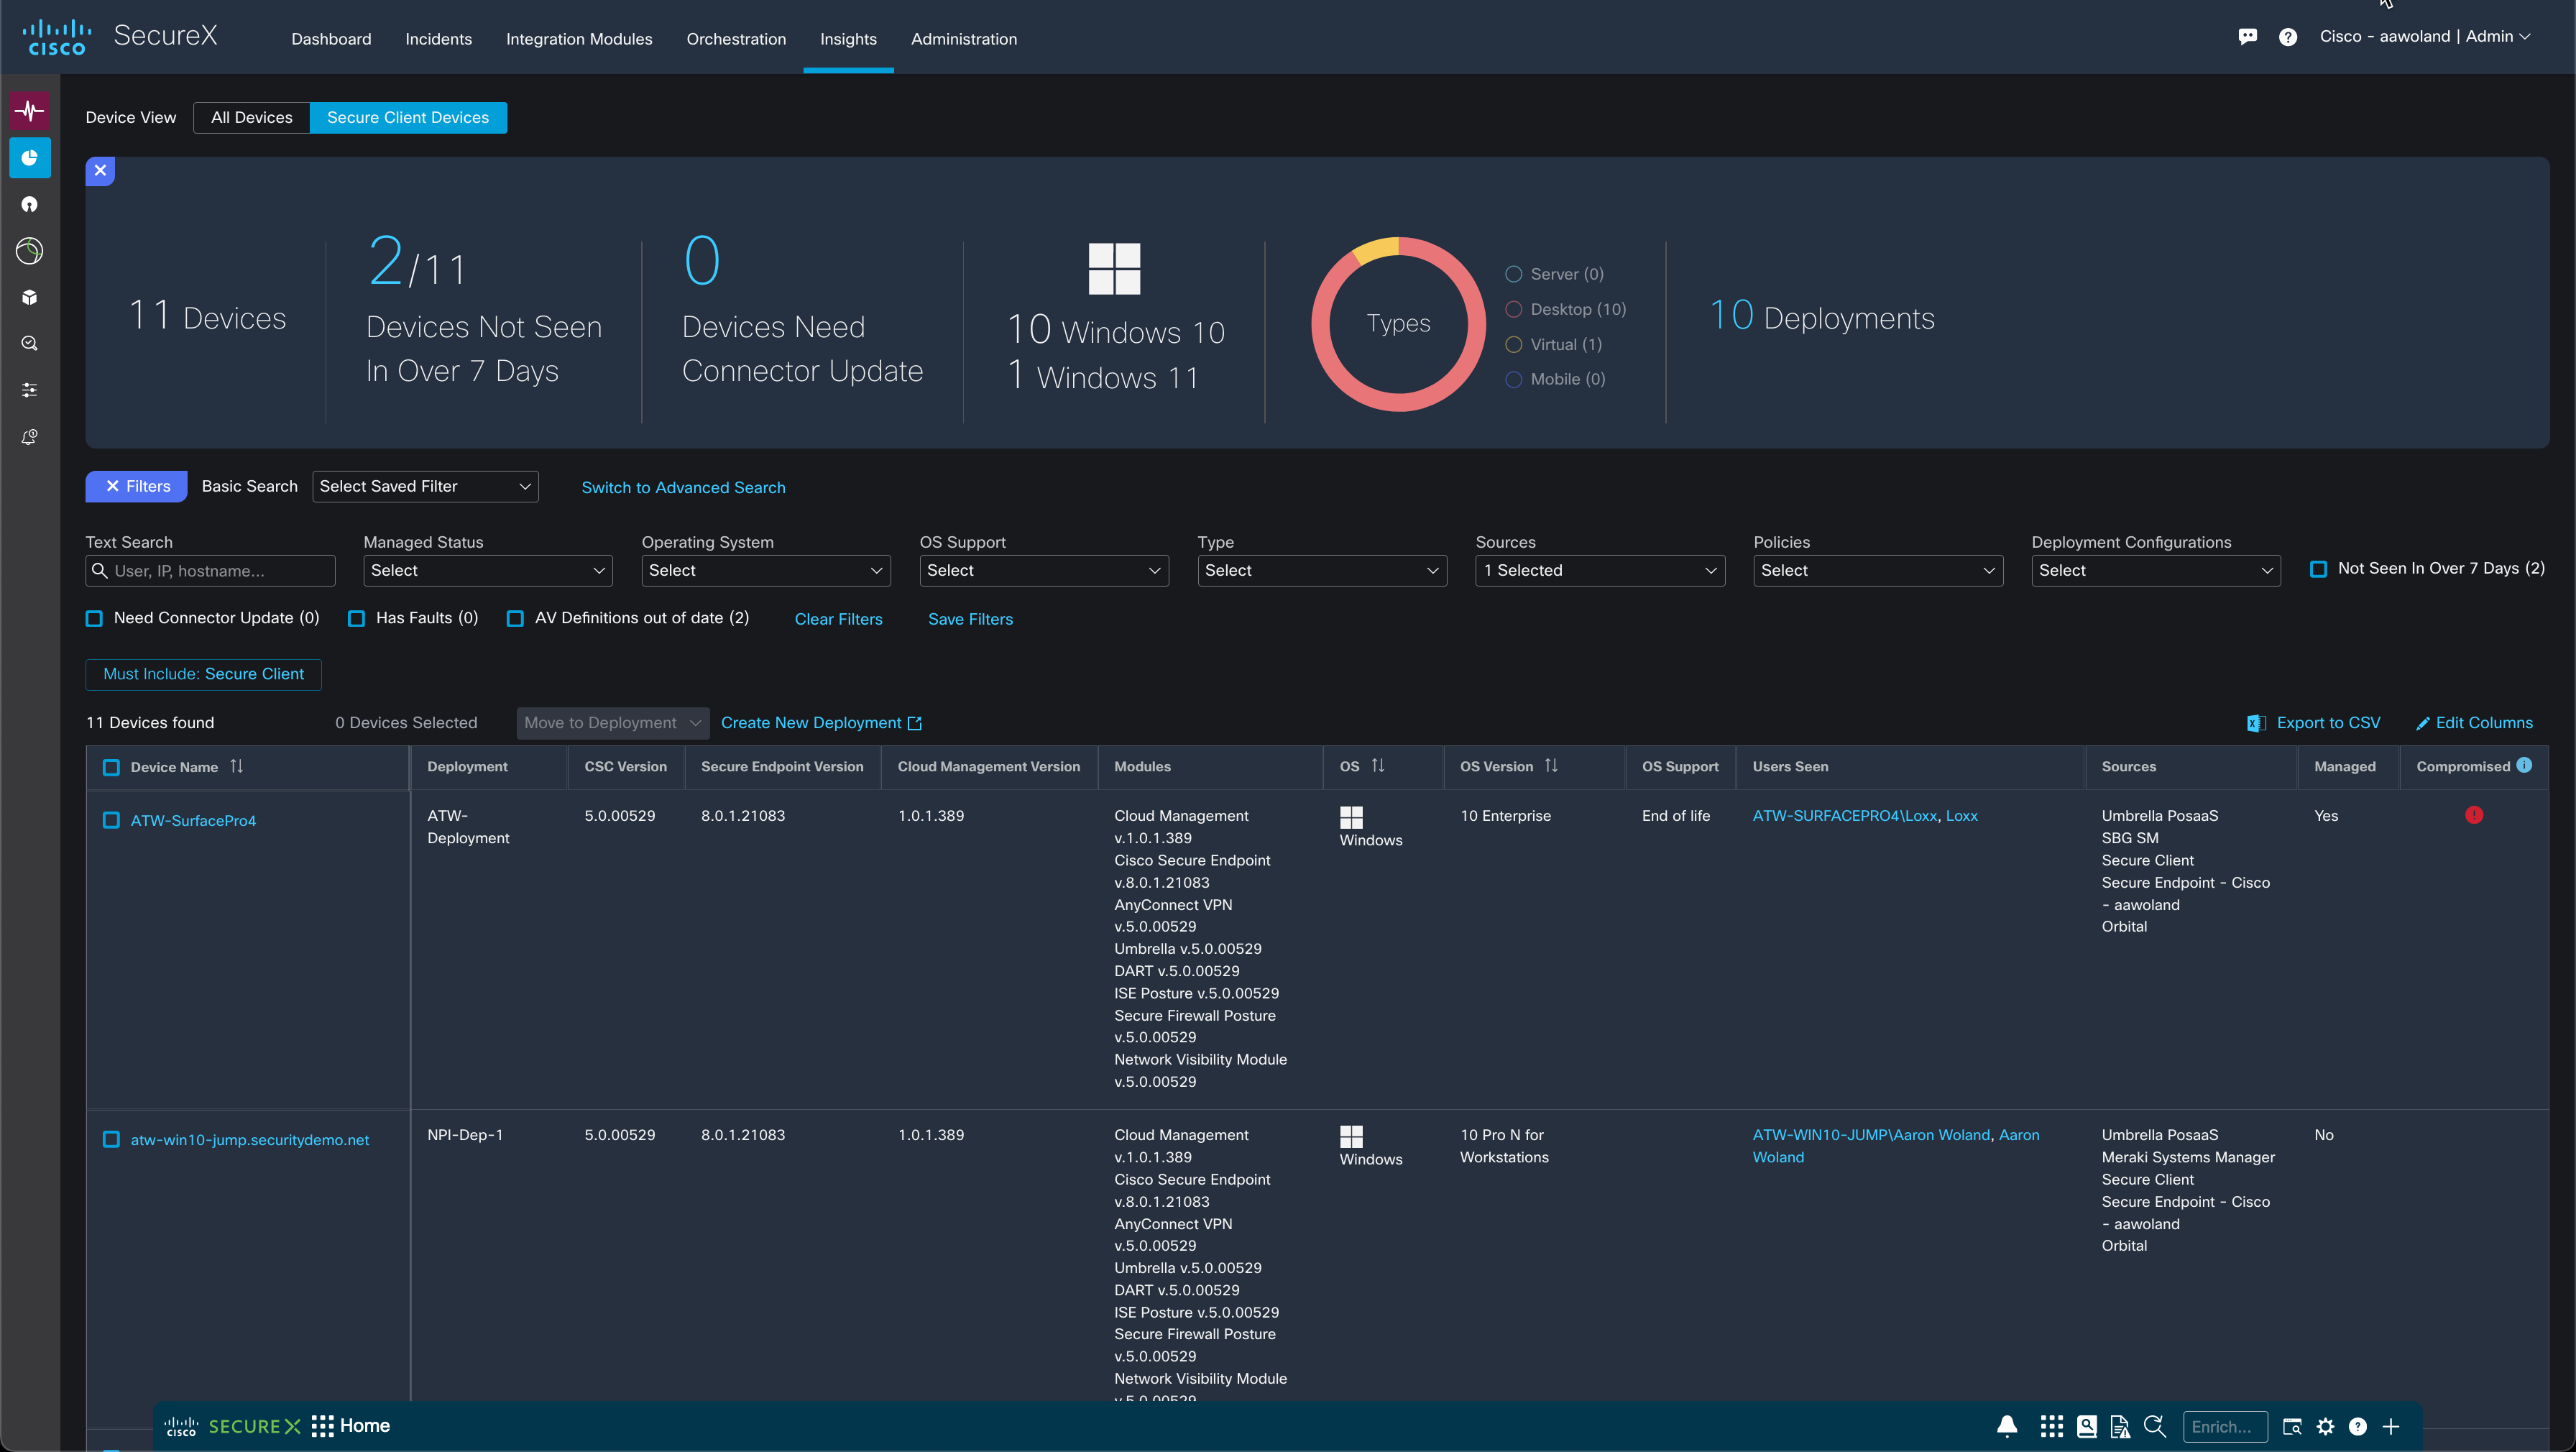
Visit our homepage to see how Secure Client can help your organization today.
We’d love to hear what you think. Ask a Question, Comment Below, and Stay Connected with Cisco Secure on social!
Cisco Secure Social Channels
Instagram
Facebook
Twitter
LinkedIn
We have entered a world where uncertainty has become the normal operating mode for everyone. Within this new frontier, cybersecurity has become even more challenging. However, some cybersecurity professionals have stood out, using their unique skills and resourcefulness to protect the integrity of their businesses, and to withstand unpredictable and dynamically changing threats. In the end, they, and their businesses have emerged even stronger.
These accomplishments have lead them to be selected from over more than 700 Cisco Cybersecurity Advocates – who are also members of Cisco Insider Advocates – to join the League of Cybersecurity Heroes.
Cisco Insider Advocates is a peer networking community developed several years ago for Cisco customers around the globe. Currently, over 14,000 customers are using it to share technology insights, feedback, and best practices, and also to make meaningful connections with others in the industry. We at Cisco believe that when we connect, anything is possible, and the Insider Advocacy program is a great example of the great things that can happen when people come together.
As the global CISO of Mediapro, Roberto has deployed Cisco SecureX together with Umbrella, Secure Endpoint, Secure Firewall, ISE, NGIP, Threat Response, AnyConnect, and Web security. With this partnership, Mediapro has reduced its threat detection time by 90%. In addition, they have seen no false positives in their threat detection alerts. It is rare to boast of a 100% success rate, but they can boldly make that pronouncement. All of this has also benefitted Mediapro financially by incurring zero fines for any compliance issues
What do music, cybersecurity, and teaching all have in common? They all culminate in a readiness to perform. Equally, they all require collaboration, comfort with the unexpected, and a passion for the job. Blair exemplifies the best of these traits, and in doing so, he provides inspiration and excellence to all with whom he interacts. Watching Blair at work makes one wonder if there are more hours granted to him during a day than the average person. He is a time-maximizer, spending most of that time in the service of others.
Too often, cybersecurity certifications are treated derisively by some of the very professionals who need them most. This is not the case with Kevin, who can list the many benefits of attaining certifications. Kevin’s desire to improve his knowledge doesn’t stop with technology and cybersecurity. He is an avid reader of anything that can raise him up to be better than he was the day before. With a career that started in the US Marine Corps, Kevin continues to learn and grow, all the while remaining as masterful at a computer keyboard as he is his with his traditional 55-gallon-barrel BBQ smoker and grill.
Steve is a Senior Cybersecurity and Network Architect at Lake Trust Credit Union. Like most organizations, Lake Trust has had to transition to a completely remote workforce quickly, and thanks to Secure Network Analytics, they were able to transition the employees to work remotely while maintaining the same high level of visibility and protection in place. Steve was the subject of a case study about the benefits that Cisco products have brought to Lake Trust Credit Unions’ customers. He is currently collaborating to update that information to share more of his knowledge.
Being the Head of Information Technology is never an easy job. However, when food manufacturer, Leng-d’Or, was faced with a challenge during the pandemic that could have interrupted its production line, quick thinking, skilled leadership, and a close partnership with Cisco all lead to positive outcomes, and helped them to pull through stronger than before. Part of this success comes from Enric’s distinct understanding of the threats, solutions, and processes needed to bring security to a higher level for the Leng-d’Or organization. Enric also shares his success story very freely, adding immeasurable benefits to the security community.
Cybersecurity is truly a global discipline. Tony Dous proves this by practicing his craft as a Senior Network Security Engineer in Cairo, Egypt. Tony’s involvement with the Cisco community shows how no distance is too far for a motivated cybersecurity professional.
When John Patrick is on the job, there is no longer any feeling that the criminals are one-step ahead of the good guys. He adopted Umbrella together with Meraki to develop a proactive security approach inside his organization. John Patrick created a more unified network from a patchwork of disparate entities. In doing so, he reduced the complexity within the environment. Complexity is so often responsible for security gaps, and John Patrick’s work not only corrected those gaps, but he brought people together in the process. He and his team received great feedback from the employees, who enjoyed a consistent network experience.
We often hear stories about teenagers who become enamored with technology, leading to the fulfillment of a dream. Amit Gumber became interested in cybersecurity at an early age, pursued his passion and has worked in the field ever since. His sense of advocacy is best described in his own words: “I’m quite passionate about sharing knowledge and ideas with peers and participating in collaborative activities.” Amit’s use of Cisco technologies has helped HCL Technologies to stabilize and secure their environment.
One of the most important factors for success is insatiable curiosity. Mark Healey is a continuous learner, and he is an example of someone who enthusiastically shares his knowledge. Whether it is on a personal level, or through his high engagement as part of the Cisco Insider Advocates community, or as an active member of the Internet Society, Mark is an evangelist and a positive voice for cybersecurity.
Wouter holds a special designation, not only as a member of the League of Cybersecurity Heroes, but also as the recipient of the “Cybersecurity Defender of the Year” award. Wouter is an active participant in the cybersecurity community, working with an almost evangelical zeal towards sharing the importance of holistic cybersecurity. His contributions stand out towards making the cyber realm a safer place.
It is often said that the job of a cybersecurity professional in an educational facility is especially challenging. When that facility happens to be the largest in an entire country, with over 4,000 schools and universities, the job of protecting it can seem insurmountable. At AzEduNet, in Azerbaijan, Bahruz and his team is tasked with securing the network for its 1.5 Million students. With Cisco Secure, the security team reduced security incidents by 80%. This not only ensures access for the students, but also keeps the data safe.
Many people want to enter the cybersecurity profession, but few have the dedication and perseverance to fully embrace the skillset required to meet that goal. Walther Noel not only had the desire to refocus his career, but he proved it by earning the CyberOps Associate Certification. His accomplishment is a prime example of how one can step outside of their comfort zone to grow and thrive.
Pascual demonstrates how important it is to make the most of the learning opportunities in Cisco Insiders Advocates. While already a successful NOC engineer, he sought to advance his professional development by studying cybersecurity. He passed the CCNA CyberOps 200-201 exam, moving him closer to propelling his career to even higher achievements.
One of the noblest expressions of knowledge is the desire to freely share that information. Inderdeep lives up to this ideal, offering his expertise to all with no expectations of reciprocity. His charitable spirit has not gone unnoticed, as he has been a previous award winner for Cisco IT Blogs, as well as a designation on the Feedspot top 100 Networking Blog.
Being the first to try a new technology can be a risky proposition. However, as a COO, risk calculations are in one’s blood. Luigi, along with the Sara Assicurazioni organization, hails as the first company in Italy to embrace cloud technology. As a company with more than one million customers, this was a bold initiative that required careful planning, keen insight, and above all, collaboration. In the end, this has resulted not only in a digital transformation, but a business transformation.
Whether it is a technical achievement, a personal triumph, or a spirit of helping others, each member of our League of Cybersecurity Heroes proves how technology and humanity can work together to accomplish the impossible. Congratulations to all of them!
We’d love to hear what you think. Ask a Question, Comment Below, and Stay Connected with Cisco Secure on social!
Cisco Secure Social Channels
Instagram
Facebook
Twitter
LinkedIn
A deep dive into the latest updates from Secure Network and Cloud Analytics that show Cisco’s leadership in the Security Industry.
![]()
The year 2022 has been rather hectic for many reasons, and as the World undergoes its various challenges and opportunities, We At Cisco Security have buckled up and focused on improving the World in the way which we know best: by making it more Secure.
In an increasingly vulnerable Internet environment, where attackers rapidly develop new techniques to compromise organizations around the world, ensuring a robust security infrastructure becomes ever more imperative. Across the Cisco Security Portfolio, Secure Network Analytics (SNA) and Secure Cloud Analytics (SCA) have continued to add value for their customers since their inception by innovating their products and enhancing their capabilities.
In the latest SNA 7.4.1 release, four core features have been added to target important milestones in our roadmap. As a first addition, SNA has widely expanded on its Data Store deployment options by introducing the single node Data Store; supporting existing Flow Collector (FC) and new Data Store expansion by the Manager; and the capacity to mix and match virtual and physical appliances to build a Data Store deployment.
The SNA Data Store started as a simple concept, and while it maintained its simplicity, it became increasingly more robust and performant over the recent releases. In essence, it represents a new and improved database architecture design that can be made up of virtual or physical appliances to provide industry leading horizontal scaling for telemetry and event retention for over a year. Additionally, the Flow Ingest from the Flow Collectors is now separate from the data storage, which allows them to now scale to 500K + Flows Per Second (FPS). With this new database design, are now optimized for performance, which has improved across all metrics by a considerable amount.
For the second major addition, SNA now supports multi-telemetry collection within a single deployment. Such data encompasses network telemetry, firewall logging, and remote worker telemetry. Now, Firewall logs can be stored on premises with the Data Store, making data available to the Firepower Management Center (FMC) via APIs to support remote queries. From the FMC, users can pivot directly to the Data Store interface and look at detailed events that optimize SecOps workflows, such as automatically filtering on events of interest.
On the topic of interfaces, users can now benefit from an intelligent viewer which provides all Firewall data. This feature allows to select custom timeframes, apply unique filters on Security Events, create custom views based on relevant subsets of data, visualize trends from summary reports, and finally to export any such view as a CSV format for archiving or further forensic investigations.
With respect to VPN telemetry, the AnyConnect Secure Mobility Client can now store all network traffic even if users are not using their VPN in the given moment. Once a VPN connection is restored, the data is then sent to the Flow Collector, and, with a Data Store deployment, off-network flow updates can bypass FC flow caches which allow NVM historical data to be stored correctly.
Continuing down the Data Store journey (and, what a journey indeed), users can now monitor and evaluate its performance in a simple and intuitive way. This is achieved with charts and trends directly available in the Manager, which can now support traditional non-Data Store FCs and one singular Data Store. The division of Flow Collectors is made possible by SNA Domains, where a Data Store Domain can be created, and new FCs added to it when desired. This comes as part of a series of robust enhancements to the Flow Collector, where the FC can now be made up of a single image (NetFlow + sFlow) and its image can be switched between the two options. As yet another perk of the new database design, any FC can send its data to the Data Store.
As it can be seen, the Data Store has been the star of the latest SNA release, and for obvious good reasons. Before coming to an ending though, it has one more feature up its sleeve: Converged Analytics. This SNA feature brings a simplified, intuitive and clear analytics experience to Secure Network Analytics users. It comes with out- of-the-box detections mapped to MITRE with clearly defined tactics and techniques, self-taught baselining and graduated alerting, and the ability to quiet non-relevant alerts, leading to more relevant detections.
This new Analytics feature is a strong step forward to give users the confidence of network security awareness thanks to an intuitive workflow and 43 new alerts. It also gives them a deep understanding of each alert with observations and mappings related to the industry-standard MITRE tactics and techniques. When you think it couldn’t get any better, the Secure Network and Cloud Analytics teams have worked hard to add even more value to this release, and ensured the same workflows, functionality and user experience could be further available in the SCA portal. Yes, this is the first step towards a more cohesive experience across both SNA and SCA, where users of either platform will start to benefit from more consistent outcomes regardless of their deployment model. As some would say, it’s like a birthday coming early.
![]()
Pivoting to Secure Cloud Analytics, as per Network sibling, the product got several enhancements over the last months of development. The core additions revolve around additional detections and context, as well as usability and integration enhancements, including those in Secure Cloud Insights. In parallel with SNA’s Converged Analytics, SCA benefits from detections mapped to the MITRE ATT&CK framework. Additionally, several detections underwent algorithm improvements, while 4 new ones were added, such as Worm Propagation, which was native to SNA. Regarding the backbone of SCA’s alerts, a multitude of new roles and observations were added to the platform, to further optimize and tune the alerts for the users.
Additionally, alerts now offer a pivot directly to AWS’ load balancer and VPC, as well as direct access to Azure Security Groups, to allow for further investigation through streamlined workflows. The two Public Cloud Providers are now also included in coverage reports that provide a gap analysis to gain insight as to what logs may have potentially gone missing.
Focusing more on the detection workflows, the Alert Details view also got additional information pertaining to device context which gives insight into hostnames, subnets, and role metrics. The ingest mechanism has also gotten more robust thanks to data now coming from Talos intelligence feed and ISE, shown in the Event Viewer for expanded forensics and visibility use cases.
While dealing with integrations, the highly requested SecureX integration can now be enabled in 1 click, with no API keys needed and a workflow that is seamless across the two platforms. Among some of the other improvements around graphs and visualizations, the Encrypted Traffic widget now allows an hourly breakdown of the data, while the Event Viewer now displays bi-directional session traffic, to bring even greater context to SCA flows.
In the context of pivots, as a user is navigating through devices that, for example, have raised an alert, they will now also see the new functionality to pivot directly into the Secure Cloud Insights (SCI) Knowledge Graph, to learn more about how various sources are connected to one another. Another SCI integration is present within the Device Outline of an Alert, to gain more posture context, and as part of a configuration menu, it’s now possible to run cloud posture assessments on demand, for immediate results and recommendations.
With this all said, we from the Secure Analytics team are extremely excited about the adoption and usage of these features so that we can keep on improving the product and iterating to solve even more use cases. As we look ahead, the World has never needed more than now a comprehensive solution to solve one of the most pressing problems in our society: cyber threats in the continuously evolving Internet space. And Secure Analytics will be there, to pioneer and lead the effort for a safe World.
We’d love to hear what you think. Ask a Question, Comment Below, and Stay Connected with Cisco Secure on social!
Cisco Secure Social Channels
Extended Detection and Response, or XDR, the cybersecurity topic that dominated the RSA conference 2022 show floor with multiple vendors, has been getting a lot of attention lately, and for good reason. A connected, unified approach to detection and response promises to give security professionals all the tools and capabilities they need to address the ever-growing attack surface.
At Cisco, we wanted to get an independent view of what XDR means to a security operations audience, so we partnered with ESG on a survey conducted in April 2022 of 376 IT cybersecurity professionals in North America, which explored some key questions and trends for security operations centers as it relates to XDR. This new eBook, SOC Modernization and the Role of XDR, provides insights into the survey. Unsurprisingly, 52 percent of organizations surveyed believe that security operations are more challenging than just two years ago, and it’s clear cybersecurity professionals are looking for the next architecture to solve these challenges.
![]()
The distributed nature of the network is resulting in more data from multiple control points. The survey showed that while 80 percent of organizations are already using more than 10 data sources as a part of their security operations, they want even more as they realize the value of being able to aggregate, normalize, correlate, and contextualize data so they can take better actions faster. At the same time, 81 percent say that they have been impacted by the cybersecurity skills shortage, and more data without the capabilities and skills in place to act will only diminish the ability to address threats.
To help fill those skills gaps, improved threat detection playbooks and incident prioritization will be critical aspects of the security operations strategy. Another key tool widely recognized as important in building a foundation is the MITRE ATT&CK framework that can help your teams focus and understand adversary tactics and techniques based on real-world observations.
While a common industry definition remains elusive, one thing is clear: XDR will play a critical role in the modernization of the security operations center. Determining how it will help your security operations team, and which partners to work with as you build out your XDR approach, will determine your level of success.
You need XDR to transform your infrastructure from a series of disjointed solutions into a fully integrated ecosystem that gets you to your outcome more effectively and efficiently. Cisco has built XDR capabilities into the broad portfolio of our security products and easily integrates with existing solutions in your environment using open APIs. After you’ve read the ESG SOC Modernization and the Role of XDR eBook, we invite you to take a look at the Cisco XDR Buyer’s Guide, which outlines five key elements of XDR done right and provides some questions to ask as you consider which vendors you want to work with in building out your security strategy. Don’t wait to start planning how XDR will help your security operations team.
Source: ESG Research Study, SOC Modernization and the Role of XDR, June 2022
See XDR done right:
Cisco XDR Buyer’s Guide
As an early adopter of Cisco Secure Endpoint, Per Mar Security Services has seen the product evolve alongside the threat landscape. According to Dan Turner, CIO at Per Mar, the evolution of the Cisco security portfolio has helped the company remain cyber resilient during the pandemic and beyond.
We recently spoke with Turner to discuss how Per Mar uses Cisco technology to rapidly detect and mitigate threats, while still enabling employees to work from wherever they need to — whether it’s a conference, job site, or home office.
Per Mar Security provides physical security services to both homes and businesses, protecting roughly 75,000 customers across 16 U.S. states. The company began using Cisco Secure Endpoint almost a decade ago to defend against attacks on its various devices. Today, it’s the main point of defense in making sure the company’s endpoints are safe. Cisco Secure Endpoint integrates with the other security products in Per Mar’s environment via Cisco SecureX.
SecureX brings together disparate security technologies from both Cisco and third parties to provide unified visibility and control. “This allows us peace of mind to know that we have the whole Cisco Secure solution being an extra set of eyes for us and making sure our customers and end users all stay safe and secure,” says Turner.
Per Mar has roughly 3,000 employees using a variety of devices on the company’s network — from Windows machines to iOS and Android devices. “We have become very mobile over the years, so working off tablets and mobile devices is how we get business done,” Turner explains. “Finding a tool like Cisco Secure Endpoint that can work across all those platforms and give my team one pane of glass to manage everything has been hugely important for us.”
This capability has enabled Per Mar to continue to operate smoothly in the midst of the pandemic. The company leveraged its existing infrastructure to spin up virtual workspaces for all of its employees within a week so they could work securely from home.
“Our Cisco systems and security frameworks allowed Per Mar to move
quickly and safely to support our employees when the pandemic hit.”— Dan Turner, CIO, Per Mar Security Services
Even before the pandemic, Cisco Secure Endpoint was able to swiftly remediate malware that found its way onto Per Mar’s network when employees worked remotely to attend conferences, for example, or to tend to other off-site obligations.
Per Mar Security provides critical protection from hazards such as burglary and fires for homes, manufacturing facilities, hospitals, college campuses, and more. It also secures special events such as high-profile football games and political conventions. Reliable IT and security systems are imperative for this work. “Without the infrastructure we have, we simply can’t provide services for our customers,” says Turner.
In addition to quickly detecting and blocking threats, the Cisco Secure portfolio integrated through SecureX has also dramatically improved Per Mar’s threat hunting and investigation capabilities. Being able to rapidly analyze data from multiple Cisco tools together in one place has enabled the company’s security team to efficiently identify the origin of a compromise down to the exact device and behavior that caused it. This ensures that the root cause can be addressed in a timely manner — often within a single day or even just a few hours.
“All those analytics allow my team to stay nimble, adapt as threats evolve, and capture any zero-day exploits that are sitting out there,” says Turner. “With Cisco Secure Endpoint, our mean time to detection is measured in hours, if not minutes, versus months or years. Because of how it ties back to the rest of the security stack that we use from Cisco, my team is able to go back through and pinpoint compromised systems in record speed.”
As the threat landscape and work environments continue to shift with the emergence of hybrid work, Per Mar remains secure. Its multi-layered defense provides robust protection against the full range of threat vectors. “Our Cisco technologies are just as critical today as they were when the world stopped spinning,” says Turner.
We are honored to play such a significant role in Per Mar’s continued success. Find out how your organization can maintain security resilience in the face of constant change.
Watch video: Per Mar Security gains threat visibility with Cisco Secure Endpoint
We’d love to hear what you think. Ask a Question, Comment Below, and Stay Connected with Cisco Secure on social!
Cisco Secure Social Channels
This article is part of a series in which we will explore several features, principles, and the building blocks of a security detection engine within an extended detection and response (XDR) solution.
In this second installment, we will look at ways of structuring the presentation of machine-generated alerts, so that each alert offers a cohesive and compelling narrative, as if written by a human analyst, at scale and in realtime.
In cyber security, we are used to two types of stories.
The first story is common for reports written by humans. It contains sections such as “impact,” “reproduction,” and “remediation” to help us understand what is at stake and what we need to fix. For example:
IMPACT: An SSH server which supports password authentication is susceptible to brute-forcing attacks.
REPRODUCTION: Use the `ssh` command in verbose mode (`ssh -v`) to determine supported authentication methods. Look for “keyboard-interactive” and “password” methods.
REMEDIATION: Disable unneeded authentication methods.
The second story comes from machine detections. It is much terser in content and sometimes leaves us scratching our heads. “Malware,” the machine says with little explanation, followed by a horde of gibberish-looking data of network flows, executable traces, and so on.
![]()
The challenge is now to get the best of both worlds: to enhance machine-generated alerts with the richness of human-written reports. The following sections explain how this can be approached.
In our example of a report written by a human, the “reproduction” section would help us understand, from a factual perspective, how exactly the conclusions were derived.
On the other hand, the machine-generated horde of data provides evidence in a very nondescript way. We would need to be smart enough to spot or reverse-engineer what algorithm the machine was following on said data. Most security analysts do not wish to do this. Instead, they attempt to seek the first story type. “Surely, someone must have written a blog or something more descriptive about this already,” they would say. Then, they would copy-paste anything that looks like a searchable term – an IP address, domain, SHA checksum – and start searching it, either on a threat intelligence search site or even a general-purpose search engine.
Having such cryptic machine-generated alerts is leading us to our first two issues: first, when the story is incomplete or misunderstood, it may lead the analyst astray. For example, the security event might involve requests to communicate with an IP address, and the analyst would say, “This IP address belongs to my DNS server, so the traffic is legitimate.” However, the detection engine was really saying, “I suspect there is DNS tunnelling activity happening through your DNS server—just look at the volume.”
Second, when an analyst seeks explanations from elsewhere, the main function of an advanced detection engine — finding novel, localized, and targeted attacks — cannot work. Information on attacks is generally available only after they have been discovered and analyzed, not when they happen initially.
A common approach to remedy this situation is to include a short description of the algorithm. “This detector works by maintaining a baseline of when during the day a user is active and then reports any deviations,” a help dialog would say. “Okay, that’s clever,” an analyst would reply. But this is not enough. “Wait, what is the baseline, and how was it violated in this particular security event?” To find the answer, we need to go back to the horde of data.
To mimic the “reproduction” section of the human-written report, our security events are enriched with an annotation—a short summary of the behavior described by the event. Here are a few examples of such annotated events:
![]()
In the first and second cases, the story is relatively straightforward: in the horde of data, successful communication with said hostnames was observed. An inference through threat intelligence associates these hostnames to the Sality malware.
The third line informs us that, on a factual basis, only a communication with an IP address was observed. Further chain of inferences is that this IP address was associated by a passive DNS mechanism to a hostname which is in turn associated to the Sality malware.
In the fourth event, we have an observation of full HTTP URL requests, and inference through a pattern matcher associates this URL to the Sality malware. In this case, neither the hostname nor the IP address is important to the detector.
In all these annotated events, an analyst can easily grasp the factual circumstances and what the detection engine infers and thinks about the observations. Note that whether these events describe benign, malicious, relevant, or irrelevant behavior, or whether they lead to true or false positives, is not necessarily the concern. The concern is to be specific about the circumstances of the observed behavior and to be transparent about the inferences.
When we eventually succeed in explaining the security events, we might not be finished with the storytelling yet. The analyst would face another dilemma. They would ask: “What relevance does this event have in my environment? Is it part of an attack, an attack technique perhaps? What should I look for next?”
In the human-written report, the “impact” section provides a translation between the fact-based technical language of “how” and the business language of “what.” In this business language, we talk about threats, risks, attacker objectives, their progress, and so on.
This translation is an important part of the story. In our previous example about DNS tunnelling, we might want to express that “an anomaly in DNS traffic is a sign of an attacker communicating with their command-and-control infrastructure,” or that “it is a sign of exfiltration,” or perhaps both. The connotation is that both techniques are post-infection, and that there is probably already a foothold that the attacker has established. Perhaps other security events point to this, or perhaps it needs to be sought after by the analyst.
When it is not explicit, the analyst needs to mentally perform the translation. Again, an analyst might look up some intelligence in external sources and incorrectly interpret the detection engine’s message. Instead, they might conclude that “an anomaly in DNS traffic is a policy violation, user error, or reconnaissance activity,” leading them astray from pivoting and searching for the endpoint foothold that performs the command-and-control activity.
We take special attention not to mix these two different dictionaries. Rather, we express separately the factual observations versus the conclusions in the form of threats and risks. Inbetween, there are the various chains of inferences. Based on the complexity, the depth of the story varies, but the beginning and the end will always be there: facts versus conclusions.
This is very similar to how an analyst would set up their investigation board to organize what they know about the case. Here is an elaborate example:
![]()
In this case, from top to bottom:
In all points, the “what” and “how” languages are distinguished from each other. Finally, the whole story is stitched together into one alert by using the alert fusion algorithm described in the Intelligent alert management blog post.
Have we bridged the storytelling gap between machine-generated and human-generated reports?
Threat detections need to be narrated in sufficient detail, so that our users can understand them. Previously, we relied on the human aspect—we would need to document, provide support, and even reverse-engineer what the detection algorithms said.
The two solutions, distinguishing the “what/how” languages and the annotated events, provide the bandwidth to transmit the details and the expert knowledge directly from the detection algorithms. Our stories are now rich with detail and are built automatically in real time.
The result allows for quick orientation in complex detections and lowers the time to triage. It also helps to correctly convey the message, from our team, through the detection engine, and towards the analyst, lowering the possibility of misinterpretation.
This capability is part of Cisco Global Threat Alerts, currently available within Cisco Secure Network Analytics and Cisco Secure Endpoint, and has been continually improved based on customer feedback. In the future, it will also be available in Cisco SecureX XDR.
We’d love to hear what you think. Ask a Question, Comment Below, and Stay Connected with Cisco Secure on social!
Cisco Secure Social Channels
It’s a busy month for cybersecurity, with the return of in-person RSAC in San Francisco, followed by Cisco Live in very lively Las Vegas! With so much happening, and so many announcements from every security vendor out there, it can be hard to keep track of everything going on. Let us help give you the highlights from a Cisco SecureX perspective!
We have been busy this past year, with our acquisition of Kenna Security and our recent innovations around device insights – all helping to expand and strengthen SecureX and our extended detection and response (XDR) capabilities.
Let’s start with device insights. We know that correlation of incidents and alerts is a vital capability for every good XDR offering, but what about correlating and aggregating information about the devices themselves? With the growing number of devices in many customer environments there is also a growing number of products with information about those devices. This can cause duplicate records and multiple alerts from the same device – which means more potentially false positive incidents to investigate, and more headaches trying to manually correlate and connect device information. With device insights organizations can discover, normalize, and consolidate information about all the devices in your environment – so you can avoid duplicate alerts, and discover devices that may be sneaking through gaps in your security. Device insights gives you a comprehensive view into each device’s security posture and management status.
Now, a more insightful view of all the devices across your infrastructure is a must-have, but so is the ability to view and manage vulnerabilities across these endpoints. With Cisco’s acquisition of Kenna Security last year, and our on-going integration of Kenna offerings into the Cisco Secure portfolio, we’re continuing to fortify SecureX and our XDR capabilities with industry leading risk-based vulnerability management. Kenna vulnerability management has already started integrations with Cisco Secure Endpoint, providing vulnerability scores on the OS version, as well as any available fixes. On the SecureX side, Kenna integrations are being leveraged to automatically enrich threat detections with vulnerability information, and automatically create ticketing workflows for Kenna.VM customers using ServiceNow.
With these integrations, and more innovations planned for the near future, risk-based vulnerability management will become a cornerstone for all endpoint and XDR deployments.
Check out our recent blog posts for more information about device insights and Kenna and SecureX orchestration!
Visit us at RSAC at booth 6045 for Cisco Secure, and booth 6362 for Kenna, and at Cisco Live in the World of Solutions to learn more.
Cisco Secure Firewall stops threats faster, empowers collaboration between teams, and enables consistency across your on-premises, hybrid, and multi-cloud environments. With an included entitlement for Cisco SecureX, our XDR and orchestration platform, you’ll experience efficiency at scale and maximize your productivity. New streamlined Secure Firewall integrations make it easier to use SecureX capabilities to increase threat detection, save time and provide the rapid and deeper investigations you require. These new features and workflows provide the integration and automation to simplify your security.
The entire suite of Firewall Management Center APIs is now available in the cloud. This means that existing APIs can now be executed from the cloud. Cisco makes this even easier for you by delivering fully operational workflows as well as pre-built drag-n-drop code blocks that you can use to craft your own custom workflows. SecureX is able to proxy API calls from the cloud to the SSE connector embedded in the FMC codebase. This integration between Firewall 7.2 and SecureX provides your Firewall with modern cloud-based automation.
We’ve dramatically reduced the amount of time needed to fully integrate Firewall into Securex. Even existing Firewall customers who use on-premises Firewall Management Center will be able to upgrade to version 7.2 and start automating/orchestrating in under 15 minutes — a huge time savings! The 7.2 release makes the opportunities for automating your Firewall deployment limitless with our built-in low code orchestration engine.
Previously Firewall admins had to jump through hoops to link their smart licensing account with SecureX which resulted in a very complicated integration process. With the new one-click integration, simply click “Enable SecureX” in your Firewall Management Center and log into SecureX. That’s it! Your Firewalls will automatically be onboarded to SecureX.
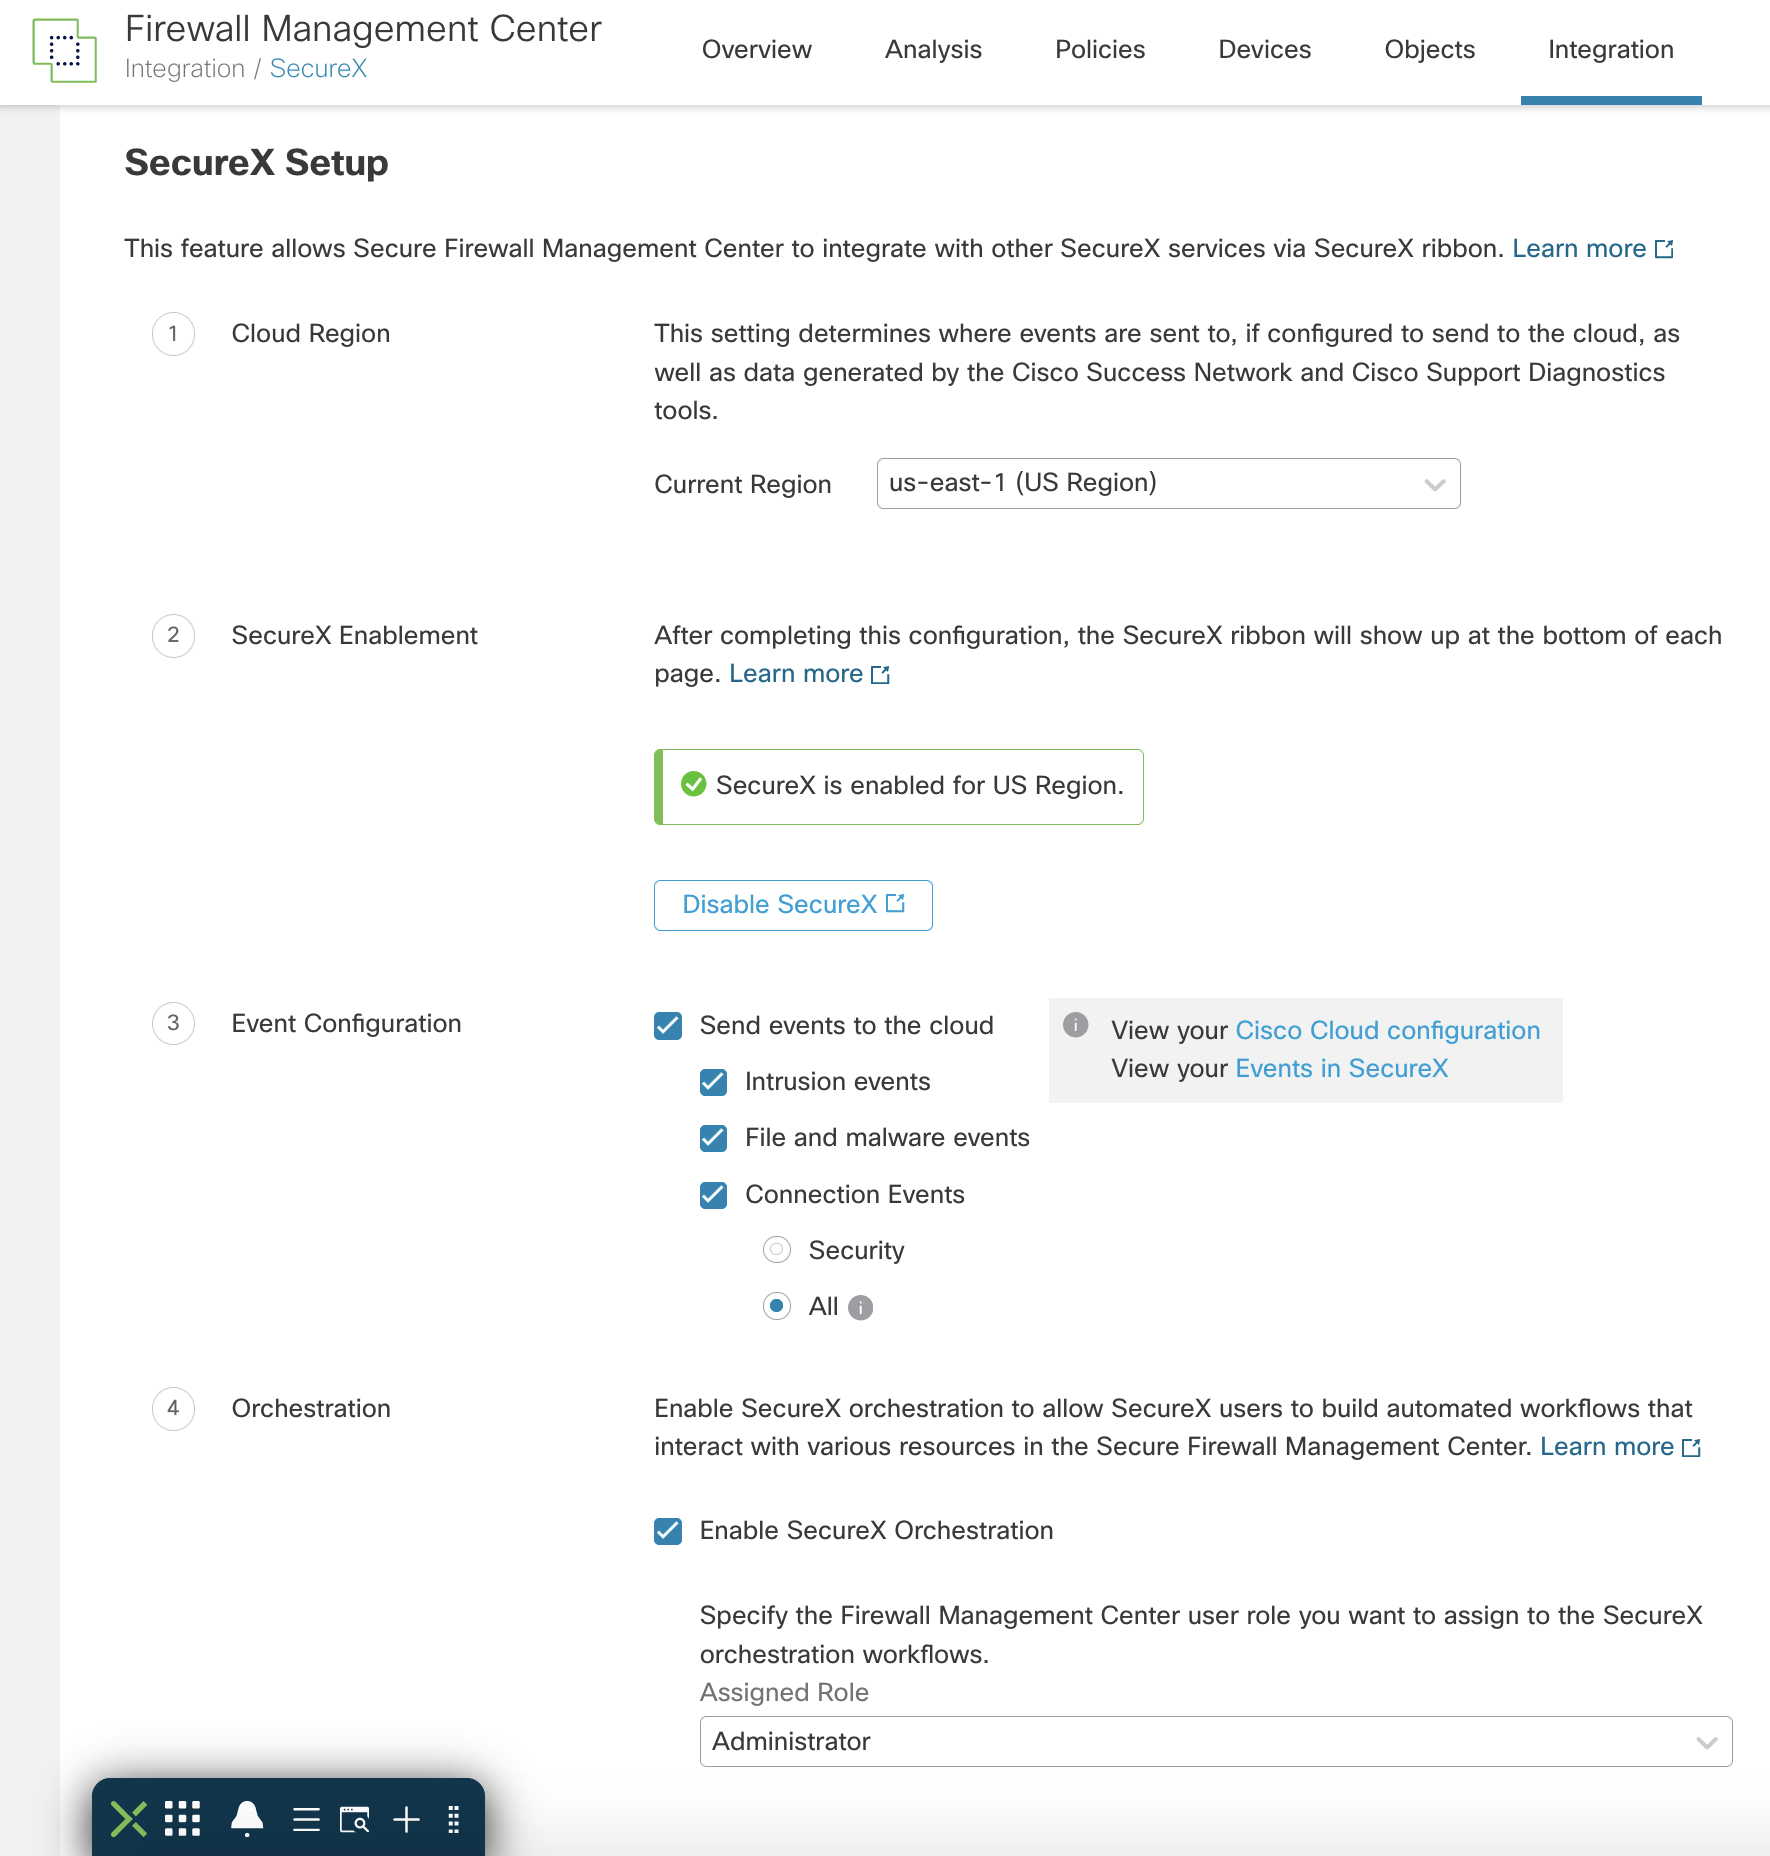
Cisco Secure Firewall users now get immense value from SecureX with the orchestration capability built natively into the Firewall. Previously Firewall admins would have to deploy an on-premises virtual machine in vCenter to take advantage of Firewall APIs in the cloud which was a major hurdle to overcome. With the 7.2 release, orchestration is built right into your existing Firewall Management Center. There is no on-premises connector required; SecureX orchestration is able to communicate directly with Firewall APIs highlighting the power of Cisco-on-Cisco integrations.
The PSIRT impact monitoring workflows helps customers streamline their patch management process to ensure their network is always up to date and not vulnerable to CVE’s. This workflow will check for new PSIRTs, determine if device versions are impacted, and suggest a fixed version to upgrade to. By scheduling this workflow to run once a week customers can be notified via email if there is any potential impact from a PSIRT.
This workflow will run every 15 minutes to pull a health report from FMC and proactively notify customers via email if any devices are unhealthy. This means customers can rest assured that their fleet of devices is operating as expected or be notified of things like high CPU usage, low disk space, or interfaces going down.
This workflow highlights the power of automation and showcases what is possible by using the orchestration proxy to use FMC API’s. Managing policy is always an on-going effort but can be made easier by introducing automation. This workflow can be run once a week to search through Firewall policies and determine if any rules are going to expire soon. This makes managing policy much easier because customers will be notified before rules expire and can make changes accordingly.
This workflow is a one-click response action available from the threat response pivot menu. With the click of a button a URL is added to an object in a block rule of your access control policy. This action can be invoked during an investigation in SecureX or from any browser page using the SecureX browser extension. Reducing time to remediation is a critical aspect of keeping your business secure. This workflow turns a multi-step policy change into a single click by taking advantage of Secure Firewall’s integration with SecureX.
A recent Forrester Economic Impact Study of Secure Firewall show that deploying these types of workflows in SecureX with Secure Firewall increased operational efficiency.
In fact, SecureX in combination with Secure Firewall helped to dramatically reduce the risk of a material breach. It’s clear that the integration of the two meant a significant time savings for already overburdened teams.
![]()
We continue to innovate new features and workflows that prioritize the efficacy of your teams and help drive the security resilience of your organization.
Ready to add SecureX capabilities to your Firewall environment? Start here.
We’d love to hear what you think. Ask a Question, Comment Below, and Stay Connected with Cisco Secure on social!
Cisco Secure Social Channels
Instagram
Facebook
Twitter
LinkedIn
In part one of our Black Hat Asia 2022 NOC blog, we discussed building the network with Meraki:
In this part two, we will discuss:
SecureX: Bringing Threat Intelligence Together by Ian Redden
In addition to the Meraki networking gear, Cisco Secure also shipped two Umbrella DNS virtual appliances to Black Hat Asia, for internal network visibility with redundancy, in addition to providing:
![]()
Cisco Secure Threat Intelligence (correlated through SecureX)
Donated Partner Threat Intelligence (correlated through SecureX)
alphaMountain.ai threat intelligence
![]()
Open-Source Threat Intelligence (correlated through SecureX)
Continued Integrations from past Black Hat events
![]()
New Integrations Created at Black Hat Asia 2022
Device type spoofing event by Jonny Noble
Overview
During the conference, a NOC Partner informed us that they received an alert from May 10 concerning an endpoint client that accessed two domains that they saw as malicious:
Client details from Partner:
Based on the user agent, the partner derived that the device type was an Apple iPhone.
SecureX analysis
![]()
Umbrella Investigate analysis
Umbrella Investigate positions both domains as low risk, both registered recently in Poland, and both hosted on the same IP:
![]()
Despite the low-risk score, the nameservers have high counts of malicious associated domains:
![]()
Targeting users in ASA, UK, and Nigeria:
![]()
Meraki analysis
Based on the time of the incident, we can trace the device’s location (based on its IP address). This is thanks to the effort we invested in mapping out the exact location of all Meraki APs, which we deployed across the convention center with an overlay of the event map covering the area of the event:
![]()
Further analysis and conclusions
The device name (LAPTOP-8MLGXXXXXX) and MAC address seen (f4:XX:XX:XX:XX:XX) both matched across the partner and Meraki, so there was no question that we were analyzing the same device.
Based on the useragent captured by the partner, the device type was an Apple iPhone. However, Meraki was reporting the Device and its OS as “Intel, Android”
![]()
A quick look up for the MAC address confirmed that the OUI (organizationally unique identifier) for f42679 was Intel Malaysia, making it unlikely that this was an Apple iPhone.
The description for the training “Web Hacking Black Belt Edition” can be seen here:
https://www.blackhat.com/asia-22/training/schedule/#web-hacking-black-belt-edition–day-25388
It is highly likely that the training content included the use of tools and techniques for spoofing the visibility of useragent or device type.
There is also a high probability that the two domains observed were used as part of the training activity, rather than this being part of a live attack.
It is clear that integrating the various Cisco technologies (Meraki wireless infrastructure, SecureX, Umbrella, Investigate) used in the investigation of this incident, together with the close partnership and collaboration of our NOC partners, positioned us where we needed to be and provided us with the tools we needed to swiftly collect the data, join the dots, make conclusions, and successfully bring the incident to closure.
Self Service with SecureX Orchestration and Slack by Matt Vander Horst
Overview
Since Meraki was a new platform for much of the NOC’s staff, we wanted to make information easier to gather and enable a certain amount of self-service. Since the Black Hat NOC uses Slack for messaging, we decided to create a Slack bot that NOC staff could use to interact with the Meraki infrastructure as well as Palo Alto Panorama using the SecureX Orchestration remote appliance. When users communicate with the bot, webhooks are sent to Cisco SecureX Orchestration to do the work on the back end and send the results back to the user.
Design
Here’s how this integration works:
![]()
Workflow #1: Handle Slash Commands
Slash commands are a special type of message built into Slack that allow users to interact with a bot. When a Slack user executes a slash command, the command and its arguments are sent to SecureX Orchestration where a workflow handles the command. The table below shows a summary of the slash commands our bot supported for Black Hat Asia 2022:
![]()
![]()
Here’s a sample of a portion of the SecureX Orchestration workflow that powers the above commands:
![]()
And here’s a sample of firewall logs as returned from the “/pan_traffic_history” command:
![]()
Workflow #2: Handle Interactivity
A more advanced form of user interaction comes in the form of Slack blocks. Instead of including a command’s arguments in the command itself, you can execute the command and Slack will present you with a form to complete, like this one for the “/update_vlan” command:
![]()
These forms are much more user friendly and allow information to be pre-populated for the user. In the example above, the user can simply select the switch to configure from a drop-down list instead of having to enter its name or serial number. When the user submits one of these forms, a webhook is sent to SecureX Orchestration to execute a workflow. The workflow takes the requested action and sends back a confirmation to the user:
![]()
Conclusion
While these two workflows only scratched the surface of what can be done with SecureX Orchestration webhooks and Slack, we now have a foundation that can be easily expanded upon going forward. We can add additional commands, new forms of interactivity, and continue to enable NOC staff to get the information they need and take necessary action. The goal of orchestration is to make life simpler, whether it is by automating our interactions with technology or making those interactions easier for the user.
Future Threat Vectors to Consider – Cloud App Discovery by Alejo Calaoagan
Since 2017 (starting in Black Hat USA – Las Vegas), Cisco Umbrella has provided DNS security to the Black Hat attendee network, added layers of traffic visibility previously not seen. Our efforts have largely been successful, identifying thousands of threats over the years and mitigating them via Umbrella’s blocking capabilities when necessary. This was taken a step further at Black Hat London 2021, where we introduced our Virtual Appliances to provide source IP attribution to the devices making requests.
![]()
Here at Black Hat Asia 2022, we’ve been noodling on additional ways to provide advanced protection for future shows, and it starts with Umbrella’s Cloud Application Discovery’s feature, which identified 2,286 unique applications accessed by users on the attendee network across the four-day conference. Looking at a snapshot from a single day of the show, Umbrella captured 572,282 DNS requests from all cloud apps, with over 42,000 posing either high or very high risk.
![]()
Digging deeper into the data, we see not only the types of apps being accessed…
![]()
…but also see the apps themselves…
![]()
…and we can flag apps that look suspicious.
![]()
We also include risk downs breaks by category…
![]()
…and drill downs on each.
![]()
While this data alone won’t provide enough information to take action, including this data in analysis, something we have been doing, may provide a window into new threat vectors that may have previously gone unseen. For example, if we identify a compromised device infected with malware or a device attempting to access things on the network that are restricted, we can dig deeper into the types of cloud apps those devices are using and correlate that data with suspicious request activity, potential uncovering tools we should be blocking in the future.
I can’t say for certain how much this extra data set will help us uncover new threats, but, with Black Hat USA just around the corner, we’ll find out soon.
![]()
Using SecureX sign-on to streamline access to the Cisco Stack at Black Hat by Adi Sankar
From five years ago to now, Cisco has tremendously expanded our presence at Black Hat to include a multitude of products. Of course, sign-on was simple when it was just one product (Secure Malware Analytics) and one user to log in. When it came time to add a new technology to the stack it was added separately as a standalone product with its own method of logging in. As the number of products increased, so did the number of Cisco staff at the conference to support these products. This means sharing usernames and passwords became tedious and not to mention insecure, especially with 15 Cisco staff, plus partners, accessing the platforms.
The Cisco Secure stack at Black Hat includes SecureX, Umbrella, Malware Analytics, Secure Endpoint (iOS clarity), and Meraki. All of these technologies support using SAML SSO natively with SecureX sign-on. This means that each of our Cisco staff members can have an individual SecureX sign-on account to log into the various consoles. This results in better role-based access control, better audit logging and an overall better login experience. With SecureX sign-on we can log into all the products only having to type a password one time and approve one Cisco DUO Multi-Factor Authentication (MFA) push.
How does this magic work behind the scenes? It’s actually rather simple to configure SSO for each of the Cisco technologies, since they all support SecureX sign-on natively. First and foremost, you must set up a new SecureX org by creating a SecureX sign-on account, creating a new organization and integrating at least one Cisco technology. In this case I created a new SecureX organization for Black Hat and added the Secure Endpoint module, Umbrella Module, Meraki Systems Manager module and the Secure Malware Analytics module. Then from Administration à Users in SecureX, I sent an invite to the Cisco staffers that would be attending the conference, which contained a link to create their account and join the Blackhat SecureX organization. Next let’s take a look at the individual product configurations.
![]()
![]()
![]()
Meraki:
In the Meraki organization settings enable SecureX sign-on. Then under Organization à Administrators add a new user and specify SecureX sign-on as the authentication method. Meraki even lets you limit users to particular networks and set permission levels for those networks. Accepting the email invitation is easy since the user should already be logged into their SecureX sign-on account. Now, logging into Meraki only requires an email address and no password or additional DUO push.
![]()
![]()
Umbrella:
Under Admin à Authentication configure SecureX sign-on which requires a test login to ensure you can still login before using SSO for authentication to Umbrella. There is no need to configure MFA in Umbrella since SecureX sign-on comes with built in DUO MFA. Existing users and any new users added in Umbrella under Admin à Accounts will now be using SecureX sign-on to login to Umbrella. Logging into Umbrella is now a seamless launch from the SecureX dashboard or from the SecureX ribbon in any of the other consoles.
![]()
![]()
Secure Malware Analytics:
A Secure Malware Analytics organization admin can create new users in their Threat Grid tenant. This username is unique to Malware Analytics, but it can be connected to a SecureX sign-on account to take advantage of the seamless login flow. From the email invitation the user will create a password for their Malware Analytics user and accept the EULA. Then in the top right under My Malware Analytics Account, the user has an option to connect their SecureX sign-on account which is a one click process if already signed in with SecureX sign-on. Now when a user navigates to Malware Analytics login page, simply clicking “Login with SecureX Sign-On” will grant them access to the console.
![]()
![]()
Secure Endpoint:
The Secure Endpoint deployment at Blackhat is limited to IOS clarity through Meraki Systems Manager for the conference IOS devices. Most of the asset information we need about the iPhones/iPads is brought in through the SecureX Device Insights inventory. However, for initial configuration and to view device trajectory it is required to log into Secure Endpoint. A new Secure Endpoint account can be created under Accounts à Users and an invite is sent to corresponding email address. Accepting the invite is a smooth process since the user is already signed in with SecureX sign-on. Privileges for the user in the Endpoint console can be granted from within the user account.
![]()
![]()
Conclusion:
To sum it all up, SecureX sign-on is the standard for the Cisco stack moving forward. With a new SecureX organization instantiated using SecureX sign-on any new users to the Cisco stack at Black Hat will be using SecureX sign-on. SecureX sign-on has helped our user management be much more secure as we have expanded our presence at Black Hat. SecureX sign-on provides a unified login mechanism for all the products and modernized our login experience at the conference.
![]()
Malware Threat Intelligence made easy and available, with Cisco Secure Malware Analytics and SecureX by Ben Greenbaum
I’d gotten used to people’s reactions upon seeing SecureX in use for the first time. A few times at Black Hat, a small audience gathered just to watch us effortlessly correlate data from multiple threat intelligence repositories and several security sensor networks in just a few clicks in a single interface for rapid sequencing of events and an intuitive understanding of security events, situations, causes, and consequences. You’ve already read about a few of these instances above. Here is just one example of SecureX automatically putting together a chronological history of observed network events detected by products from two vendors (Cisco Umbrella and NetWitness) . The participation of NetWitness in this and all of our other investigations was made possible by our open architecture, available APIs and API specifications, and the creation of the NetWitness module described above.
![]()
In addition to the traffic and online activities of hundreds of user devices on the network, we were responsible for monitoring a handful of Black Hat-owned devices as well. Secure X Device Insights made it easy to access information about these assets, either en masse or as required during an ongoing investigation. iOS Clarity for Secure Endpoint and Meraki System Manager both contributed to this useful tool which adds business intelligence and asset context to SecureX’s native event and threat intelligence, for more complete and more actionable security intelligence overall.
![]()
SecureX is made possible by dozens of integrations, each bringing their own unique information and capabilities. This time though, for me, the star of the SecureX show was our malware analysis engine, Cisco Secure Malware Analytics (CSMA). Shortly before Black Hat Asia, the CSMA team released a new version of their SecureX module. SecureX can now query CSMA’s database of malware behavior and activity, including all relevant indicators and observables, as an automated part of the regular process of any investigation performed in SecureX Threat Response.
This capability is most useful in two scenarios:
1: determining if suspicious domains, IPs and files reported by any other technology had been observed in the analysis of any of the millions of publicly submitted file samples, or our own.
2: rapidly gathering additional context about files submitted to the analysis engine by the integrated products in the Black Hat NOC.
The first was a significant time saver in several investigations. In the example below, we received an alert about connections to a suspicious domain. In that scenario, our first course of action is to investigate the domain and any other observables reported with it (typically the internal and public IPs included in the alert). Due to the new CSMA module, we immediately discovered that the domain had a history of being contacted by a variety of malware samples, from multiple families, and that information, corroborated by automatically gathered reputation information from multiple sources about each of those files, gave us an immediate next direction to investigate as we hunted for evidence of those files being present in network traffic or of any traffic to other C&C resources known to be used by those families. From the first alert to having a robust, data-driven set of related signals to look for, took only minutes, including from SecureX partner Recorded Future, who donated a full threat intelligence license for the Black Hat NOC.
![]()
The other scenario, investigating files submitted for analysis, came up less frequently but when it did, the CSMA/SecureX integration was equally impressive. We could rapidly, nearly immediately, look for evidence of any of our analyzed samples in the environment across all other deployed SecureX-compatible technologies. That evidence was no longer limited to searching for the hash itself, but included any of the network resources or dropped payloads associated with the sample as well, easily identifying local targets who had not perhaps seen the exact variant submitted, but who had nonetheless been in contact with that sample’s Command and Control infrastructure or other related artifacts.
![]()
And of course, thanks to the presence of the ribbon in the CSMA UI, we could be even more efficient and do this with multiple samples at once.
![]()
SecureX greatly increased the efficiency of our small volunteer team, and certainly made it possible for us to investigate more alerts and events, and hunt for more threats, all more thoroughly, than we would have been able to without it. SecureX truly took this team to the next level, by augmenting and operationalizing the tools and the staff that we had at our disposal.
We look forward to seeing you at Black Hat USA in Las Vegas, 6-11 August 2022!
![]()
Acknowledgements: Special thanks to the Cisco Meraki and Cisco Secure Black Hat NOC team: Aditya Sankar, Aldous Yeung, Alejo Calaoagan, Ben Greenbaum, Christian Clasen, Felix H Y Lam, George Dorsey, Humphrey Cheung, Ian Redden, Jeffrey Chua, Jeffry Handal, Jonny Noble, Matt Vander Horst, Paul Fidler and Steven Fan.
Also, to our NOC partners NetWitness (especially David Glover), Palo Alto Networks (especially James Holland), Gigamon, IronNet (especially Bill Swearington), and the entire Black Hat / Informa Tech staff (especially Grifter ‘Neil Wyler’, Bart Stump, James Pope, Steve Fink and Steve Oldenbourg).
About Black Hat
For more than 20 years, Black Hat has provided attendees with the very latest in information security research, development, and trends. These high-profile global events and trainings are driven by the needs of the security community, striving to bring together the best minds in the industry. Black Hat inspires professionals at all career levels, encouraging growth and collaboration among academia, world-class researchers, and leaders in the public and private sectors. Black Hat Briefings and Trainings are held annually in the United States, Europe and Asia. More information is available at: blackhat.com. Black Hat is brought to you by Informa Tech.
In part one of this issue of our Black Hat Asia NOC blog, you will find:
Cisco Meraki was asked by Black Hat Events to be the Official Wired and Wireless Network Equipment, for Black Hat Asia 2022, in Singapore, 10-13 May 2022; in addition to providing the Mobile Device Management (since Black Hat USA 2021), Malware Analysis (since Black Hat USA 2016), & DNS (since Black Hat USA 2017) for the Network Operations Center. We were proud to collaborate with NOC partners Gigamon, IronNet, MyRepublic, NetWitness and Palo Alto Networks.
![]()
To accomplish this undertaking in a few weeks’ time, after the conference had a green light with the new COVID protocols, Cisco Meraki and Cisco Secure leadership gave their full support to send the necessary hardware, software licenses and staff to Singapore. Thirteen Cisco engineers deployed to the Marina Bay Sands Convention Center, from Singapore, Australia, United States and United Kingdom; with two additional remote Cisco engineers from the United States.
From attendee to press to volunteer – coming back to Black Hat as NOC volunteer by Humphrey Cheung
Loops in the networking world are usually considered a bad thing. Spanning tree loops and routing loops happen in an instant and can ruin your whole day, but over the 2nd week in May, I made a different kind of loop. Twenty years ago, I first attended the Black Hat and Defcon conventions – yay Caesars Palace and Alexis Park – a wide-eyed tech newbie who barely knew what WEP hacking, Driftnet image stealing and session hijacking meant. The community was amazing and the friendships and knowledge I gained, springboarded my IT career.
In 2005, I was lucky enough to become a Senior Editor at Tom’s Hardware Guide and attended Black Hat as accredited press from 2005 to 2008. From writing about the latest hardware zero-days to learning how to steal cookies from the master himself, Robert Graham, I can say, without any doubt, Black Hat and Defcon were my favorite events of the year.
Since 2016, I have been a Technical Solutions Architect at Cisco Meraki and have worked on insanely large Meraki installations – some with twenty thousand branches and more than a hundred thousand access points, so setting up the Black Hat network should be a piece of cake right? Heck no, this is unlike any network you’ve experienced!
As an attendee and press, I took the Black Hat network for granted. To take a phrase that we often hear about Cisco Meraki equipment, “it just works”. Back then, while I did see access points and switches around the show, I never really dived into how everything was set up.
![]()
A serious challenge was to secure the needed hardware and ship it in time for the conference, given the global supply chain issues. Special recognition to Jeffry Handal for locating the hardware and obtaining the approvals to donate to Black Hat Events. For Black Hat Asia, Cisco Meraki shipped:
Let’s start with availability. iPads and iPhones are scanning QR codes to register attendees. Badge printers need access to the registration system. Training rooms all have their separate wireless networks – after all, Black Hat attendees get a baptism by fire on network defense and attack. To top it all off, hundreds of attendees gulped down terabytes of data through the main conference wireless network.
All this connectivity was provided by Cisco Meraki access points, switches, security appliances, along with integrations into SecureX, Umbrella and other products. We fielded a literal army of engineers to stand up the network in less than two days… just in time for the training sessions on May 10 to 13th and throughout the Black Hat Briefings and Business Hall on May 12 and 13.
![]()
Let’s talk security and visibility. For a few days, the Black Hat network is probably one of the most hostile in the world. Attendees learn new exploits, download new tools and are encouraged to test them out. Being able to drill down on attendee connection details and traffic was instrumental on ensuring attendees didn’t get too crazy.
On the wireless front, we made extensive use of our Radio Profiles to reduce interference by tuning power and channel settings. We enabled band steering to get more clients on the 5GHz bands versus 2.4GHz and watched the Location Heatmap like a hawk looking for hotspots and dead areas. Handling the barrage of wireless change requests – enable or disabling this SSID, moving VLANs (Virtual Local Area Networks), enabling tunneling or NAT mode, – was a snap with the Meraki Dashboard.
While the Cisco Meraki Dashboard is extremely powerful, we happily supported exporting of logs and integration in major event collectors, such as the NetWitness SIEM and even the Palo Alto firewall. On Thursday morning, the NOC team found a potentially malicious Macbook Pro performing vulnerability scans against the Black Hat management network. It is a balance, as we must allow trainings and demos connect to malicious websites, download malware and execute. However, there is a Code of Conduct to which all attendees are expected to follow and is posted at Registration with a QR code.
The Cisco Meraki network was exporting syslog and other information to the Palo Alto firewall, and after correlating the data between the Palo Alto Dashboard and Cisco Meraki client details page, we tracked down the laptop to the Business Hall.
![]()
We briefed the NOC management, who confirmed the scanning was violation of the Code of Conduct, and the device was blocked in the Meraki Dashboard, with the instruction to come to the NOC.
![]()
The device name and location made it very easy to determine to whom it belonged in the conference attendees.
![]()
A delegation from the NOC went to the Business Hall, politely waited for the demo to finish at the booth and had a thoughtful conversation with the person about scanning the network. ![]()
Coming back to Black Hat as a NOC volunteer was an amazing experience. While it made for long days with little sleep, I really can’t think of a better way to give back to the conference that helped jumpstart my professional career.
Meraki MR, MS, MX and Systems Manager by Paul Fidler
With the invitation extended to Cisco Meraki to provide network access, both from a wired and wireless perspective, there was an opportunity to show the value of the Meraki platform integration capabilities of Access Points (AP), switches, security appliances and mobile device management.
![]()
The first amongst this was the use of the Meraki API. We were able to import the list of MAC addresses of the Meraki MRs, to ensure that the APs were named appropriately and tagged, using a single source of truth document shared with the NOC management and partners, with the ability to update en masse at any time.
On the first day of NOC setup, the Cisco team walked around the venue to discuss AP placements with the staff of the Marina Bay Sands. Whilst we had a simple Powerpoint showing approximate AP placements for the conference, it was noted that the venue team had an incredibly detailed floor plan of the venue. This was acquired in PDF and uploaded into the Meraki Dashboard; and with a little fine tuning, aligned perfectly with the Google Map.
![]()
Meraki APs were then placed physically in the venue meeting and training rooms, and very roughly on the floor plan. One of the team members then used a printout of the floor plan to mark accurately the placement of the APs. Having the APs named, as mentioned above, made this an easy task (walking around the venue notwithstanding!). This enabled accurate heatmap capability.
The Location Heatmap was a new capability for Black Hat NOC, and the client data visualized in NOC continued to be of great interest to the Black Hat management team, such as which training, briefing and sponsor booths drew the most interest.
![]()
The ability to use SSID Availability was incredibly useful. It allowed ALL of the access points to be placed within a single Meraki Network. Not only that, because of the training events happening during the week, as well as TWO dedicated SSIDs for the Registration and lead tracking iOS devices (more of which later), one for initial provisioning (which was later turned off), and one for certificated based authentication, for a very secure connection.
We were able to monitor the number of connected clients, network usage, the persons passing by the network and location analytics, throughout the conference days. We provided visibility access to the Black Hat NOC management and the technology partners (along with full API access), so they could integrate with the network platform.
![]()
![]()
![]()
Meraki alerts are exactly that: the ability to be alerted to something that happens in the Dashboard. Default behavior is to be emailed when something happens. Obviously, emails got lost in the noise, so a web hook was created in SecureX orchestration to be able to consume Meraki alerts and send it to Slack (the messaging platform within the Black Hat NOC), using the native template in the Meraki Dashboard. The first alert to be created was to be alerted if an AP went down. We were to be alerted after five minutes of an AP going down, which is the smallest amount of time available before being alerted.
![]()
The bot was ready; however, the APs stayed up the entire time!
Applying the lessons learned at Black Hat Europe 2021, for the initial configuration of the conference iOS devices, we set up the Registration iPads and lead retrieval iPhones with Umbrella, Secure Endpoint and WiFi config. Devices were, as in London, initially configured using Apple Configurator, to both supervise and enroll the devices into a new Meraki Systems Manager instance in the Dashboard.
![]()
However, Black Hat Asia 2022 offered us a unique opportunity to show off some of the more integrated functionality.
System Apps were hidden and various restrictions (disallow joining of unknown networks, disallow tethering to computers, etc.) were applied, as well as a standard WPA2 SSID for the devices that the device vendor had set up (we gave them the name of the SSID and Password).
We also stood up a new SSID and turned-on Sentry, which allows you to provision managed devices with, not only the SSID information, but also a dynamically generated certificate. The certificate authority and radius server needed to do this 802.1x is included in the Meraki Dashboard automatically! When the device attempts to authenticate to the network, if it doesn’t have the certificate, it doesn’t get access. This SSID, using SSID availability, was only available to the access points in the Registration area.
Using the Sentry allowed us to easily identify devices in the client list.
![]()
One of the alerts generated with SysLog by Meraki, and then viewable and correlated in the NetWitness SIEM, was a ‘De Auth’ event that came from an access point. Whilst we had the IP address of the device, making it easy to find, because the event was a de auth, meaning 802.1x, it narrowed down the devices to JUST the iPads and iPhones used for registration (as all other access points were using WPA2). This was further enhanced by seeing the certificate name used in the de-auth:
![]()
Along with the certificate name was the name of the AP: R**
One of the inherent problems with iOS device location is when devices are used indoors, as GPS signals just aren’t strong enough to penetrate modern buildings. However, because the accurate location of the Meraki access points was placed on the floor plan in the Dashboard, and because the Meraki Systems Manager iOS devices were in the same Dashboard organization as the access points, we got to see a much more accurate map of devices compared to Black Hat Europe 2021 in London.
![]()
When the conference Registration closed on the last day and the Business Hall Sponsors all returned their iPhones, we were able to remotely wipe all of the devices, removing all attendee data, prior to returning to the device contractor.
![]()
Meraki Scanning API Receiver by Christian Clasen
Leveraging the ubiquity of both WiFi and Bluetooth radios in mobile devices and laptops, Cisco Meraki’s wireless access points can detect and provide location analytics to report on user foot traffic behavior. This can be useful in retail scenarios where customers desire location and movement data to better understand the trends of engagement in their physical stores.
Meraki can aggregate real-time data of detected WiFi and Bluetooth devices and triangulate their location rather precisely when the floorplan and AP placement has been diligently designed and documented. At the Black Hat Asia conference, we made sure to properly map the AP locations carefully to ensure the highest accuracy possible.
This scanning data is available for clients whether they are associated with the access points or not. At the conference, we were able to get very detailed heatmaps and time-lapse animations representing the movement of attendees throughout the day. This data is valuable to conference organizers in determining the popularity of certain talks, and the attendance at things like keynote presentations and foot traffic at booths.
![]()
This was great for monitoring during the event, but the Dashboard would only provide 24-hours of scanning data, limiting what we could do when it came to long-term data analysis. Fortunately for us, Meraki offers an API service we can use to capture this treasure trove offline for further analysis. We only needed to build a receiver for it.
The Scanning API requires that the customer stand up infrastructure to store the data, and then register with the Meraki cloud using a verification code and secret. It is composed of two endpoints:
Returns the validator string in the response body
[GET] https://yourserver/
This endpoint is called by Meraki to validate the receiving server. It expects to receive a string that matches the validator defined in the Meraki Dashboard for the respective network.
Accepts an observation payload from the Meraki cloud
[POST] https://yourserver/
This endpoint is responsible for receiving the observation data provided by Meraki. The URL path should match that of the [GET] request, used for validation.
The response body will consist of an array of JSON objects containing the observations at an aggregate per network level. The JSON will be determined based on WiFi or BLE device observations as indicated in the type parameter.
![]()
What we needed was a simple technology stack that would contain (at minimum) a publicly accessible web server capable of TLS. In the end, the simplest implementation was a web server written using Python Flask, in a Docker container, deployed in AWS, connected through ngrok.
In fewer than 50 lines of Python, we could accept the inbound connection from Meraki and reply with the chosen verification code. We would then listen for the incoming POST data and dump it into a local data store for future analysis. Since this was to be a temporary solution (the duration of the four-day conference), the thought of registering a public domain and configuring TLS certificates wasn’t particularly appealing. An excellent solution for these types of API integrations is ngrok (https://ngrok.com/). And a handy Python wrapper was available for simple integration into the script (https://pyngrok.readthedocs.io/en/latest/index.html).
We wanted to easily re-use this stack next time around, so it only made sense to containerize it in Docker. This way, the whole thing could be stood up at the next conference, with one simple command. The image we ended up with would mount a local volume, so that the ingested data would remain persistent across container restarts.
Ngrok allowed us to create a secure tunnel from the container that could be connected in the cloud to a publicly resolvable domain with a trusted TLS certificate generated for us. Adding that URL to the Meraki Dashboard is all we needed to do start ingesting the massive treasure trove of location data from the Aps – nearly 1GB of JSON over 24 hours.
![]()
This “quick and dirty” solution illustrated the importance of interoperability and openness in the technology space when enabling security operations to gather and analyze the data they require to monitor and secure events like Black Hat, and their enterprise networks as well. It served us well during the conference and will certainly be used again going forward.
![]()
Check out part two of the blog, Black Hat Asia 2022 Continued: Cisco Secure Integrations, where we will discuss integrating NOC operations and making your Cisco Secure deployment more effective:
Acknowledgements: Special thanks to the Cisco Meraki and Cisco Secure Black Hat NOC team: Aditya Sankar, Aldous Yeung, Alejo Calaoagan, Ben Greenbaum, Christian Clasen, Felix H Y Lam, George Dorsey, Humphrey Cheung, Ian Redden, Jeffrey Chua, Jeffry Handal, Jonny Noble, Matt Vander Horst, Paul Fidler and Steven Fan.
Also, to our NOC partners NetWitness (especially David Glover), Palo Alto Networks (especially James Holland), Gigamon, IronNet (especially Bill Swearington), and the entire Black Hat / Informa Tech staff (especially Grifter ‘Neil Wyler’, Bart Stump, James Pope, Steve Fink and Steve Oldenbourg).
For more than 20 years, Black Hat has provided attendees with the very latest in information security research, development, and trends. These high-profile global events and trainings are driven by the needs of the security community, striving to bring together the best minds in the industry. Black Hat inspires professionals at all career levels, encouraging growth and collaboration among academia, world-class researchers, and leaders in the public and private sectors. Black Hat Briefings and Trainings are held annually in the United States, Europe and Asia. More information is available at: blackhat.com. Black Hat is brought to you by Informa Tech.
We’d love to hear what you think. Ask a Question, Comment Below, and Stay Connected with Cisco Secure on social!
Cisco Secure Social Channels